Your coupon for will be reflected when you check out!
✖
Your coupon for
✖
Hello!
You're visiting the PartSelect site in U.S.
Would you like to shop on the Canadian site?
Stay on this site
Go to Canadian site
✖
Model Number Locations
1Select Category Type
Select Category Type
2Select Product Type
Select Product Type
3Select {MODEL} Type
Select {MODEL} Type
Sample Model Number Tags
Model numbers can be made up of numbers (1005400, for example) or a combination of letters and numbers (LAT1000AAE). The model number will most likely appear on either a paper sticker or a metal plate. Your appliance's model number tag may look similar to the sample model number tags shown here (model number highlighted in yellow):
Model has been saved to My Models. If you're not signed in, your lists are available on this device and will expire within 30 days.
Model has been saved to My Models.
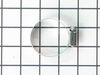
This hose clamp is used in a wide variety of household appliances. Most often it is found in washers, dishwashers, refrigerators, freezers, dehumidifiers, garbage disposals, or air conditioners. This ...
This washing machine cleaner includes three time-release tablets designed to remove odor-causing residues, grime, and buildup from high-efficiency and top-load washing machines. The tablets work by cl...
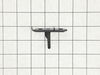
Ensure your Whirlpool washing machine functions at its best with our genuine OEM door strike. This essential component is designed to seamlessly fit with specific Whirlpool models. It efficiently acti...
Note: This part has been updated by the manufacturer. It may appear different but will still function the same as the original. The hose clamp is about 2 inches in diameter and made of stainless steel...
This Affresh Washing Machine Cleaner deep cleans to help remove the odor-causing residues and grime that daily loads leave behind. The time-release tablets are EPA Safer Choice certified, septic-safe ...
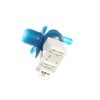
Introducing the Whirlpool Double Water Inlet Valve. This genuine OEM part is designed for optimal, reliable operation in a variety of washing machines. Not only is this valve perfect for Whirlpool mod...
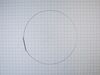
This is an OEM boot seal retaining ring for various models of front-load washing machines. This retaining ring is used to clamp down and secure the inner boot, also known as a seal or gasket, of your...
Explore the convenience of saving space in your laundry room with the Whirlpool long vent dryer stack kit. Specifically designed to fit a selection of Whirlpool, KitchenAid, Maytag, Jenn-Air, Amana, I...
This washer water inlet valve is a key component responsible for regulating the flow of hot and cold water into the washing machine. It ensures precise water delivery during each cycle, contributing t...
$74.08
In Stock
Order now and your part arrives by Apr 23
Questions And Answers for WFW5720RR0
Be the first to ask our experts a question about this model!
✖
Ask a Question
Ask our experts a question on this model and we'll respond as soon as we can.
Replaced the Whirlpool washer water inlet valve. 1. Unplug washer 2. Close Hot and Cold water valves 3. Remove top cover of the machine by taking out 3 screws in the top back. Slide top back and remove. 4. Water Inlet Valve is located on the back left side, remove tubing using a nutdriver to loosen the hose clamps.
... Read more />5. Water Inlet Valve is removed by removing the screw in the back of the valve and turning the valve clockwise a little. Replace with the new one, connect hoses, put cover back on, open valves, plug it in. 6. Ran washer and Fabric Softener dispenser now works
Nothing to it. Just remember to put the insert in the knob, NOT on the selector stem. Line up the flat part of the insert with the flat part of the stem and push the knob in place.
Don NOT ram it on the selector stem. When it's seated, don't push any more. That's all there is to it. It works. If the pointer on the knob indicat
... Read morees the selector is lined up correctly, but it isn't, the problem is the selector, not the knob.
1. First I unplugged the machine. 2. Then I turned off the hot and cold water supply valves. 3. With a towel ready to catch the water, I used channel locks to unscrew the water supply hose from the valve in the back of the machine. 4. Next with 1/4" socket I removed the three screws at the top rear of the machine securing t
... Read morehe top cover plate. You could also use a T20 driver. 5. Then I slid the top plate back about an inch and lifted it up to remove it from the machine, being careful with the sharp edges of the plate. 6. Then using my fingers I unclipped the electrical connections to the valve, taking note of how they attached. 7. Warning: I wish someone had told me this! Have a small towel ready to catch any water from the valve hose inside the machine so as not to get any electrical parts wet! I got the machine wet and had to wait a few days to let it dry before it would run water instead of just making a buzzing sound. Luckily it did work again. So with that in mind, I took pliers and squeezed the hose clamp to loosen it and slid it down over the hose. 8. Then using a flathead screwdriver I carefully worked around the hose and pried the hose off of the valve. Again have a small towel ready for the hose to drain onto! 9. Once the hose is drained, I removed the screw on the back of the machine that secured the valve to the machine. I don't remember if it is T20 or Phillips screw. 10. Then I turned the old valve counter clockwise a quarter turn (using channel locks to help me) to release the valve from the two metal tabs holding it in place. 11. I then pulled the old valve out and put the new one in following these steps in reverse order. 12. Don't forget to turn the water back on and plug the machine in! Not that I would ever do such a thing...


 Diagram and Parts List for Whirlpool Washer")