Your coupon for will be reflected when you check out!
✖
Your coupon for
✖
Hello!
You're visiting the PartSelect site in U.S.
Would you like to shop on the Canadian site?
Stay on this site
Go to Canadian site
✖
Model Number Locations
1Select Category Type
Select Category Type
2Select Product Type
Select Product Type
3Select {MODEL} Type
Select {MODEL} Type
Sample Model Number Tags
Model numbers can be made up of numbers (1005400, for example) or a combination of letters and numbers (LAT1000AAE). The model number will most likely appear on either a paper sticker or a metal plate. Your appliance's model number tag may look similar to the sample model number tags shown here (model number highlighted in yellow):
Model has been saved to My Models. If you're not signed in, your lists are available on this device and will expire within 30 days.
Model has been saved to My Models.
This manufacturer-approved Rack Stop Clip is a gray plastic part which can be installed with a screwdriver. Measuring slightly over an inch in length, it prevents the rack from sliding too far and fal...
This manufacturer-certified heating element is used to create heat during the dry cycle and increase water temperature during portions of the wash cycle when certain options are selected. If your dish...
The mounting bracket is sold individually, without screws. This part secures the upper side of the dishwasher to the underside of the counter or cabinet to prevent the dishwasher from moving, shaking,...
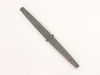
This dishwasher drawer track, also known as a rack slider bar, is a genuine replacement component designed to support the upper dish rack and allow smooth sliding in and out of the dishwasher cavity. ...
This drain pump is used in dishwashers to remove water from the dishwasher tub. If the impeller in the dishwasher is damaged or the motor has been shorted out and will not drain, it is possible the bo...
This is a lower spray arm for a dishwasher. The lower spray arm allows water to be spread evenly throughout the dishwasher tub with the proper force so dishes come out clean. This spray arm is gray in...
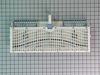
This dishwasher filter is a genuine OEM component designed to work with the water pump, preventing debris from entering and potentially damaging the pump system. Made with a gray plastic top and botto...
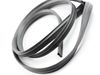
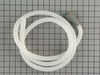
This hose clamp is used in a wide variety of household appliances. Most often it is found in washers, dishwashers, refrigerators, freezers, dehumidifiers, garbage disposals, or air conditioners. This ...
$7.47
In Stock
Order now and your part arrives by May 16
Questions And Answers for WDT710PAYB6
Ask our experts a question about this model and we'll get back to you as soon as possible!
5 questions answered by our experts.
Sort by:
< Prev
1
Next >
Search filter:
Clear Filter
Your search term must have 3 or more characters.
Keep searches simple. Use keywords, e.g. "leaking", "pump", "broken" or "fit".
Sorry, we couldn't find any existing answers that matched.Try using some different or simpler keywords, or submit your new question by using the "Ask a Question" button above!
Daryl
March 10, 2020
This dish machine when in use the water dose not get hot the heat element is new the high limit is new there is no power getting to the heating element can you help thanks.
For model number WDT710PAYB6
Hello Daryl, thank you for writing. The rinse aid or the rinse aid dispensing cap could be the reason why your dishwasher is not fully drying your dishes. Without the rinse aid, the dishes will not shed water easily and will not dry properly. How to inspect a dishwasher rinse aid dispenser: This inspection is very simple; you will not need to disassemble your appliance or have any tools to complete this inspection. Your rinse aid dispenser will be found on the inside of the door, remove the cap from the dispenser. After verifying that there is rinse aid in the chamber, inspect the cap and chamber for any signs of discoloration, warping, or any other damage. If you find any issues with your rinse aid dispenser while performing this inspection, you will need a replacement rinse aid dispenser.
Did this question help you?
Thank you for voting!
John
August 2, 2021
Why making a grinding noise. Water in bottom of dishwasher, so i know it is getting water, but dishes are not wet.
For model number WDT710PAYB6
Hi John,
Thank you for your question. If your dishwasher is making a grinding noise, a piece of hard food may be stuck inside the circulation pump. You will need to turn the power off to the dishwasher and remove the pump to verify if this is the issue. If there is debris in the pump you will need to clean it.
If you are unable to clean it or if the pump is damaged you will need to replace it. You should also check the drain pump and the impeller to verify which part is causing the issue. We hope this helps! If you have any questions, please let us know.
Hi Kevin, thank you for your inquiry. According to our research, the circulation pump assembly, part number PS11756694, is compatible with your model number. Glad to be of help!
The handle to open the dishwasher door is very loose. I am not sure how to go about tightening the screws up? Thanks for your advise.
For model number WDT710PAYB6
Hello and thank you for writing.
Step 1
Turn off the dishwasher's power by opening or turning off the breaker dedicated to the appliance at the main electrical panel in the house or garage.
Step 2
Open the dishwasher door about 1/4 of the way open and hold it in that position.
Step 3
Locate the hex screws on the sides of the door panel, near the inside of the door, and loosen them. Do not completely remove all of the hex screws from the door, so they can hold the door guards in place.
Step 4
Grasp both sides of the door. Have someone loosen and remove the hex head screws to gain access to the inside of the door. Put the door in a near-closed position and remove the outer door panel from the inner door panel by pulling it down and away. In some instances, this make take a few attempts.
Step 5
Locate the door handle assembly screws in the outer door panel. Tighten the screws with a Phillips head screwdriver and then reassemble the dishwasher door. Align the inner and outer door panels and replace the hex-head screws. Turn the breaker back on. We hope this helps. Please contact us anytime if you require further assistance.
Handle # PS11738115
The water dose not get hot when in use i have checked the heating element ,high limit and the,filter is clean
For model number WDT710PAYB6
Hello Daryl, thank you for writing. The rinse aid or the rinse aid dispensing cap could be the reason why your dishwasher is not fully drying your dishes. Without the rinse aid, the dishes will not shed water easily and will not dry properly.
How to inspect a dishwasher rinse aid dispenser: This inspection is very simple; you will not need to disassemble your appliance or have any tools to complete this inspection. Your rinse aid dispenser will be found on the inside of the door, remove the cap from the dispenser. After verifying that there is rinse aid in the chamber, inspect the cap and chamber for any signs of discoloration, warping, or any other damage. If you find any issues with your rinse aid dispenser while performing this inspection, you will need a replacement rinse aid dispenser.
I hope this helps.
Did this question help you?
Thank you for voting!
< Prev
1
Next >
✖
Ask a Question
Ask our experts a question on this model and we'll respond as soon as we can.
Caviat: The actual repair is less than 15 minutes, but I spent a lot of time playing with it before I figured out it was that easy and fast. You don't need to remove the dishwasher from the counter to do this. And it will probably help to look at the new part closely so you can understand where the retainer clip is to press it and release
... Read more the old pump.
First remove the water from the dishwasher pan that would not drain with a wet/dry vac. Otherwise the water will all drain on the floor when you remove the pump. Then remove the two screws on the kickplate on the front of the unit below the door. Remove the kickplate/maintainence access cover. The drain pump is on the right about 8 inches in. Using two hands you grasp the drain pump with your right hand and use the left hand to push the retaining clip down. Then the drain pump will rotate 1/4 turn counterclockwise and can be removed without pulling the dishwasher out. There is likely to be some water leak out that was traped in the pump housing that you can not reach with the vac. Disconnect the wire. Connect the wire to the new pump, put it in place and 1/4 turn clockwise to install it. Replace the kickplate and you're done.
I called an experienced plumber, who balanced and installed my new dishwasher properly, using the brackets I ordered from Parts Select, after an INEXPERIENCED plumber had tossed the factory-provided mounting brackets out with the shipping carton. Relief!


 Diagram and Parts List for Whirlpool Dishwasher")