Your coupon for will be reflected when you check out!
✖
Your coupon for
✖
Hello!
You're visiting the PartSelect site in U.S.
Would you like to shop on the Canadian site?
Stay on this site
Go to Canadian site
✖
Model Number Locations
1Select Category Type
Select Category Type
2Select Product Type
Select Product Type
3Select {MODEL} Type
Select {MODEL} Type
Sample Model Number Tags
Model numbers can be made up of numbers (1005400, for example) or a combination of letters and numbers (LAT1000AAE). The model number will most likely appear on either a paper sticker or a metal plate. Your appliance's model number tag may look similar to the sample model number tags shown here (model number highlighted in yellow):
UCG1650L0II General Electric Trash Compactor - Overview
Save your modelModel Saved!
Save your model for later to make things easier.
Model has been saved to My Models. If you're not signed in, your lists are available on this device and will expire within 30 days.
Model has been saved to My Models.
This frame roller assembly allows a trash compactor drawer to glide smoothly in and out, reducing strain and preventing grinding or squeaking noises during operation. When the rollers wear down, the d...
This power nut assembly is made to be used in conjunction with your trash compactor. It comes with five pieces that include the two mounting pins, two clips, and the new power nut. This piece is beige...
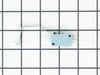
This is a top limit directional switch for a trash compactor. The directional switch reverses the motor direction when the trash compactor has reached the top of the drawer. If your trash compactor is...
The foot pedal on your trash compactor is located at the bottom of the unit. This part, when compressed, allows the container drawer on the trash compactor to slide in and out. If your current foot pe...
Removed compactor from opening. Using screw driver unthreaded 4 screws from top and then removed the on/off dial. Face plate came off easy and provided access to relay switch bank. Unscrewed two screws which allowed both relay switches to be removed and replaced. Recommend replacing both relay switches. Reassembled and compactor work
... Read moreed fine. Very easy job. If your compactor is making a machine gun noise during the return cycle then this will solve your problem.
Followed YouTube instructions. Was relatively easy to dismantle, though on this GE Profile model compactor, needed to partially undo the front panel to provide room to remove the RAM. Works great now!!