Your coupon for will be reflected when you check out!
✖
Your coupon for
✖
Hello!
You're visiting the PartSelect site in U.S.
Would you like to shop on the Canadian site?
Stay on this site
Go to Canadian site
✖
Model Number Locations
1Select Category Type
Select Category Type
2Select Product Type
Select Product Type
3Select {MODEL} Type
Select {MODEL} Type
Sample Model Number Tags
Model numbers can be made up of numbers (1005400, for example) or a combination of letters and numbers (LAT1000AAE). The model number will most likely appear on either a paper sticker or a metal plate. Your appliance's model number tag may look similar to the sample model number tags shown here (model number highlighted in yellow):
Model has been saved to My Models. If you're not signed in, your lists are available on this device and will expire within 30 days.
Model has been saved to My Models.
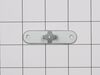
This thermal fuse acts as a high-limit thermostat, and shuts off the heating element when the dryer overheats by cutting off power to the dryer. If the thermal fuse has blown, the dryer will not start...
The sensor controls the temperature in your dryer and will turn off once your clothes have reached the desired dryness level. If you notice that your dryer is not giving off enough heat to dry the clo...
This dryer thermistor temperature sensor helps monitor and regulate the temperature inside a dryer. This part includes the wire harness. If your dryer overheats, does not produce enough heat, or takes...
The high limit thermostat on your dyer prevents your dryer from overheating. When the dryer heats up too much, the high limit thermostat will sense it and automatically shut off the heating element. I...
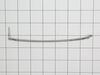
This genuine OEM felt gasket provides a cushioned seal between the inner tub of your electric dryer and the rear panel. It prevents your clothes from getting snagged and helps in heat retention. You w...
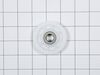
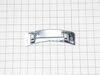
This genuine LG product is an Idle Pulley meticulously designed for LG electric dryers. It plays a crucial role in maintaining the correct tension on the drive belt, enabling it to spin the drum effec...
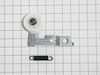
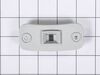
Ideal for LG dryers, the genuine LG Dryer Door Latch Replacement serves as an essential part to ensure efficient performance of your appliance. It is a locker assembly piece that functions as a door c...
Designed exclusively for your LG dryer, the Drum Baffle - Lifter is a premium, OEM (Original Equipment Manufacturer) component guaranteed for an exact fit and superior performance. This drum baffle li...
Crafted with precision, this genuine LG door hinge is a high-quality and durable solution for your LG dryer door. This essential part, straight from the original equipment manufacturer, boasts an impr...
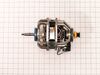
Discover the Motor Pulley Assembly for LG dryers, designed to efficiently maintain the correct tension of the drive belt to spin the drum. This high-quality item is crafted by LG, ensuring you of its ...
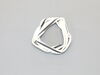
Introducing the LG Dryer Door Latch Hook Locker, a high quality, genuine OEM item created by renowned brand LG, for specific dryer models. This essential component, also known as a Door Strike, plays ...
$47.40
In Stock
Order now and your part arrives by Apr 10
Questions And Answers for TD-V10170EM
Be the first to ask our experts a question about this model!
✖
Ask a Question
Ask our experts a question on this model and we'll respond as soon as we can.
I actually went to mr fix it on u tube. Great instruction on how to take dryer apart. First I unplugged the dryer. I found I could reach the heating system by removing the lint tube in the back of the dryer. I put my I phone with the light on inside the back of the dryer and tested the connections to see if all were working. The thermal f
... Read moreuse was not working. I removed the two wires , red on top and white on the bottom. Then used a small Phillips screwdriver to remove the two mounting screws and removed the fuse. I then used a vacuum to clear any lint from the back of the dryer and inside the dryer. This took me about an hour and a half. I did it this way because I did not want to disassemble the entire dryer to get to the components. I received the fuse in 3 days and tested it. It was fine. I then put it in the dryer screwed it in place, connected the wires. Replaced the lint tube. This took about 10 minutes. Dryer is running great.
I unplugged the dryer and disconnected the vent. I pulled the dryer away from the wall so I had room to work on it. Pulled the top cover off (slides back). Took the door off Took the front adjustable feet on the bottom off Unscrewed all of the face screws on the front of the dryer Took the two screws off of t
... Read morehe back of the control panel holding the control panel to the metal frame. Gently pulled on the control panel to reveal 4 screws under the control panel to be able to take the front cover off. Pulled the front cover off (the dryer door front cover). Pulled the dryer vent cover off (two screws). I could now see the heating element with sensor/fuse (right side). Did a continuity test (beep) on all visable sensors/fuses on the heating element. No beep on the thermal fuse (used website diagram to locate parts to test and replacement part numbers). Got the part after about a week, tested the parted (it beeped), replaced with new part and put dryer back together, plugged in and the dryer heated. Problem solved.
1. Had to find out what was causing the problem by eliminating each part one by one using a multimeter. I got a video link from parts select on how to do this.
2. Then got another video link sent to me by parts select on how to take my dryer a part and replace the part.
3. Followed it step by step and it worked reall
... Read morey well.
4. The process was great except shipping was excessively high for such a small part.