Your coupon for will be reflected when you check out!
✖
Your coupon for
✖
Hello!
You're visiting the PartSelect site in U.S.
Would you like to shop on the Canadian site?
Stay on this site
Go to Canadian site
✖
Model Number Locations
1Select Category Type
Select Category Type
2Select Product Type
Select Product Type
3Select {MODEL} Type
Select {MODEL} Type
Sample Model Number Tags
Model numbers can be made up of numbers (1005400, for example) or a combination of letters and numbers (LAT1000AAE). The model number will most likely appear on either a paper sticker or a metal plate. Your appliance's model number tag may look similar to the sample model number tags shown here (model number highlighted in yellow):
Model has been saved to My Models. If you're not signed in, your lists are available on this device and will expire within 30 days.
Model has been saved to My Models.
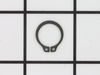
The metal retaining ring, which is under an inch long, holds the rear wheels on the axels of the dryer. The main reason why it would need to replaced is if the retaining ring has sprung out of place o...
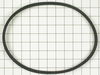
This hose clamp is used in a wide variety of household appliances. Most often it is found in washers, dishwashers, refrigerators, freezers, dehumidifiers, garbage disposals, or air conditioners. This ...
The hose clamp is used to hold the water hose in place which will prevent the hose from leaking water. Sometimes the clamp may lose its ability to latch on, causing a leaking washer. For the installat...
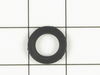
This inlet hose washer, also known as a high pressure inlet hose washer, is used in washing machines, refrigerators, freezers, and dishwashers. The function of this part is to create a watertight seal...
Biggest trick is getting the agitator off. It seems like it is bolted on. I used a piece of braided cotton cord to run under both sides of the agitator and just pulled real hard. It WILL pop off.
Next the old seal will also seem to be attached. The edge is firm but not bolted. A small prybar will help.
Easy repa
... Read moreir to do, but it did not fix my problem. I decided to get a new washer rather than go through further disassembly.
I had some sweaking and then burning followed. I came to find the belt had burnt and stopped my washer from working. Ordered a belt and replaced. Washer worked for one week. Squeaking and burning again. Belt was still intact, thank goodness. Beleive it is another pulley part for the washer. Might order another part. Overall the fi
... Read morex was good, but had another issue.
remove agitator then remove center bolt from hub, match bolt with longer bolt so that gear puller will work. install bolt and gear puller and twist top of gear puller until hub is removed. remove old seal ,use sand cloth or emery cloth to remove all deposits from shoulder. make it shinny, use some dawn dishwashing soap to line the inside
... Read moreof the new seal at the bottom and slide into place.take a piece of 2" PVC about 4" long and slide over the top of the seal and tap with a rubber hammer until seal is seated firmly on shoulder. look to see that there are no gaps with a inspection mirror or a make-up mirror.If their are no gaps ,install the hub and tap on the new hub with the rubber hammer. the hub will not seat all the way down so use the old bolt to pull it down, now take out the old bolt and install the new one, this is because the new one has lock tite on it ,your done!