Your coupon for will be reflected when you check out!
✖
Your coupon for
✖
Hello!
You're visiting the PartSelect site in U.S.
Would you like to shop on the Canadian site?
Stay on this site
Go to Canadian site
✖
Model Number Locations
1Select Category Type
Select Category Type
2Select Product Type
Select Product Type
3Select {MODEL} Type
Select {MODEL} Type
Sample Model Number Tags
Model numbers can be made up of numbers (1005400, for example) or a combination of letters and numbers (LAT1000AAE). The model number will most likely appear on either a paper sticker or a metal plate. Your appliance's model number tag may look similar to the sample model number tags shown here (model number highlighted in yellow):
Model has been saved to My Models. If you're not signed in, your lists are available on this device and will expire within 30 days.
Model has been saved to My Models.
This temperature sensor, also known as a thermistor, is compatible with various makes and types of appliances. This thermistor uses electrical currents to detect the interior temperature of the applia...
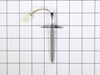
This gas range oven igniter is compatible with various models of LG gas ranges. It is made up of the igniter element, wire harness, connector and mounting bracket. The igniter is responsible for gener...
This transparent inner door glass is designed for LG range ovens and serves as a key component in maintaining heat insulation while allowing visibility into the oven during cooking. Made from heat-res...
This genuine OEM convection fan motor powers the fan that circulates hot air evenly throughout the oven cavity, ensuring consistent temperatures and uniform cooking and baking. This motor is typically...
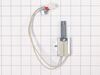
This is a high-limit thermostat for various models of LG microwave ovens. This thermostat acts as a preventative safety device and is designed to cut off continuity for the microwave oven if/when its ...
This sheath heater is a genuine OEM heating element designed for select LG oven and range models. Positioned at the top of the oven interior, it provides the heat necessary for broiling and, in some c...
Unplugged oven electric and turned gas off. Removed all back covers from the unit. Removed the cover on the inside covering the burner and fan in the back of the convection oven. Removed the nut securing the fan to motor shaft with helper holding the motor. Removed the three electrical wires attached to motor, making note where they go.
... Read more Removed screws mounting the motor to oven. Removed motor cooling fan and shaft spacer from old motor. Fit in same orientation on new motor. Replace all parts in reverse order, restore gas and electric, turn on and test.
Took off the oven door then took out the racks and two screws in the oven bottom and removed it . Then removed the heat deflector. Then un plugged the old igniter and removed the burner to make it easier to remove the old igniter. Then installed the new igniter and reversed the process
As soon as my husband put it in the oven, the very thin prongs broke. There was no guard on either side of the prongs for protection like the one that had been in there. Very costly to us of $185 with no fix. Very disappointed in that ignitor. It would have been an easy fix. Had replaced one previously but it only lasted 6 months. Now
... Read morewe have a new stove