Your coupon for will be reflected when you check out!
✖
Your coupon for
✖
Hello!
You're visiting the PartSelect site in U.S.
Would you like to shop on the Canadian site?
Stay on this site
Go to Canadian site
✖
Model Number Locations
1Select Category Type
Select Category Type
2Select Product Type
Select Product Type
3Select {MODEL} Type
Select {MODEL} Type
Sample Model Number Tags
Model numbers can be made up of numbers (1005400, for example) or a combination of letters and numbers (LAT1000AAE). The model number will most likely appear on either a paper sticker or a metal plate. Your appliance's model number tag may look similar to the sample model number tags shown here (model number highlighted in yellow):
Model has been saved to My Models. If you're not signed in, your lists are available on this device and will expire within 30 days.
Model has been saved to My Models.
This dishrack roller is a genuine replacement part designed for the lower rack of select dishwashers. Made from durable gray plastic and measuring slightly over one inch in diameter, it features an in...
This part is a replacement tine row clip for your dishwasher. The tine row clip is adjustable, and it fits onto your dishrack to holds the tines into place. If your dishrack tine rows will not stay in...
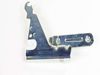
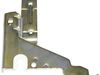
This genuine OEM dishwasher mounting bracket is designed to securely fasten the appliance to the surrounding cabinet or countertop, helping ensure stable and safe operation. Typically sold as a pair, ...
This micro filter is a genuine OEM replacement part that is compatible with dishwashers. Its primary function is to catch and trap small particles of food, debris, and other contaminants that may be p...
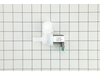
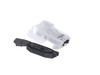
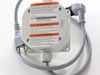
This water access valve, also known as a water inlet valve, is an authentic OEM replacement part used in dishwashers. The valve controls the flow of water into the dishwasher. It is responsible for al...
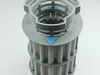
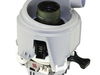
This OEM upper spray arm is sourced directly from the manufacturer for use in various models of dishwasher. It is responsible for spraying water onto the dishes that are placed in the top rack. It is ...
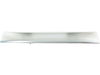
This is a door handle, which is is installed at the top of your dishwasher door and allows you to open and close it. However, if this part is missing or broken, the opening and closing your dishwasher...
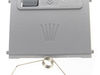
This upper dishrack assembly is designed to fit select models of Bosch, Thermador, and Gaggenau dishwashers. Engineered for durability and optimal performance, it features multiple tine rows to secure...
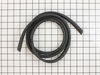
This dishwasher drain hose is designed to transport wastewater from the appliance to the household plumbing system, ensuring proper drainage and preventing water retention. Constructed for durability ...
Introducing the Dishrack Tine Row Holder from Bosch, a high-quality, authentic OEM part designed for dishwashers. This particular component is known for its compatibility with various models from the ...
$6.40
In Stock
Order now and your part arrives by Jun 4
Questions And Answers for SHP7PT55UC
Be the first to ask our experts a question about this model!
✖
Ask a Question
Ask our experts a question on this model and we'll respond as soon as we can.
The bottom rack of our Bosch dishwasher was discontinued & no longer available anywhere, so we ordered an OEM replacement rack from PartSelect.com & hoped that it would fit.
The new rack fits perfectly & is actually an improvement over the old one. The new rack doesn't have a vase tower, but that is actually a big design impr
... Read moreovement because it can store more dishes & is more flexible than the old one. The new rack comes without a handle cover, but it was very easy to move the handle cover from our old rack to the new one.
The E:15 error code means water is detected in the pan under the unit. There are several ways this can happen.
In this case, it was caused by a bad inlet valve. It did not close properly and led to an overflow of water inside that eventually spilled into the pan underneath the unit.
I see now why the pump keeps run
... Read morening after this error. In this case, it would have led to a big flood in the kitchen if it did not.
I was actually able to run the unit while broke by manually operating the valve under our sink that provides water to the unit.
Be sure to turn off breaker before servicing. Don't get shocked!
Be sure to turn off water before starting! Or, you'll have a flood.
Anyway, I just pulled the unit out (was secured by 2 screws on the sides). I lifted up the insulation material on the left side to get at the valve. Pushed a little green tab to release the electrical plug. Then, use pliers to move clamp off the white water hose on the inside. Then, pull of white hose. This was hard in my case. Took a lot of force. Then, reach behind the unit and use pliers to unscrew water hose. Now, the whole gray panel there can pop out with some force. Then, slip the old valve out and slip new one in. Reconnect hoses and clamp. Note that I put some caulk on the connector where white hose goes. Not sure if needed or not.