


SDG5401AWQ Maytag Dryer - Overview
Sections of the SDG5401AWQ
[Viewing 1 of 1]
Keep searches simple, eg. "belt" or "pump".

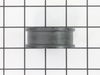
Idler Pulley Wheel w/ Bearing
PartSelect #: PS11757553
Manufacturer #: WPY54414
The idler pulley wheel helps the belt to rotate the drum in your dryer. If your dryer will not start, will not tumble, or is noisy during operation, the idler pulley wheel may need to be replaced. Thi...
$21.45
In Stock

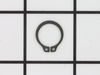
Retaining Ring
PartSelect #: PS11740487
Manufacturer #: WP23748
The metal retaining ring, which is under an inch long, holds the rear wheels on the axels of the dryer. The main reason why it would need to replaced is if the retaining ring has sprung out of place o...
$12.85
On Order


Motor Assembly - Threaded Shaft
PartSelect #: PS11739459
Manufacturer #: WP2200376
This 1/4 horsepower gas or electric clothes dryer motor carries 120 volts, 60 Hz, and 5.5 amps. It also performs 1725 revolutions per minute. This motor is used for some gas and some electric clothes dryers.
$120.55
In Stock

Blower Wheel
PartSelect #: PS2052494
Manufacturer #: 56000
If your dryer is noisy, will not tumble, or is not producing enough heat, you may need to replace the blower wheel. This part is white in color, and is made of plastic. This part is approximately 8 in...
$68.86
In Stock

Idler Pulley Lever and Shaft
PartSelect #: PS11741920
Manufacturer #: WP37001144
This arm is what attaches to the idler pulley wheel.
$44.23
In Stock

Idler Pulley Spring
PartSelect #: PS11742854
Manufacturer #: WP56076
At just two and a half inches, this metal spring fits onto the arm of the idler pulley assembly of gas and electric clothes dryers.
$51.61
Special Order

Dryer Multi-Temperature Gas Thermostat
PartSelect #: PS11740685
Manufacturer #: WP307250
Also known as cycling thermostat with internal bias heater - L150-25 - 5 terminal.
$63.64
Special Order


Dryer Nut
PartSelect #: PS11748944
Manufacturer #: WPW10139757
Sold individually. This nut is for dryers.
Follow appropriate safety practices when installing the nut.
$7.47
Special Order
Questions And Answers for SDG5401AWQ
We're sorry, but our Q&A experts are temporarily unavailable.
Please check back later if you still haven't found the answer you need.
Common Symptoms of the SDG5401AWQ
[Viewing 5 of 5]Noisy
Fixed by
these parts
these parts

Show All
Drum Not Spinning
Fixed by
these parts
these parts

Show All
Will not agitate
Fixed by
these parts
these parts
Show All
Burning smell
Fixed by
these parts
these parts
Show All
Spins slowly
Fixed by
these parts
these parts
Show All


Keep searches simple. Use keywords, e.g. "leaking", "pump", "broken" or "fit".
Dryer would make humming noise and stop running as Motor would overheat.
This was much easier than I expected. I pulled the front covers, released the belt (just move tentioner pulley with fingers to release belt), removed the drum to access the motor. The motor was easy to remove. I loosened then nut in the fan assy using my channel locks (because I did not have a socket that big and then removed the wire har
... Read more
ness clip to prepare the motor for removal. The two mounting clips were the tricky part as the fit over a metal ear on each side locked by the spring tension of the clips. It looks like a special tool my be available but I simply used my big straitslot and heavy downward pressure to remove and install. This repair can be completed by anyone with very basic mechanical skills and impress the spouse.
Read less
Parts Used:
-
Bryan from Everett, WA
-
Difficulty Level:Easy
-
Total Repair Time:30 - 60 mins
-
Tools:Nutdriver, Pliers, Screw drivers, Socket set, Wrench set
65 of 82 people
found this instruction helpful.
Was this instruction helpful to you?
Thank you for voting!
motor pulley went bad
First unplugged unit .2nd took off front cover and removed bottom screws and that allows it to open up and lean back.3rd pryed the motor lock down springs by applying pressure down and out . forth used vise grips to hold motor shaft, while using the 7/8 socket to loosen the blower fan.Last go through steps to put back together.
Parts Used:
-
Brian from Sedalia, MO
-
Difficulty Level:Easy
-
Total Repair Time:15 - 30 mins
-
Tools:Nutdriver, Pliers, Screw drivers, Socket set
55 of 68 people
found this instruction helpful.
Was this instruction helpful to you?
Thank you for voting!
Blower fan cracked
Unplug the power cord from the unit. Remove the lower front panel; then the upper front panel including the door (unplug wire to door switch). Then remove the cover on the fan housing. Need to block the motor from turning; I used a stick to jamb the front of the motor; then unscrew the old blower fan and screw on the new one. Then repla
... Read more
ce the cover and put front panels back on.
Read less
Parts Used:
-
Rick from Birch Run, MI
-
Difficulty Level:A Bit Difficult
-
Total Repair Time:30 - 60 mins
-
Tools:Nutdriver, Socket set
44 of 54 people
found this instruction helpful.
Was this instruction helpful to you?
Thank you for voting!