


SDE907WF Speed Queen Dryer - Overview
Models starting with SDE907WF
Click on the best match to narrow your results.
Keep searches simple, eg. "belt" or "pump".

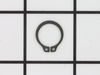
Retaining Ring
PartSelect #: PS11740487
Manufacturer #: WP23748
The metal retaining ring, which is under an inch long, holds the rear wheels on the axels of the dryer. The main reason why it would need to replaced is if the retaining ring has sprung out of place o...
$12.85
In Stock

Cylinder Felt Seal
PartSelect #: PS11741917
Manufacturer #: WP37001132
This cylinder felt seal is used in dryers and is located between the back of the drum and the rear dryer panel. If your dryer is experiencing any of these symptoms, replacing the felt seal could solve...
$45.29
In Stock


Dryer Screw
PartSelect #: PS11746840
Manufacturer #: WP90767
This screw is sold individually.
$7.47
In Stock

Spring Retaining Clip
PartSelect #: PS11739294
Manufacturer #: WP22001650
This spring retaining clip is just under 1 inch long. The clip is made entirely of metal and is attached to the back wall of the washer, under the console. If your washer is vibrating and louder than ...
$9.62
In Stock

Washer Screw 818 X 1/2
PartSelect #: PS11741443
Manufacturer #: WP3390631
This screw is sold individually.
$7.47
In Stock

Glide Bracket Kit
PartSelect #: PS2003560
Manufacturer #: 12002090
This kit contains two glide brackets and four screws.
$79.10
Special Order

Dryer Screw
PartSelect #: PS11723095
Manufacturer #: W10815455
This tapping screw is sold individually.
$7.47
In Stock


Refrigerator Screw
PartSelect #: PS11742751
Manufacturer #: WP489464
Sold individually.
$9.62
In Stock

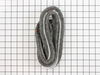
Washer Hose Inlet 6 Ft. Hose w/El
PartSelect #: PS11744637
Manufacturer #: WP76314
Requires two washers.
$34.74
Special Order

Common Symptoms of models starting with SDE907WF
[Viewing 5 of 5]Noisy
Fixed by
these parts
these parts

Show All
Marks left on clothes
Fixed by
these parts
these parts
Show All
Will not agitate
Fixed by
these parts
these parts
Show All
Burning smell
Fixed by
these parts
these parts
Show All
Spins slowly
Fixed by
these parts
these parts
Show All


Keep searches simple. Use keywords, e.g. "leaking", "pump", "broken" or "fit".
belt was cracking and dryer was somewhat noisy
I used your great video for pointers as to what to do. I took off the front, raised the top, vacuumed the whole thing up, that took quite a while. Took out the drum. Did more cleaning. Then took off the old retaining rings with retaining ring pliers, took off the old drum rollers and support. Replaced with new roller supports, washer, rol
... Read more
ler, washer and retaining rings. Then I replaced the belt. Tested it and turned the wrong way and it came off. Replaced and tested it again and I don't know why but it came off. Replaced the belt again, tested fine. Then I replaced the felt pads and glides, they were worn. I ended up asking my husband to help hold the drum so I could get the front back on. Replaced front and door. Tried the dryer. Works great AND very, very little noise. Note: when taking the wiring off the light and the door switch, I took photo's of those places with my cell phone and had them to look at to make sure the wiring was correct.
Read less
Parts Used:
-
Melody from Silverton, CO
-
Difficulty Level:Easy
-
Total Repair Time:More than 2 hours
-
Tools:Nutdriver, Screw drivers
4 of 7 people
found this instruction helpful.
Was this instruction helpful to you?
Thank you for voting!
Squealing when running
I had already taken the dryer apart prior to changing the felt seal. Had oiled the rollers, greased the bearings & vacuumed the whole inside of the dryer out. Had used a high temp lubricant on the seal & had stopped squeaking for about a month. I ordered 2 seals & when they arrived, I popped the top of the dryer off using the putty knife
... Read more
to pry the spring latches. I opened the top up & leaned it against a wall. I disconnected the wiring to the light & the switch in the door, making note of the wiring order. Then used a nut driver to take the 2 screws from the inside out, that holds the front cover in place. Then the same for the 4 screws holding the front bulkhead in place. Then lifted up & out from the unit. Then used the putty knife to scrap the adhesive & old seal off the bulkhead. Cleaned as much of the adhesive off, then applied some high temp silicone adhesive to the bulkhead, placed the new seal on, using some clamps to hold it in place. After making sure it had adhered to the seal & bulkhead. Did the reversal of the above mentioned steps. Moved the unit to laundry room, plugged it in then started it & voila no more squeaking dryer.
Read less
Parts Used:
-
Eric from Carlsbad, NM
-
Difficulty Level:Easy
-
Total Repair Time:30 - 60 mins
-
Tools:Nutdriver
2 of 2 people
found this instruction helpful.
Was this instruction helpful to you?
Thank you for voting!
Cylinder Seal came out
Early in the life of my dryer, the Cylinder Seal came out. For the past two years I put off buying the part. When it came in, I p[opped the top of the dryer, removed the two screws holding on the front panel, and pulled the Cylinder of the back wall of the dryer. I then placed the seal in the right spot, glued it down and reassembled.
... Read more
About Fifteen minutes of work and a cheap part, and now my dryer dries a l;oad of clothes in an hour instead of three.
Read less
Parts Used:
-
Marcia from Hammond, LA
-
Difficulty Level:Easy
-
Total Repair Time:Less than 15 mins
-
Tools:Pliers
4 of 8 people
found this instruction helpful.
Was this instruction helpful to you?
Thank you for voting!