Your coupon for will be reflected when you check out!
✖
Your coupon for
✖
Hello!
You're visiting the PartSelect site in U.S.
Would you like to shop on the Canadian site?
Stay on this site
Go to Canadian site
✖
Model Number Locations
1Select Category Type
Select Category Type
2Select Product Type
Select Product Type
3Select {MODEL} Type
Select {MODEL} Type
Sample Model Number Tags
Model numbers can be made up of numbers (1005400, for example) or a combination of letters and numbers (LAT1000AAE). The model number will most likely appear on either a paper sticker or a metal plate. Your appliance's model number tag may look similar to the sample model number tags shown here (model number highlighted in yellow):
SCB1001KSS01 General Electric Microwave Oven Combo - Overview
Save your modelModel Saved!
Save your model for later to make things easier.
Model has been saved to My Models. If you're not signed in, your lists are available on this device and will expire within 30 days.
Model has been saved to My Models.
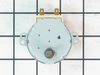
This light bulb is located on the inside of your microwave. The bulb is behind the top grill. It will need to be replaced when it has burnt out and no longer works. Unplug the unit before beginning th...
This ceramic microwave fuse is just over an inch in length. It is white in the center, and metal on both ends. This is a 20-amp fuse, and is used to power your microwave. If the touch pad on the micro...
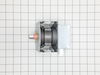
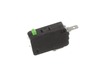
This switch monitor interlock is a critical safety component designed to ensure proper communication between the microwave door latch and the control board. When functioning correctly, it confirms tha...
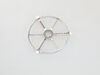
This glass tray support ring, also known as a rotating ring, is specially designed for microwaves. It is a genuine OEM part that is guaranteed to fit just like the original part. The support ring is f...
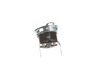
Introducing the GE Microwave Thermostat - a vital safety component for your microwave. Crafted with precision, this thermostat is specifically designed to prevent overheating scenarios which can cause...
This diode cable is a replacement electrical component designed to regulate current flow within an appliance circuit. It helps protect sensitive components and is commonly replaced when electrical fau...
This capacitor delivers the electrical boost required for motors to start and operate efficiently. Proper capacitance reduces strain on motor components and helps prevent startup failures or inconsist...
Meet the GE Canopy Mica, a sturdy waveguide cover designed for your microwave. Made with high-quality materials, this essential part safeguards the waveguide channel from any debris, food splatters, a...
Ask our experts a question about this model and we'll get back to you as soon as possible!
3 questions answered by our experts.
Sort by:
< Prev
1
Next >
Search filter:
Clear Filter
Your search term must have 3 or more characters.
Keep searches simple. Use keywords, e.g. "leaking", "pump", "broken" or "fit".
Sorry, we couldn't find any existing answers that matched.Try using some different or simpler keywords, or submit your new question by using the "Ask a Question" button above!
Keith
March 5, 2023
Display flickering erratically. No touch pad response so can’t use any functions.
For model number SCB1001KSS01
Hello Keith, thank you for reaching out. According to our research, the issue is probably with the display control board, part number PS1022528. Before replacing the control board, we recommend checking the wire connections to ensure they are not loose. We hope this sorts out your problem!
Hi Judy, thank you for reaching out. According to our research, if the connector plug is not fitted firmly in the socket, the display screen may blink, on and off. We recommend checking the display control board, part number PS1022528. We hope this solves your problem!
Microwave display not working. Was flashing before it quite. Replaced the control board and display board. Touchpad and microwave function just no display
Possible I got bad display or is it another part I need to be looking at
Just the clock display lighted display not working. Everything else works. Must be overlooking something. All the lights under the display work as well. Help
For model number SCB1001KSS01
Hi Earl, thank you for the question. We would suggest checking that you are using the model compatible parts. If they are compatible then, we would recommend checking that they have been installed properly. You may need to re-install them to fix the issue. We hope this sorts out your problem!
Did this question help you?
Thank you for voting!
< Prev
1
Next >
✖
Ask a Question
Ask our experts a question on this model and we'll respond as soon as we can.
Turned out the issue was easily solved by replacing a single, inexpensive fuse.
First off, UNPLUG THE MICROWAVE.
The fuse is located under the plastic grill at the top of the microwave. It's held on by two screws. Once you've removed the screws and taken off the plastic grill, you go to the right side of the mic
... Read morerowave and remove another screw that holds a small metal grill in place. Removing the small metal grill is probably the toughest part of this repair. You kind of have to rock it back and forth a bit to get it to release. Once that's off, you can get to the fuse. I removed the burnt out one with a pair of needle nose pliers. I also put a small piece of cardboard under the fuse when I did this so I didn't accidentally drop it into the innards of the microwave. I did the same thing when I replaced the new fuse. I then plugged the appliance back in and made sure it worked. Once that was confirmed, I replaced both grills.
Turned of f the circuit breaker to the microwave. Unscrewed the cover (1 screw!) popped out the old bulbs and plugged in the new ones, using the bubblewrap as a handle to be sure my skin didn't touch the light bulbs so the oil from my hands didn't damage or shorten the life of the new bulbs. Turned the circuit back on. That's it!