EasyApplianceParts is now PartSelect! We've merged our sites to provide a better shopping experience for you.   Full Details
Back
Back
Back
Keep typing for more specific results...

RT218GCW1 Gibson Refrigerator - Overview

Sections of the RT218GCW1

[Viewing 1 of 1]
Keep searches simple, eg. "belt" or "pump".
Defrost Thermostat – Part Number: 5303917954
Defrost Thermostat
★★★★★
★★★★★
(7)
PartSelect #: PS469269
Manufacturer #: 5303917954
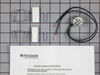
This limiter thermostat cuts out when the temperature inside your refrigerator reaches 55 degrees Fahrenheit and kicks back in when the internal temperature drops to 20 degrees Fahrenheit. If you disc...
$42.12
  In Stock
Order now and your part arrives by Apr 9
Evaporator Fan Motor Kit – Part Number: 5300158289
Evaporator Fan Motor Kit
★★★★★
★★★★★
(7)
PartSelect #: PS450319
Manufacturer #: 5300158289
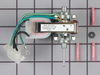
The evaporator fan motor kit is specifically made for your refrigerator to run the evaporator fan in your refrigerator. It is mounted on the center hub and has three lead wire terminals; its shaft has...
$104.52
  In Stock
Order now and your part arrives by Apr 9
Evaporator Fan Blade – Part Number: 5308000010
Evaporator Fan Blade
★★★★★
★★★★★
(5)
PartSelect #: PS473177
Manufacturer #: 5308000010
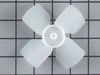
This evaporator fan blade is a genuine OEM part that is sourced directly from the manufacturer. The evaporator fan blade circulates air through the refrigerator to control the amount of cold air goes ...
$51.61
  In Stock
Order now and your part arrives by Apr 9
Bottom Door Shelf Rack - Cut-to-Fit – Part Number: 215366074
Bottom Door Shelf Rack - Cut-to-Fit
★★★★★
★★★★★
(1)
PartSelect #: PS422688
Manufacturer #: 215366074
Replacement part may be longer than the original part. You might need to cut it to make it fit your appliance.
  No Longer Available
Defrost Heater With Straps – Part Number: 5317842502
Defrost Heater With Straps
PartSelect #: PS475083
Manufacturer #: 5317842502
The defrost heater keeps the cooling coils from frosting over.
$95.54
  In Stock
Order now and your part arrives by Apr 9
Defrost Drain Pan - White – Part Number: 5308000086
Defrost Drain Pan - White
PartSelect #: PS473189
Manufacturer #: 5308000086
This part is found under the refrigerator.
  No Longer Available
2 Pack Light Bulb - 40W – Part Number: 5304490731
2 Pack Light Bulb - 40W
★★★★★
★★★★★
(1)
PartSelect #: PS8760365
Manufacturer #: 5304490731
$35.80
  On Order
GRILL – Part Number: G163080-02
GRILL
PartSelect #: PS491377
Manufacturer #: G163080-02
  No Longer Available
Temperature Cold Control Thermostat – Part Number: 5303200810
Temperature Cold Control Thermostat
PartSelect #: PS454277
Manufacturer #: 5303200810
This cold control thermostat helps maintains the proper temperature in the refrigerator.
  No Longer Available
GASKET – Part Number: 5304403828
GASKET
PartSelect #: PS470692
Manufacturer #: 5304403828
$172.19
  Special Order
GASKET-ALMOND – Part Number: 5304404037
GASKET-ALMOND
PartSelect #: PS470713
Manufacturer #: 5304404037
  No Longer Available
SUPPORT-DOOR RACK – Part Number: 5317689101
SUPPORT-DOOR RACK
PartSelect #: PS475033
Manufacturer #: 5317689101
$30.53
  Special Order

Questions And Answers for RT218GCW1

Be the first to ask our experts a question about this model!

Common Symptoms of the RT218GCW1

[Viewing 12 of 12]
Fridge too warm
Fixed by
these parts
Fixing Fixing Fixing
Show All
Noisy
Fixed by
these parts
Fixing Fixing
Show All
Freezer not defrosting
Fixed by
these parts
Fixing
Show All
Freezer section too warm
Fixed by
these parts
Fixing Fixing
Show All
Fridge runs too long
Fixed by
these parts
Fixing
Show All
Freezer too cold
Fixed by
these parts
Fixing
Show All
Frost buildup
Fixed by
these parts
Fixing
Show All
Fridge and Freezer are too warm
Fixed by
these parts
Fixing
Show All
Fridge too cold
Fixed by
these parts
Fixing
Show All
Leaking
Fixed by
these parts
Fixing Fixing
Show All
Too warm
Fixed by
these parts
Fixing
Show All
Will Not Start
Fixed by
these parts
Fixing
Show All
Keep searches simple. Use keywords, e.g. "leaking", "pump", "broken" or "fit".
Noisy fan
1. Removed the 7 nuts using the nut driver from the freezer back panel inside the freezer.
2. Remove the back panel. The evaporator motor and fan are located above the coils.
3. Unplug the wiring harness.
4. Remove the two gold mounting screws holding the motor and fan in place.
5. Remove the motor and fan including the brackets.
6. Install the new motor and fan onto the mounting bracket.
6a. Attach the green ground to the mounting bracket.
7. Screw the two gold screws back into the freezer.
8. Attach the new wiring harness. Note, the old harness had a mounting hole/space for it to connect to the wiring harness of the freezer. The new motor's harness was not long enough for this, so it is connected freely to the freezer harness.
9. Use the hair dryer to melt any ice that may have formed on the coils and hole where the fan goes.
10. Turn the freezer on to see if the fan turns on.
11. Reinstall the back panel.
All done!
Parts Used:
Evaporator Fan Blade Evaporator Fan Motor Kit
  • Jordan from Maumee, OH
  • Difficulty Level:
    Easy
  • Total Repair Time:
    1- 2 hours
  • Tools:
    Nutdriver
153 of 180 people found this instruction helpful.
Was this instruction helpful to you?
Thank you for voting!
The Evaporator Fan Burnt Up
The fan motor all but caught the inside of the freezer on fire . Had to remove then clean, and I mean clean the walls of the freezer . Then had to pry out the old fan without breaking anything . Replacement of new fan was quick and easy because all the parts that I needed were in the bag
Parts Used:
Evaporator Fan Blade Evaporator Fan Motor Kit
  • ROY from PENSACOLA, FL
  • Difficulty Level:
    A Bit Difficult
  • Total Repair Time:
    1- 2 hours
  • Tools:
    Pliers, Screw drivers
29 of 39 people found this instruction helpful.
Was this instruction helpful to you?
Thank you for voting!
freezer kept icing over, refrigerator too hot
First, I unplugged the appliance. Safety, first.
Than I removed the shield which was held in by screws. This covered the fan, thermometer.
The defrost thermostat was taken out, with a little extra force. The wires on the defective part were no longer attached to the part. The instructions were easy to follow in replacing the defrost thermostat. I stripped the coating on the wire, attached it with the enclosed electical bugs. The assy was able to follow, and the part went back on. The refrigerator is working perfectly. I couldn't have done it without the help in diagnosing the problem and with the speedy delivery of the new part. Thanks for all your help and the ease of the installing the new part!
Parts Used:
Defrost Thermostat
  • debra from new washington, OH
  • Difficulty Level:
    Really Easy
  • Total Repair Time:
    15 - 30 mins
  • Tools:
    Nutdriver, Pliers
11 of 13 people found this instruction helpful.
Was this instruction helpful to you?
Thank you for voting!