Your coupon for will be reflected when you check out!
✖
Your coupon for
✖
Hello!
You're visiting the PartSelect site in U.S.
Would you like to shop on the Canadian site?
Stay on this site
Go to Canadian site
✖
Model Number Locations
1Select Category Type
Select Category Type
2Select Product Type
Select Product Type
3Select {MODEL} Type
Select {MODEL} Type
Sample Model Number Tags
Model numbers can be made up of numbers (1005400, for example) or a combination of letters and numbers (LAT1000AAE). The model number will most likely appear on either a paper sticker or a metal plate. Your appliance's model number tag may look similar to the sample model number tags shown here (model number highlighted in yellow):
Model has been saved to My Models. If you're not signed in, your lists are available on this device and will expire within 30 days.
Model has been saved to My Models.
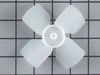
This evaporator fan blade is a genuine OEM part that is sourced directly from the manufacturer. The evaporator fan blade circulates air through the refrigerator to control the amount of cold air goes ...
The ice cube tray is made of plastic, is white in color, and is sold individually. This is a part for your freezer. The ice cube tray is sturdy but flexible to allow you to easily release the ice once...
This is a door/light switch and it is a replacement part for your refrigerator. This part is activated as you open and close your refrigerator door. When the switch is activated and the door is open i...
Simple switch repair: Unplug fridge, pull down to remove switch assembly, slip contacts off. Reverse with replacement switch. HOWEVER, check first to see if the bulb filament might be broken, as this could cause the same symptom. OR in my case, the light socket connection was the culprit. Check that too before ordering a replacement s
... Read morewitch.
From discussions with friends, I determined the problem might be easy to fix. The fridge made a lot of noise, but the compressor DID come on, and inside the freezer was cold, but the main fridge was warming.
After unplugging the fridge, I removed the fan assembly in the freezer (there were about 4 nuts and a couple of plugs to
... Read moreuncouple.
I could see right away the fan blades has broken off, but the motor looked good. The new new fan pushed easily onto the shift and fit perfectly in the housing.
I reinstalled the fan assembly, plugged in the fridge, and right away heard the new fan come on - very quietly. What was a roar became a whisper and the fridge was down to 38 degrees with a few hours.
1. I took out one screw on the ice maker and loosened the other two screws and unplugged and removed the ice maker. 2. Next I took out 2 screws from the bottom of the auger drive box and unplugged the wiring harness and removed the box. The wiring harness was a little tricky. The lock on the plug pushes in to unlock even though
... Read moreit looks like it pulls out,. 3.next you must remove 2 screws from the left side bracket that holds the auger box and remove the bracket. 4.Now take out 8 screws that hold the back panel in place and remove the back panel. 5. now your looking at the evaporator fan blade and motor. The simple way to replace the fan blade is to unplug the motor and remove it from the freezer. It just sits in with nothing holding it. The fan requires a little pressure but should pull right off. Install new fan blade and put everything back in the same order it was removed.