Your coupon for will be reflected when you check out!
✖
Your coupon for
✖
Hello!
You're visiting the PartSelect site in U.S.
Would you like to shop on the Canadian site?
Stay on this site
Go to Canadian site
✖
Model Number Locations
1Select Category Type
Select Category Type
2Select Product Type
Select Product Type
3Select {MODEL} Type
Select {MODEL} Type
Sample Model Number Tags
Model numbers can be made up of numbers (1005400, for example) or a combination of letters and numbers (LAT1000AAE). The model number will most likely appear on either a paper sticker or a metal plate. Your appliance's model number tag may look similar to the sample model number tags shown here (model number highlighted in yellow):
Model has been saved to My Models. If you're not signed in, your lists are available on this device and will expire within 30 days.
Model has been saved to My Models.
This inner door glass is a heat resistant part that fits into a stove, oven, wall oven, cooktop, or range as the inner glass panel of the appliance door. The glass panel allows you to see the items be...
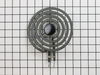
The surface burner or element on your range provides the heat that you cook with. If your element will not heat, you may need to replace the surface burner. This surface burner is 8 inches in diameter...
The standard y-frame surface burner provides heat to your range. If you notice that your element will not heat, you may need to replace your surface burner. This product is 6 inches in diameter, and 1...
The bake element is located at the bottom of the oven and gives off heat in order to bake evenly. If you notice that the element is not heating up or is not cooking evenly, it could be because it is b...
This oven rack is chrome in color and is approximately 24.76 inches wide by 15.78 inches deep. If your old oven rack is damaged, you should consider replacing it. Many of our customers have determined...
This is a multi-use and multi-appliance screw. It can be used on a microwave, refrigerator, range/oven, air conditioner, dehumidifier, washer, or dryer. The measurements of this screw are 8 x 1/2 inch...
This touch-up paint can be used on a wide variety of household appliances. It is most often used on washers, dryer, refrigerators, dishwashers, ranges, freezers, trash compactors, or microwaves. It is...
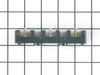
The surface burner stabilizer keeps your burners level and secure to your gas range. Stabilizers are used to ensure there is a constant burning of the gas-air mixture by the surface burner. If your bu...
This is cookware designed for use in your range or oven. It is a two-piece dish that is used to grill or cook food while the broil function is on, meaning it can withstand high temperatures. This set ...
This part is a light bulb that is 120-130 volts and 15 watts, and is used in conjunction with your range or wall oven. The function of this bulb is to illuminate the interior of the oven.Before making...
$48.45
In Stock
Order now and your part arrives by May 15
Questions And Answers for RS610PXEN2
Be the first to ask our experts a question about this model!
✖
Ask a Question
Ask our experts a question on this model and we'll respond as soon as we can.
Easily removed the door from the oven by releasing clips attached to the door hinge -- very nicely engineered. Removed about 6 philips head screws to allow the door assembly to be taken apart for access to the glass. Lifted out the broken glass, cleaned the inside of the door, installed the new glass, reassembled the door (a two minute
... Read more project), and reattached the door to the oven. Cleaning the inside of the door took longer than the actual repair!
I removed the two screws that held the bake element in place. Next I removed the Bake Element. I had to unscrew the oven to go behind it because when one piece off of the element broke, it slide back behind the oven. I pushed the wire back thru the piece holes, connected the Element, and pushed the element with the wires back through the
... Read moreholes. I rescrewed the element in place and the oven. PartSelect helped me to save this year's Christmas.
Removed the oven door by following the straightforward instructions in the user's manual. Removed philips head screws to take the door assembly apart. Removed clips holding the two inner door glass plates, and the two plates. Removed the clamp holding the broken glass plate, then the glass and associated glass fragments. Then cleaned
... Read moreand re-installed the three glass plates and their clamps in reverse order. Re-assembled the door and re-attached to the oven. Only cautionary note is to be careful when removing, handling and re-installing the various glass plates. Watch out for fragments from the broken plate; they can cut you and/or fall on the floor.


 – Part Number: WP4173175")


")
