


RND24AN-3A Refrigerator - Overview
Models starting with RND24AN-3A
Click on the best match to narrow your results.
Keep searches simple, eg. "belt" or "pump".

Light Bulb - 40W
PartSelect #: PS884734
Manufacturer #: 8009
This an authentic OEM 40-Watt replacement light bulb, used in a number of household appliances. It is specially designed to withstand extreme temperatures, which is why these replacement bulbs are mos...
$19.54
In Stock

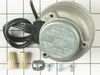
Refrigerator Condenser Fan Motor Kit
PartSelect #: PS395284
Manufacturer #: 833697
This condenser fan motor kit is designed for use with refrigerators. This fan draws air through the condenser coils and over the compressor. It does this with the goal of cooling the warm refrigerant ...
$65.73
In Stock

Washer Hose Clamp
PartSelect #: PS11743008
Manufacturer #: WP596669
This hose clamp is used in a wide variety of household appliances. Most often it is found in washers, dishwashers, refrigerators, freezers, dehumidifiers, garbage disposals, or air conditioners. This ...
$7.47
In Stock

Light Bulb - 7W
PartSelect #: PS11731356
Manufacturer #: W10857122
Sold individually. This bulb is a 7-watt appliance incandescent light bulb. This appliance light bulb is two inches long. It is used for many clothes dryers. You will need a Phillips screwdriver and n...
$16.07
In Stock

Refrigerator Screw
PartSelect #: PS11742754
Manufacturer #: WP489478
Sold individually.
$7.47
In Stock

Refrigerator Compression Nut
PartSelect #: PS11743305
Manufacturer #: WP627018
The compression nut is used as a connection between the water supply line and other components in your refrigerator such as your ice maker and your water dispenser. Tools required for this repair incl...
$11.77
In Stock

Ice Bin Drive Ring
PartSelect #: PS11743163
Manufacturer #: WP61003336
This drive ring is three inches in diameter. It is all white in color and is made of plastic. This ring is used with a refrigeraor's icemaker assembly.
No Longer Available

Door Shelf Trim Retainer
PartSelect #: PS11743360
Manufacturer #: WP65245-1
This door shelf trim retainer is just over one inch long. It is all white in color and it is made entirely of plastic.
$10.70
In Stock

SCREW
PartSelect #: PS12728594
Manufacturer #: W11380570
Sold individually. For white and almond models.
$21.45
In Stock

Refrigerator Plastic Tubing
PartSelect #: PS11747816
Manufacturer #: WPB5705307
This part supplies water to refrigerator components that require water, such as the ice maker and water dispenser. If you notice a leak coming from your refrigerator, the plastic tubing that feeds you...
$17.15
In Stock

Washer Inlet Hose Washer
PartSelect #: PS11757437
Manufacturer #: WPY013783
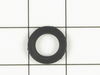
This inlet hose washer, also known as a high pressure inlet hose washer, is used in washing machines, refrigerators, freezers, and dishwashers. The function of this part is to create a watertight seal...
No Longer Available

Light Bulb
PartSelect #: PS11765660
Manufacturer #: W10887190
This appliance light bulb is used for many Maytag brand refrigerators. This 40W light bulb is frosted. Sold individually.
$17.15
In Stock
Common Symptoms of models starting with RND24AN-3A
[Viewing 12 of 12]Leaking
Fixed by
these parts
these parts


Show All
Fridge too warm
Fixed by
these parts
these parts

Show All
Freezer section too warm
Fixed by
these parts
these parts

Show All
Noisy
Fixed by
these parts
these parts
Show All
Fridge runs too long
Fixed by
these parts
these parts
Show All
Fridge and Freezer are too warm
Fixed by
these parts
these parts
Show All
Will Not Start
Fixed by
these parts
these parts
Show All
Ice maker won’t dispense ice
Fixed by
these parts
these parts


Show All
Ice maker not making ice
Fixed by
these parts
these parts


Show All
Freezer not defrosting
Fixed by
these parts
these parts
Show All
Not dispensing water
Fixed by
these parts
these parts

Show All
Too warm
Fixed by
these parts
these parts
Show All


Keep searches simple. Use keywords, e.g. "leaking", "pump", "broken" or "fit".
Sometimes the condenser fan would start causing the refrigerator to overheat.
Unplug the appliance.
Removed the screws holding the back panel.
Removed the fan blade.
removed 3 screws holding the condenser fan.
Remove the 3 metal brackets attached to the fan.
(First note which studs the brackets are attached to. Attach the 3 metal brackets to the new fan. (New screws were supplied)
Cut ... Read more and strip the wire about two inches from the fan.
Cut and strip the new wire. I cut the new wire in half (about 6 inches.) Connect the two wires, twist and used 2 wire nuts. Tie wrap the wire to the wire harness. Mount the new fan (three screws)
Screw the back panel back on.
Mount the new
Read less
Parts Used:
-
Tom from Franklin, WI
-
Difficulty Level:A Bit Difficult
-
Total Repair Time:15 - 30 mins
-
Tools:Nutdriver, Pliers
184 of 220 people
found this instruction helpful.
Was this instruction helpful to you?
Thank you for voting!
noisy fan motor
rmv panel (5min) rmv fan/motor 3 screws (10 m) cut wire 2in from motor, re route remainder of wire to front so can strip for wire nuts. ( 10m) attach old fan to new motor, place in old opening ,3 screws, a little fussy to align, ( 15m ) route and strip wire from new motor , zip ties work well, wire nuts , plug in fridge vola, no noise, c
... Read more
lose up, reverse panel. ( 20m). i also took time to clean grilles with small vac and damp rag, ( looks and sounds like new) bob Wi.
Read less
Parts Used:
-
robert from nashotah, WI
-
Difficulty Level:A Bit Difficult
-
Total Repair Time:30 - 60 mins
-
Tools:Nutdriver, Socket set
38 of 46 people
found this instruction helpful.
Was this instruction helpful to you?
Thank you for voting!
Washer made excessive noise during spin
This repair involved basically completely disassembling the washer. I found a reasonably usable set of step-by-step directions that got me most of the way through the process. Where there were gaps or steps missing, I was able to improvise.
The problem with my washer was that the bearings for the inner tub were shot. The only ... Read more way to repair this problem is by replacing the rear outer tub. This is because the bearings and the water seal are pressed in place on the rear outer tub assembly and cannot be removed and replaced separately. It makes for a very expensive part.
Here are the steps I found elsewhere on the PartSelect forum:
*******************************
Remove the washer top.
Disconnect the touch pad/led assembly ribbon connector from the left side of the central control unit and release if from the wiring harness brackets on the right side of the washer top.
Remove the detergent dispenser drawer by pressing down on the release tab at the back of the drawer and pulling it completely out to the washer.
Once the drawer is removed, remove the screw in the recessed hole next to the drawer opening.
Release the tab securing the right side of the console to the washer and remove the console. Be sure the ribbon cable clears the cabinet frame.
Removing the washer front panel will require that the door switch be removed and the boot be separated completely from the front panel opening.
Access to the door switch requires that the water seal boot be removed from the front of the washer.
Use a flat bladed screwdriver at the location of the retainer spring and pull the retainer forward and then off the perimeter of the boot.
Ease the edge of the boot off of the lip of the washer front.
The door switch is secured to the washer front panel with three screws. Once these screws are removed, the door switch will remain in place until it is lifted slightly and pulled back from the washer front panel.
Remove the two screws securing the bottom of the front panel to the washer, and the two screws securing the top of the front panel to the washer.
Remove th detergent dispenser assembly.
Separate the water inlet and window washer tube from the boot.
Pull the water inlet tube from the outlet connector of the detergent dispenser.
When reinstalling the water inlet tube, wet the water inlet gasket on the detergent dispenser with water only. Do Not Use any other lubricant.
Remove the screw securing the front of the detergent dispenser assemble to the top front frame.
Disconnect the vent tube from the detergent dispenser assembly.
Remove the screw securing the detergent dispenser assembly to the top left frame member.
Slide the assembly back sightly and lift the assembly out.
To remove the detergent dispenser motor assembly, disconnect the cam follower spring and lift the cam follower from the diverter locate the diverter cam clockwise to access the motor mounting screws.
Disconnect the wiring harness from the heating element.
There are three concrete weights attached to the tub assembly. All three must be removed for safe removal of the tub assembly.
Access to the weight on the top front of the tub requires removing the six screws securing the top front frame member from the washer and removing the frame member.
Access to the weight on the top back of the tub requires removing the two screws securing the upper transport brace to the washer and removing the brace.
Each weight is secured to the tub by three bolts.
Remove the three bolts and lift the weight from the tub.
Remove the flat nuts from the tub for safekeeping.
At the back of the tub assembly, remove the belt.
To remove the pulley from the basket, Place the handle of a crescent wrench through the pulley and into the steel bearing hub to keep the pulley from turning.
Use a socket wrench to remove the nut securing the pulley to the basket.
Disconnect the ground wire from the bearing hub.
Remove the screw securing the left end of the pressure tube connector tot
Read less
Parts Used:

-
Dan from Collinsville, OK
-
Difficulty Level:A Bit Difficult
-
Total Repair Time:More than 2 hours
-
Tools:Pliers, Screw drivers, Socket set
30 of 41 people
found this instruction helpful.
Was this instruction helpful to you?
Thank you for voting!