Your coupon for will be reflected when you check out!
✖
Your coupon for
✖
Hello!
You're visiting the PartSelect site in U.S.
Would you like to shop on the Canadian site?
Stay on this site
Go to Canadian site
✖
Model Number Locations
1Select Category Type
Select Category Type
2Select Product Type
Select Product Type
3Select {MODEL} Type
Select {MODEL} Type
Sample Model Number Tags
Model numbers can be made up of numbers (1005400, for example) or a combination of letters and numbers (LAT1000AAE). The model number will most likely appear on either a paper sticker or a metal plate. Your appliance's model number tag may look similar to the sample model number tags shown here (model number highlighted in yellow):
Model has been saved to My Models. If you're not signed in, your lists are available on this device and will expire within 30 days.
Model has been saved to My Models.
This an authentic OEM 40-Watt replacement light bulb, used in a number of household appliances. It is specially designed to withstand extreme temperatures, which is why these replacement bulbs are mos...
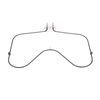
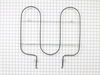
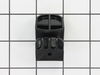
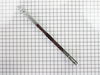
This bake element is located at the bottom of the oven to supply heat and it has push-on terminals. If your baking element is burnt out, the heat is not consistent, or is defective, then replacing the...
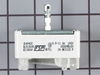
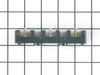
This surface burner element switch is for an 8-inch surface burner on an oven, stove, or range. The element switch controls the heat of the surface burner. Disconnect power to your range before comple...
The standard y-frame surface burner provides heat to your range. If you notice that your element will not heat, you may need to replace your surface burner. This product is 6 inches in diameter, and 1...
This is a multi-use and multi-appliance screw. It can be used on a microwave, refrigerator, range/oven, air conditioner, dehumidifier, washer, or dryer. The measurements of this screw are 8 x 1/2 inch...
This OEM replacement rear drawer glide supports the storage drawer on your range, and allows the drawer to open and close with ease. If your storage drawer will not open or close, or catches and stick...
This is a surface element for the stove top on your range. It supplies heat to the top of the range cooking area. This model is 2100 watts and is eight inches in diameter. It has looped terminal ends,...
This oven rack is a piece for your range. The oven rack is sold individually and is silver in color. The function of this part is to provide a balanced and flat surface for your cookware to sit inside...
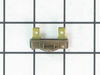
Sold individually. Lock washers are used with screws when vibration from an appliance may cause the screw to loosen. Lock washers are also used in the electrical components of an appliance to ensure ...
This touch-up paint can be used on a wide variety of household appliances. It is most often used on washers, dryer, refrigerators, dishwashers, ranges, freezers, trash compactors, or microwaves. It is...
$11.77
In Stock
Order now and your part arrives by Apr 6
Questions And Answers for RF385PXEW0
Ask our experts a question about this model and we'll get back to you as soon as possible!
1 question answered by our experts.
Sort by:
< Prev
1
Next >
Search filter:
Clear Filter
Your search term must have 3 or more characters.
Keep searches simple. Use keywords, e.g. "leaking", "pump", "broken" or "fit".
Sorry, we couldn't find any existing answers that matched.Try using some different or simpler keywords, or submit your new question by using the "Ask a Question" button above!
Stacey
February 1, 2025
Have error code E0 F5
Oven door locked and won’t release. Have unplugged the stove and still have the same issue
For model number RF385PXEW0
Hi Stacey, thank you for reaching out. The F5 E0 error code indicates that there may be a problem with the door latch assembly, the door switch, or the associated wiring. We would suggest checking the door latch, part number PS11747307. You may need to replace it to fix the issue. We hope this sorts out your problem!
first I pulled the stove from the wall. Then unplugged the stove from the wall (electric stove) for safety. then I removed the middle back panel screws(2) and then the panel. I then pulled the wires off the heating element that was bad. I took the screws (2) off the heating element inside the oven. I had to use WD-40 to loosen the sc
... Read morerews because with the heat they were really stuck. I removed the heating element and replaced it with the one I got through partselect.com. Put everything back and walla finished. Partselect.com sent me the right part at the right price and fast. No hassles at all.
I numbered every part. ex: 1 L., for first part removed left side. I used a magic marker to circle the holes and wrote the number of screws used on the part, set the srews in a separete place, so that I new where these screws went to. The cleanup was pretty time consuming, but I was able to keep my stove, when every repairman I called to
... Read more fix my stove told me I was better off buying a new stove. ($600.00 stove 2 years old)Please Note: The insulation blanket needed for the entire stove is two pieces, the sides and top are one part # and the bottom and back, are another part #. I did not know this. I just purchased the top and sides. I got lucky, the back and bottom were still in good shape. So I guess I should have read the description of the part more carefully to see what it covers, before I ordered it. It took two people two hours to do the work, it was really nice to have an extra set of eyes, to remember what direction pieces of metal from the stove went. I would do it all over in a heart beat instead of buying a new stove.
removed the screws holding the back metal panel, this exposed the wires to the switch. tested the wires to find that they were live when the switch was in the off position. ordered a new switch. UNPLUGED THE STOVE. removed the knob on the front of the stove. this exposed 2 screws, removed screws and the switch came away from the stove. re
... Read moremoved each wire from the old switch and replaced them in the same position on the new switch. inserted new switch into the stove and attached the 2 screws. replaced back panel and pluged in stove. all tested well