Your coupon for will be reflected when you check out!
✖
Your coupon for
✖
Hello!
You're visiting the PartSelect site in U.S.
Would you like to shop on the Canadian site?
Stay on this site
Go to Canadian site
✖
Model Number Locations
1Select Category Type
Select Category Type
2Select Product Type
Select Product Type
3Select {MODEL} Type
Select {MODEL} Type
Sample Model Number Tags
Model numbers can be made up of numbers (1005400, for example) or a combination of letters and numbers (LAT1000AAE). The model number will most likely appear on either a paper sticker or a metal plate. Your appliance's model number tag may look similar to the sample model number tags shown here (model number highlighted in yellow):
Model has been saved to My Models. If you're not signed in, your lists are available on this device and will expire within 30 days.
Model has been saved to My Models.
This screw, known as a handle fixer, is used to keep the door handles on your refrigerator secure. This screw is a genuine OEM part that comes individually, and simply screws into place in your refrig...
This French door hinge is an authentic OEM part used in refrigerators. It is used to provide support and stability to the door allowing it to open and close smoothly. The hinge is vulnerable to wear a...
This a genuine OEM temperature sensor, designed for use with refrigerators, and is an individual part. This temperature sensor is responsible for detecting and adjusting the temperature in your refrig...
This is a 40W/120V ice maker assembly for your refrigerator. Ice maker assemblies are designed to continuously make ice cubes by supplying water through its valve, freezing it, and then ejecting the c...
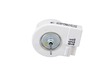
This is an evaporator fan motor for a wide range of Samsung refrigerators. Evaporator fans pull warm air through evaporator coils to cool and maintain the internal temperature of the refrigerator. If ...
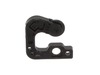
This Samsung auto-close lever assembly is an OEM replacement part made for use in Samsung refrigerators. It is a black lever mechanism, measuring approximately 2 inches by 2 inches. When the fridge do...
This evaporator fan motor is sourced from the original manufacturer for use in refrigerators. It circulates cold air throughout the refrigerator compartment to maintain consistent cooling. If the evap...
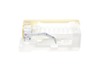
This sensor cover, also known as the ice maker thermostat cover, is a genuine OEM replacement part for Samsung refrigerators. It is made of durable white plastic and has measurements of approximately ...
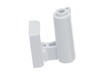
This is a power cord made for Samsung refrigerators. If your current power cord is damaged, broken, or no longer supplying power to your fridge, you can disconnect it from the wall outlet, strip it fr...
$79.80
In Stock
Order now and your part arrives by Apr 13
Questions And Answers for RF26HFENDBC
Be the first to ask our experts a question about this model!
✖
Ask a Question
Ask our experts a question on this model and we'll respond as soon as we can.
This is the Samsung French door refrigerator style that so many people have complained about freezing up and not cooling the top section. I first changed out the defrost thermostat and this did not correct the problem. I done a quick resistance check on the temp sensor that's mounted on the evaporator itself. The resistance would change w
... Read morehen holding an ice cube on the sensor so I just assumed it was ok. PLEASE TAKE NOTE: When performing a resistance check on this sensor, make sure your readings match the Samsung temp/resistance chart in their literature. My sensor was way off calibration and was causing the freeze up. Its working as designed now and DW is happy again. Learn from my mistake.
OPENED THE LEFT SIDE REFRIGERATOR DOOR WHERE THE DEFECTIVE MECHANISM WAS. GOT UP ON THE FIRST STEP OF THE STEP STOOL,REMOVED THE PHILLIPS HEAD RETAINING SCREW FROM THE BROKEN PART.PUT THE NEW CLOSING MECHANISM IN PLACE AND RE-INSTALLED THE PHILLIPS HEAD SCREW. STEPPED DOWN FROM THE STEP STOOL AND SHUT THE REFRIGERATOR DOOR.
Was incredibly easy. 1. Top front of fridge: remove cover, about 4 Philips Head screws, lift up and slide back, being careful of small wires (door position sensing magnetic switches). 2. We are working on the upper right door hinge: this was way too simple, there is a toggle lever that locks the upper bearing plate in position;
... Read more flip toggle up and remove, remove hinge. 3. lower right hinge: using the metric Allen Key, unscrew the fasteners on hinge plate (right tightly, lefty loosey) turn counter clockwise to remove screws. 4. There exists a small black thimble sized bushing on the old hinge that goes onto the new one. It didn't come with the lower right hinge but is a part the fits onto the pivot. If you need a new one, remember it doesn't come with the hinge. (check the door for it too, maybe it got stuck in there. Place the black bushing onto the new hinge pivot point; there is a slight flat in this part so you may need to rotate it before it will push on. 5. Mount new lower right hinge; using the metric Allen key, evenly screw in all screws, then put a final tightness (about the same torque effort to open a twist cap beer). 6. Now the door: make sure you placed the new upper hinge with arms reach on top of the fridge. Lift door, balance and bring it to the position slightly above where it will be in, lower it onto the lower right hinge pivot, allow the hinge to take the weight but hold the upper. 7. You are holding the door and need to place the upper right hinge into the door and also the mounting plate, this is easy and the door is not heavy. Once the upper hinge finds its location, you can put that metal toggle back on and swing down. It is not a tight fit, there is some wiggle room, that is normal. The plastic cover we removed in the first step, also prevents that latching toggle from being opened accidentally. 8. Put the plastic cover back, watch those small wires, screw torque is lightly, just screw them all back in but don't overly tighten. 9. The door is now back on! Are we finished yet? We'll I thought I was too but the door height wasn't quite right. I went online and learned that the lower right hinge, also has an adjustment. Open up the lower freezer door several inches. Using a philips head screwdriver, at the bottom facing up, there is a hole where you put the screwdriver, screw clockwise to raise door. This is basically pushing up on that black plastic bushing you put back on the new hinge.


 – Part Number: DA97-12574A")
