Your coupon for will be reflected when you check out!
✖
Your coupon for
✖
Hello!
You're visiting the PartSelect site in U.S.
Would you like to shop on the Canadian site?
Stay on this site
Go to Canadian site
✖
Model Number Locations
1Select Category Type
Select Category Type
2Select Product Type
Select Product Type
3Select {MODEL} Type
Select {MODEL} Type
Sample Model Number Tags
Model numbers can be made up of numbers (1005400, for example) or a combination of letters and numbers (LAT1000AAE). The model number will most likely appear on either a paper sticker or a metal plate. Your appliance's model number tag may look similar to the sample model number tags shown here (model number highlighted in yellow):
PYE22PSKBSS General Electric Refrigerator - Overview
Save your modelModel Saved!
Save your model for later to make things easier.
Model has been saved to My Models. If you're not signed in, your lists are available on this device and will expire within 30 days.
Model has been saved to My Models.
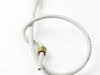
This sensor (Temperature Sensor, Thermistor, Refrigerator Temperature Sensor) sends the temperature reading of the compartment to the control board. If you notice your refrigerator is too warm, too co...
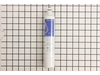
This NSF-certified water filter helps to improve the taste, quality, and health of your water by removing a number of contaminants including mercury, lead, and trace pharmaceuticals. The filter should...
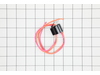
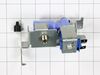
The interior light of your refrigerator is controlled by a switch that is activated when the door is opened and closed. If your refrigerator light will not turn on, there could be an issue with the sw...
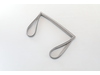
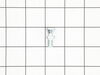
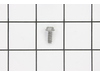
This is a door handle fastener to secure the handle to your refrigerator drawer. It is also known and a mounting bolt or screw. It is approximately 1 inch in total length, and is made of metal.
This gallon-sized refrigerator door shelf bin is a genuine OEM replacement designed for select General Electric (GE) models, including compatible units from Hotpoint and Café. Constructed from durable...
This OEM-compatible screw is designed for use with many GE dishwashers. Measuring 8-16 HXW and 1/2" in length, this stainless steel screw secures the middle spray arm hub to the upper rack assembly, e...
This OEM part is from GE and is designed for use in your refrigerator. This part is known as a door mounting screw, and is for mounting the handles of the refrigerator to the door studs.
Designed for use in the fresh food section of compatible refrigerators, this LED light and cover assembly offers reliable, energy-efficient lighting using advanced LED technology. The clear, impact-re...
This is the glass drawer cover insert for models of refrigerator. This glass pane is used as a shelf and cover that lays on top of the drawer below it. If this glass is missing or damaged in any way, ...
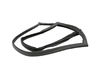
This is a door gasket for the freezer compartment of your refrigerator. Door gaskets are made of rubber and plastic and are designed to seal the cold interior of the freezer compartment from the ambie...
Need a reliable solution to improve your appliance's airflow? Meet the GE Dark Dorian Vent Grille. This part is more than just a vent grille; it's your key to getting your appliance running at peak pe...
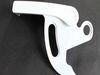
Improve the functionality of your refrigerator with this robust, GE Latch Icebox Door. Specifically designed for GE refrigerators, this essential component ensures secure closure and efficient perform...
$16.05
In Stock
Order now and your part arrives by Apr 9
Questions And Answers for PYE22PSKBSS
Ask our experts a question about this model and we'll get back to you as soon as possible!
2 questions answered by our experts.
Sort by:
< Prev
1
Next >
Search filter:
Clear Filter
Your search term must have 3 or more characters.
Keep searches simple. Use keywords, e.g. "leaking", "pump", "broken" or "fit".
Sorry, we couldn't find any existing answers that matched.Try using some different or simpler keywords, or submit your new question by using the "Ask a Question" button above!
George
June 14, 2023
How do I reset the replace the water filter light?
For model number PYE22PSKBSS
Hi George, thank you for asking. The water filter cartridge is located in the fresh food interior on the left side wall, near the top. It should be replaced every six months or earlier if 170 gallons of water has been dispensed or the flow of water to the dispenser or icemaker decreases. A filter indicator light will illuminate the screen when the water filter needs to be replaced. The filter status will automatically update when the filter is replaced. Glad to be of assistance!
Was this helpful?
Thank you for voting!
Eddie
February 19, 2026
PYE22PSKBSS. No water getting to icemaker or water dispenser. Water inlet valve is working and water is flowing to the door but no farther. Thoughts?
For model number PYE22PSKBSS
Hello Eddie, thank you for getting in touch. According to the issue description, the water line to the ice maker or the water dispenser could be blocked or frozen. Disconnect the coupler and press the dispenser. If water comes out of the valve side, but not the door side, the line at the door is definitely frozen. Use a hairdryer on low heat to carefully heat the door hinge area and the water dispenser line. Be careful not to overheat the plastic. Also check the freezer temperature, if the freezer is set too cold, it will cause the line to freeze repeatedly. We hope this helps.
Was this helpful?
Thank you for voting!
< Prev
1
Next >
✖
Ask a Question
Ask our experts a question on this model and we'll respond as soon as we can.
I went to a GE repair center to explain my problem, the service center reccomended that I have a techinician come out o look at it. $75.00 for the visit and what ever labor and materials wuld cost.
I went on line to see if there were others having this same problem and found that there were many with the same problem.
... Read more />After reading some of the ways that people found out what was wrong ...it became a matter of three components, the timer, heater or thermostat.
I tried the most common component and the less expensive one first , the thermostat switch I installed it very easily snipping two wires and attaching the news using wire nuts I used the diagram on this website to pinpoint the component and there has not been a problem since.
I applied some tips learned by reading other reviews. So before I started I grabbed my trusty vise grip pliers and a small screw driver. I locked onto the switch actuator, the part that the refrigerator door pushes in, with the vise grips and pulled on it just hard enough to get the screw driver inserted in the right side to push in the c
... Read moreatch clip so the switch could be pulled out further each time the catch clip was depressed to the next detent. Then I used the screw driver on the left site to encourage the switch past the detents on the left and very quickly the switch was out of the mount. The wires from the refrigerator pulled out with the old switch. I unplugged the old switch from the wires and plugged in the new switch and shoved the new switch back into the mount, wiggled it a couple of times to make sure it was secure and the job was done. Once I applied the vise gripes at first, the whole job took less than a minute.


 – Part Number: WR14X36194")