Your coupon for will be reflected when you check out!
✖
Your coupon for
✖
Hello!
You're visiting the PartSelect site in U.S.
Would you like to shop on the Canadian site?
Stay on this site
Go to Canadian site
✖
Model Number Locations
1Select Category Type
Select Category Type
2Select Product Type
Select Product Type
3Select {MODEL} Type
Select {MODEL} Type
Sample Model Number Tags
Model numbers can be made up of numbers (1005400, for example) or a combination of letters and numbers (LAT1000AAE). The model number will most likely appear on either a paper sticker or a metal plate. Your appliance's model number tag may look similar to the sample model number tags shown here (model number highlighted in yellow):
PVM1870SM1SS General Electric Microwave - Overview
Save your modelModel Saved!
Save your model for later to make things easier.
Model has been saved to My Models. If you're not signed in, your lists are available on this device and will expire within 30 days.
Model has been saved to My Models.
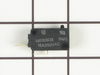
This ceramic microwave fuse is just over an inch in length. It is white in the center, and metal on both ends. This is a 20-amp fuse, and is used to power your microwave. If the touch pad on the micro...
The secondary door switch is a simple on/off mechanism that stops the microwave from operating when the door is open (normally opened). The switch monitors the door latch position, and communicates w...
The microwave glass light lens protects the light bulb inside the appliance. It is clear in color and measures approximately 6-1/2 inches long, and 2-1/2 inches wide. You may notice that this part is ...
Unplug your microwave before attempting this repair. You will need to remove the grill, which is held into place by two screws at the top of the grill (open your microwave door before doing this). Rem...
This stainless steel vent grille assembly is a precision-engineered component designed to mount above the microwave door, serving both functional and aesthetic purposes. It facilitates proper airflow ...
We're sorry, but our Q&A experts are temporarily unavailable.
Please check back later if you still haven't found the answer you need.
6 questions answered by our experts.
Sort by:
< Prev
1
2
Next >
Search filter:
Clear Filter
Your search term must have 3 or more characters.
Keep searches simple. Use keywords, e.g. "leaking", "pump", "broken" or "fit".
Sorry, we couldn't find any existing answers that matched.Try using some different or simpler keywords, or submit your new question by using the "Ask a Question" button above!
Renzo
March 9, 2020
The door handle is loose on the bottom, how do i get to tighten it??
thanks
For model number PVM1870SM1SS
Hi Renzo,
Thank you for your question. Here is some information that you may reference on how to tighten the door handle; Before you begin any repair please unplug the appliance from the electrical outlet. You will need to remove the plastic lining around the inside of the door. There are retainer clips holding the liner in place and you will need to use a putty knife to remove it. Depending on the type of microwave you have, you may have to come in from the bottom or from the top to remove the lining. Gently slide the putty knife in between the lining and the frame and go around the frame and gently pry it loose. On the hinge side you will need to come in from the backside to pry the lining off. If after you remove the lining you only see 2 screws, unthread them to see if the handle will come off. If it does not come off, you will have to remove the inside door panel in the same way you removed the lining. Once removed, unthread the remaining 2 screws and remove the old handle. Install the new door handle and reinstall both the inner door panel and the lining. Restore power to the microwave and everything should now work for you. We hope this helps. Thank you and have a great day.
1 person found this helpful.
Was this helpful?
Thank you for voting!
Nanette
December 5, 2024
After using the microwave to heat my food, when i opened the door the fan came on. I shut the door it goes off. I placed another dish in the microwave and it ran fine but when it was done and the door was opened the fan came on. 45 minutes later the same thing the fan still comes on. Is there anything I can do?
For model number PVM1870SM1SS
Hi Nanette,
Thank you for your question. If the cooling fan comes on when you open the microwave door, one of the 3 door switches is malfunctioning and you will need to test them for continuity with a multimeter on the Rx1 setting. When testing the switches, ensure the button is depressed and touch the terminals with the meter’s probes, you should receive a reading of zero or nearly zero, indicating that there is continuity. Next, with the probes still touching the terminals, ensure the button is not pushed in, this test should indicate that there is no continuity. If your test results differ from those above, you will need a replacement door interlock switch. We hope this helps!
The keypad isn’t responding to touch. Do I need a new keypad?
For model number PVM1870sm1ss
Hi Sean, thank you for reaching out. First, make sure the child lock feature is not activated. When the control panel is locked, CONTROL LOCKED or LOCKED will be displayed. To unlock the controls, press and hold the CLEAR/OFF for about three seconds. If this is not the issue, then you may need to replace the control panel and touchpad assembly, part number PS1993844, to fix the mentioned issue. We hope this helps.
Started micro for 1min cook time made a strange start up noise then shut in about 7-10 seconds. Checked power and circuit breaker all good to the plug.
For model number PVM1870SM1SS
Hello Frank, Thank you for the question. This sounds like the Fuse may have blown and will need to be tested or replaced, PartSelect Number PS1481237. We hope this helps!
The breaker shut down and turned the Microwave off I turned the breaker back on and although the microwave turns on it no longer heats up the food. So basically it simulates as if it’s working but it has no heat. Is it easier to just replace the microwave or is it an easy fix?
For model number PVM1870SM1SS
Hello Daniela, thank you for your query. We would recommend checking the following parts to fix the issue: fuse, part number PS1481237, diode, part number PS239740, thermal fuse, part number PS239811, and magnetron, part number PS1019593. We have attached a relevant link to help you check these parts. We hope this information helps!
Turned out the issue was easily solved by replacing a single, inexpensive fuse.
First off, UNPLUG THE MICROWAVE.
The fuse is located under the plastic grill at the top of the microwave. It's held on by two screws. Once you've removed the screws and taken off the plastic grill, you go to the right side of the mic
... Read morerowave and remove another screw that holds a small metal grill in place. Removing the small metal grill is probably the toughest part of this repair. You kind of have to rock it back and forth a bit to get it to release. Once that's off, you can get to the fuse. I removed the burnt out one with a pair of needle nose pliers. I also put a small piece of cardboard under the fuse when I did this so I didn't accidentally drop it into the innards of the microwave. I did the same thing when I replaced the new fuse. I then plugged the appliance back in and made sure it worked. Once that was confirmed, I replaced both grills.
Noted on partselect.com that someone else with this problem, found it to be secondary door switch. There are three door switches in this model, but online info noted that one of the three might feel "soft" (in my case, one switch clicked in a rather "jiggly" way, the other two were strong decisive clicks.) To access the door switches on
... Read more this model was the only difficult part. First use a torx bit to remove the two torx screws below the latches inside the microwave. This frees the latching part inside, that holds the door switches, which you will remove after you take off the control panel. The top grill has to come off before you can remove the door panel. Remove the screws above the grill, on the microwave top cover, The grill on this model is covered with a panel that moves out when it vents. After removing the two top screws, the covered grill vent slides left to remove. Be careful, as the sliding tabs are plastic. Wiggle and jiggle it, to slip it off. Below the removed grill, is a small metal grill with one screw in lower center. Remove that screw, and wiggle that out. You'll then see the one screw that holds on the control panel. Remove this screw, and lift the control panel up to remove. Again, go slowly and gently, as the bottom tabs holding the control panel in, are also plastic and easily broken. Lay the control panel on something, (I used the coffee maker) and pull out the wire bundles tucked on the left, that are attached to the latching panel. Wiggle the latching panel gently to lift it up off of it's plastic tabs and pull it out towards you, so you can see the three door switches. Each switch (part number WB24X829) has a little black switch on it. Feel each switch with either your finger, or a screwdriver to see which one doesn't "click" strongly. The weak one is the one you will replace. The door switches are fitted into a tab, and plugged into their wires. Remove the defective switch, pull out the wires, and replace it with the new switch, plugging back the wires, and slipping it back into it's plastic tabs. Then put everything back together in reverse order. The entire job took me fifteen minutes EXCEPT for figuring out how to slide off the upper grill, which I have told you. A repairman would have cost $150, the part was $18. AND, there's a good chance, the other two switches will get "used up" in the next year or so as well, so I'll be ready next time. Thank you, Partselect, why work all day, to make money, only to give it to somebody else, for fifteen minutes of work. All I needed was the knowledge.
This coupler has a tab on it that keeps you from being able to push it straight down onto the motor from the inside of the microwave. Turn off the breaker to the microwave or unplug it. Remove five screws that hold the bottom cover of the microwave. The cover will hinge down and hang on tabs at the back. Unplug the wire connec
... Read moretor on the drive motor by pulling it straight off. Remove one screw that locks the drive motor in place. Turn the motor slightly to unlatch it from its mounting tabs. Place the new coupler into the opening inside the microwave. While holding/turning the coupling with one hand, insert the motor shaft into the coupling. It will only fit one way. Press the motor and coupling together until the motor can be latched into its mounting tabs. Secure motor with screw and install bottom cover.