Your coupon for will be reflected when you check out!
✖
Your coupon for
✖
Hello!
You're visiting the PartSelect site in U.S.
Would you like to shop on the Canadian site?
Stay on this site
Go to Canadian site
✖
Model Number Locations
1Select Category Type
Select Category Type
2Select Product Type
Select Product Type
3Select {MODEL} Type
Select {MODEL} Type
Sample Model Number Tags
Model numbers can be made up of numbers (1005400, for example) or a combination of letters and numbers (LAT1000AAE). The model number will most likely appear on either a paper sticker or a metal plate. Your appliance's model number tag may look similar to the sample model number tags shown here (model number highlighted in yellow):
Model has been saved to My Models. If you're not signed in, your lists are available on this device and will expire within 30 days.
Model has been saved to My Models.
This 40-Watt light bulb is sold individually.
It is specially designed to withstand extreme temperatures, so this bulb is compatible with a variety of appliance types including refrigerators, ranges,...
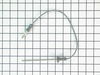
The function of the oven sensor is to detect the temperature within the oven cavity. If you notice that the oven is too hot or too cold, or it is not heating evenly, you may need to replace the oven s...
This part is the replacement oven bulb lens cover. It is made of glass and is approximately 3 inches in diameter. The lens cover is rigid and protects the oven light bulb from being damaged. The main ...
The light housing is also known as a lamp holder and is a part for the oven in your range. The function of this piece is to hold the bulb that will light up the inside of your oven. As per the manufac...
The GE Oven Door Window Pack Assembly is a genuine OEM part that fits select GE ranges and ovens. It includes a heat-resistant inner glass panel, frame, and seals, providing insulation and clear visib...
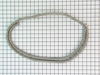
This oven door gasket is a high-performance seal made from heat-resistant rubber and fiberglass, designed to create an airtight barrier between the oven door and cavity. Measuring approximately 89.76 ...
This part is a replacement screw for your oven. It is made of black metal and is sold individually. This screw is approximately 1/4 inch in diameter and about 1/2 inch in length. It is designed to con...
Add efficiency to your cooking process with the GE Oven Rack. This high-quality accessory offers a stable surface for placing cookware inside your GE oven, allowing for optimal heat distribution and p...
Ask our experts a question about this model and we'll get back to you as soon as possible!
1 question answered by our experts.
Sort by:
< Prev
1
Next >
Search filter:
Clear Filter
Your search term must have 3 or more characters.
Keep searches simple. Use keywords, e.g. "leaking", "pump", "broken" or "fit".
Sorry, we couldn't find any existing answers that matched.Try using some different or simpler keywords, or submit your new question by using the "Ask a Question" button above!
Daniel
January 15, 2025
The heating element is staying warm hours after turning the one off. When disconnected from the electricity it cools down. The oven is 16 years old.
For model number PT956SM1SS
Hi Daniel, thank you for contacting us. We would suggest checking the oven temperature sensor, part number PS236398. Its function is to detect the temperature within the oven cavity. You may need to replace it to fix the issue. We hope this solves your problem!
I had to remove the oven from the wall because the sensor plug connction is behind the unit. Two screws hold the sensor inside the oven and then I disconnected the lead and pulled the sensor out from the front. I installed the new sensor, tightened the two screws holding it in and connected the lead. Then reinstalled the oven into the wal
... Read morel. Overall, a very easy repair once you get the oven out.
removed two phillips screws. Unplugged electrical connections replaced unit from PartSelect. They sent holder cover and new bulb (surprise). Great store with great directions.
Followed instructions and removed door. Loosened screws/bolts. Pulled the door apart. Removed the bracket that would hold the glass. Removed the broken glass and inserted the replacement glass. Re-assembled the door and reinstalled the door. Took all of 20 mins.


 – Part Number: WB48T10059")