Your coupon for will be reflected when you check out!
✖
Your coupon for
✖
Hello!
You're visiting the PartSelect site in U.S.
Would you like to shop on the Canadian site?
Stay on this site
Go to Canadian site
✖
Model Number Locations
1Select Category Type
Select Category Type
2Select Product Type
Select Product Type
3Select {MODEL} Type
Select {MODEL} Type
Sample Model Number Tags
Model numbers can be made up of numbers (1005400, for example) or a combination of letters and numbers (LAT1000AAE). The model number will most likely appear on either a paper sticker or a metal plate. Your appliance's model number tag may look similar to the sample model number tags shown here (model number highlighted in yellow):
PT7800SH9SS General Electric Microwave Oven Combo - Overview
Save your modelModel Saved!
Save your model for later to make things easier.
Model has been saved to My Models. If you're not signed in, your lists are available on this device and will expire within 30 days.
Model has been saved to My Models.
This ceramic microwave fuse is just over an inch in length. It is white in the center, and metal on both ends. This is a 20-amp fuse, and is used to power your microwave. If the touch pad on the micro...
This oven window pack assembly includes a heat-resistant glass pane and its surrounding frame, designed to restore visibility, safety, and energy efficiency to your appliance. Positioned in the oven d...
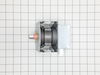
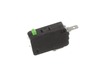
This switch monitor interlock is a critical safety component designed to ensure proper communication between the microwave door latch and the control board. When functioning correctly, it confirms tha...
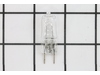
This halogen light bulb is a genuine OEM component designed for top-mounted lighting in wall ovens and ranges. Operating at 120 volts and 40 watts, it emits a clear, warm white light (approximately 27...
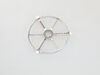
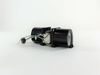
This glass tray support ring, also known as a rotating ring, is specially designed for microwaves. It is a genuine OEM part that is guaranteed to fit just like the original part. The support ring is f...
This part is a replacement screw for your oven. It is made of black metal and is sold individually. This screw is approximately 1/4 inch in diameter and about 1/2 inch in length. It is designed to con...
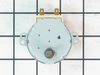
This oven temperature sensor assembly is a precision component designed to monitor and regulate the internal temperature of select wall ovens, ranges, and microwave-oven combinations. It continuously ...
$35.23
In Stock
Order now and your part arrives by Jun 27
Questions And Answers for PT7800SH9SS
Ask our experts a question about this model and we'll get back to you as soon as possible!
2 questions answered by our experts.
Sort by:
< Prev
1
Next >
Search filter:
Clear Filter
Your search term must have 3 or more characters.
Keep searches simple. Use keywords, e.g. "leaking", "pump", "broken" or "fit".
Sorry, we couldn't find any existing answers that matched.Try using some different or simpler keywords, or submit your new question by using the "Ask a Question" button above!
Rick
January 26, 2024
Looking for handle with Profile name on the microwave oven of model PT7800SH9SS.
For model number PT7800SH9SS
Hi Rick, thank you for reaching out. The door handle with the profile badge for your model is part number PS16618514. Glad to be of assistance!
In the "regular" oven (lower section -- not the microwave), can I order a new bottom piece? Ours is damaged by aluminum foil getting stuck to it and we are not able to clean/remove the melted foil.
For model number PT7800SH9SS
Hello Susan, thank you for reaching out. The bottom air duct cover you are looking for is part number PS16742667. If you need help placing an order, customer service is open 7 days a week!
Turned out the issue was easily solved by replacing a single, inexpensive fuse.
First off, UNPLUG THE MICROWAVE.
The fuse is located under the plastic grill at the top of the microwave. It's held on by two screws. Once you've removed the screws and taken off the plastic grill, you go to the right side of the mic
... Read morerowave and remove another screw that holds a small metal grill in place. Removing the small metal grill is probably the toughest part of this repair. You kind of have to rock it back and forth a bit to get it to release. Once that's off, you can get to the fuse. I removed the burnt out one with a pair of needle nose pliers. I also put a small piece of cardboard under the fuse when I did this so I didn't accidentally drop it into the innards of the microwave. I did the same thing when I replaced the new fuse. I then plugged the appliance back in and made sure it worked. Once that was confirmed, I replaced both grills.
First I disconnected the power and opened the door. Then I removed the top screws holding the top vent louvers, then removed the screw at the top of the touch pad. The touch pad removes by sliding up slightly then tilting top out. I unscrewed two screws holding the door latch assembly. Press the tab to remove and replace switch. Reco
... Read morennect wires, reseat latch mount by placing top bracket tab in place first, allign and secure with screws. Reseat touch pad by placing bottom tabs in first, tilt forward and press up to seat top tabs, secure with top screw. Secure vent louver screws, plug in and watch your microwave work again.