Your coupon for will be reflected when you check out!
✖
Your coupon for
✖
Hello!
You're visiting the PartSelect site in U.S.
Would you like to shop on the Canadian site?
Stay on this site
Go to Canadian site
✖
Model Number Locations
1Select Category Type
Select Category Type
2Select Product Type
Select Product Type
3Select {MODEL} Type
Select {MODEL} Type
Sample Model Number Tags
Model numbers can be made up of numbers (1005400, for example) or a combination of letters and numbers (LAT1000AAE). The model number will most likely appear on either a paper sticker or a metal plate. Your appliance's model number tag may look similar to the sample model number tags shown here (model number highlighted in yellow):
Model has been saved to My Models. If you're not signed in, your lists are available on this device and will expire within 30 days.
Model has been saved to My Models.
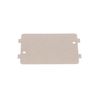
This waveguide cover protects the microwave’s internal components by shielding the magnetron from moisture, grease, and food splatters, helping prevent sparking and ensuring efficient heating. Made fr...
Discover the GE Microwave Turntable Tray designed to help make your meal preparation simple and efficient. This genuine GE product, superbly crafted and sturdily built, ensures a uniform heat distribu...
Discover the perfect balance of functionality and efficiency with the GE Roller Guide Ring. Designed to support your microwave's turntable tray, this product ensures convenient rotation for even heati...
Ask our experts a question about this model and we'll get back to you as soon as possible!
1 question answered by our experts.
Sort by:
< Prev
1
Next >
Search filter:
Clear Filter
Your search term must have 3 or more characters.
Keep searches simple. Use keywords, e.g. "leaking", "pump", "broken" or "fit".
Sorry, we couldn't find any existing answers that matched.Try using some different or simpler keywords, or submit your new question by using the "Ask a Question" button above!
Larry
January 7, 2022
Everything works but won't heat food
For model number PEM31EF1ES
Hello Larry, thank you for writing. Our recommendation is to check the H.V.DIODE PartSelect Number PS12342226. The diode allows the current to go through the system to create heat. We hope this helps.
Slide a Butter knife at left side by open push knob door will open. Then open all screws from top cover push cover top side front way then door locks Bracket have 3 microswitch pulls out switches mark them top medium and bottom. Remove 3 screws holding brackets will come out. On bottom see a Cam has 1/4” holes can holding Saft broken then
... Read more install new door lock bracket install microswitch put 3screw and slide Cam on saft . I put a small screw on saft to hold cam on place. There was no screw . That’s why cam saft was broke. Put top cover tight all the screws and door lock fixed.
I used small wire cutter I use in fly tying hobby. The metal was easy to cut. When cover was removed I unplugged the motor,removed it and plugged the new one in. To replace the cover -- reverse it,place the 2 tabs on one edge into the slots that are already part of the base. On the opposite edge there is a domed shaped tab with a h
... Read moreole in center. Place the small screw that was provided back in and thighten. Your Done