Your coupon for will be reflected when you check out!
✖
Your coupon for
✖
Hello!
You're visiting the PartSelect site in U.S.
Would you like to shop on the Canadian site?
Stay on this site
Go to Canadian site
✖
Model Number Locations
1Select Category Type
Select Category Type
2Select Product Type
Select Product Type
3Select {MODEL} Type
Select {MODEL} Type
Sample Model Number Tags
Model numbers can be made up of numbers (1005400, for example) or a combination of letters and numbers (LAT1000AAE). The model number will most likely appear on either a paper sticker or a metal plate. Your appliance's model number tag may look similar to the sample model number tags shown here (model number highlighted in yellow):
Model has been saved to My Models. If you're not signed in, your lists are available on this device and will expire within 30 days.
Model has been saved to My Models.
The rubber bumper sits between the burner and the range itself to ensure the burners do not scrape the stove top. This OEM replacement bumper is sourced directly from the manufacturer, and is sold individually.
We understand how difficult it can be when your washer isn't performing like it used to. That's why we want to introduce you to this genuine Whirlpool CNTRL-ELEC appliance part. This isn't just a part...
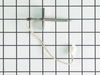
Removed oven from cabinet. unblug old sensor pluged in new and reinstalled oven. Esay repair though wish oven was designed so did not have to pull itout of cabinet which requires disconect electric cabel
I downloaded the installaion manual from the web for this model. First htings first, I located the circuit breaker for the oven and turned it off. Removed the lower trim piece from the bottom, next lifted the oven door off its hinges and set it to the side. I then wrapped a couple of small towels around the hinges for the door as per
... Read morethe manual (the hinges can pinch a finger). I then removed the four screws which secured the oven into the cabinet. Next I slid the oven forward allowing me access to the rear. I removed the pieces from the rear to gain access to the sensors connector, and unpl;ugged the sensor. Went around to the front and unscrewed the 2 screws securing the sensor and removed it. I then installed the new sensor, replaced the rear covers, slid the oven back into the cabinet, secured the four screws, snapped on the lower trim, remounted the oven door, and turned the breaker on. Oven working fine now.