


NTW5200TQ0 Amana Washer - Overview
Sections of the NTW5200TQ0
[Viewing 8 of 8]


 Diagram and Parts List for Amana Washer")


Keep searches simple, eg. "belt" or "pump".

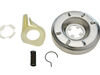
Direct Drive Motor Coupling
PartSelect #: PS1485646
Manufacturer #: 285753A
This direct drive motor coupling (Direct Drive Washer Motor Coupling, Motor Coupling, Washer Motor Coupling, Coupling Kit) provides a cushioned connection between the transmission and the motor shaft....
$21.45
In Stock

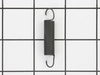
Suspension Spring
PartSelect #: PS11743345
Manufacturer #: WP63907
The suspension spring supports the outer tub and keeps the tub steady during loads that could cause an unbalance. If this part breaks, is worn down or has stretched out and lost its spring, it could c...
$9.62
In Stock

Washer Clutch Assembly
PartSelect #: PS334641
Manufacturer #: 285785
A clutch assembly (Clutch, Washer Clutch) is found in your washing machine and is responsible for spinning the basket during the spin cycle. The clutch lining can wear over time. If the clutch lining ...
$38.96
In Stock

Agitator Bolt
PartSelect #: PS11741866
Manufacturer #: WP358237
This kit contains one screw with rubber gasket and threaded sealant. The screw head is 7/16".
$6.40
In Stock

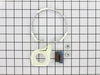
Washer Lid Switch
PartSelect #: PS11745957
Manufacturer #: WP8318084
This part is found in your washer. The pin on the lid pushes on the lever of the lid switch to tell the machine that the lid is closed. This part includes the green grounding wire. If your machine is ...
$35.80
In Stock

Dryer Screw
PartSelect #: PS11746840
Manufacturer #: WP90767
This screw is sold individually.
$7.47
In Stock

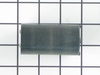
Tub Wear Pads - Package of 3
PartSelect #: PS334620
Manufacturer #: 285744
This package of pads contains three tub wear pads.
$13.92
In Stock

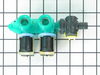
Washer Hose Clamp
PartSelect #: PS11743008
Manufacturer #: WP596669
This hose clamp is used in a wide variety of household appliances. Most often it is found in washers, dishwashers, refrigerators, freezers, dehumidifiers, garbage disposals, or air conditioners. This ...
$7.47
In Stock

Centerpost Gasket
PartSelect #: PS11723081
Manufacturer #: W10814296
This part may also be referred to as a main outer tub seal. This part prevents leaking from the bottom of the tub. The gasket is approximately 2 inches in diameter to the outer edge, black in color, a...
$7.47
In Stock

Leveling Spring
PartSelect #: PS394983
Manufacturer #: 8316845
This spring is used on the leveling components in a washer. Please note, this spring may differ in appearance, but functions the same as original.
$9.62
In Stock

Washer Front Leveling Foot
PartSelect #: PS11747965
Manufacturer #: WPW10001130
The front facing foot is sold individually. It is used on your washing machine and can also be known as an adjustable leveling leg. This specific front facing leveling leg has a rubber foot. It is imp...
$6.40
In Stock

Washer Washer
PartSelect #: PS11742027
Manufacturer #: WP3949550
This part goes on the agitator retaining bolt.
$12.85
In Stock
Manuals & Care Guides for NTW5200TQ0
Click to downloadQuestions And Answers for NTW5200TQ0
We're sorry, but our Q&A experts are temporarily unavailable.
Please check back later if you still haven't found the answer you need.
Common Symptoms of the NTW5200TQ0
[Viewing 17 of 17]Will not agitate
Fixed by
these parts
these parts


Show All
Leaking
Fixed by
these parts
these parts


Show All
Spins slowly
Fixed by
these parts
these parts
Show All
Will Not Start
Fixed by
these parts
these parts
Show All
Spinning Issues
Fixed by
these parts
these parts
Show All
Will not drain
Fixed by
these parts
these parts
Show All
Burning smell
Fixed by
these parts
these parts

Show All
Shaking and Moving
Fixed by
these parts
these parts


Show All
Cycle Not Advancing
Fixed by
these parts
these parts
Show All
Lid or door won’t close
Fixed by
these parts
these parts

Show All
No hot or cold water
Fixed by
these parts
these parts
Show All
Marks left on clothes
Fixed by
these parts
these parts
Show All
Noisy and Marks Left on Clothes
Fixed by
these parts
these parts
Show All
Timer Not Working
Fixed by
these parts
these parts
Show All
Noisy
Fixed by
these parts
these parts
Show All
Touchpad does not respond
Fixed by
these parts
these parts
Show All
Draining Issues
Fixed by
these parts
these parts
Show All


Keep searches simple. Use keywords, e.g. "leaking", "pump", "broken" or "fit".
No movement from Basket & agitator
The job looked intimidating but turned out to be very easy.
First take off the water pump by removing the two clips that hold it in place. Place a shallow pan under the pump to catch the water that is in the pump and hoses. Open the hose clamps with a pair of pliers or channel locks (better) and slide the hoses off of the water pum ... Read more p.
The motor comes off next. Unplug the electrical connector from the motor and two wires from the capacitor. Remove the two screws holding the clamps in place and then pop off the two clamps. You will need to hold up the motor with one hand while you remove the clamps or it will fall to the floor once the clamps are removed.
One piece of the coupling assemble will be attached to the motor and the other will be attached to the gearcase drive shaft. If you want to clean up the mess created by the shredded rubber center piece of the coupling assembly you will have to take off the motor mounting plate. It is held on by two bolts and removing it makes installing the coupling easier but probably not necessary.
Push the back half of the coupling on to the gearcase drive shaft until the shaft is flush with the face of the coupling. Install the new rubber center piece on to the coupling then re-install the motor mounting plate. Install the other half of the coupling on to the motor shaft and lift the motor up to the coupling. You have to rotate the motor shaft by spinning the fan blades until the coupling lines up so you can slide it into the other half of the coupling. Then just reattach the motor, connectors and water pump in the reverse order of disassembly.
Read less
Parts Used:
-
Jeff from Wayne, NJ
-
Difficulty Level:Easy
-
Total Repair Time:30 - 60 mins
-
Tools:Pliers, Screw drivers, Socket set
1121 of 1223 people
found this instruction helpful.
Was this instruction helpful to you?
Thank you for voting!
spin cycle did not engage
researched potential causes, found cluch dust under the washer and determined that it wouldn't engage because clutch was too worn. ordered the assembly, removed agitator from inside the tub as it is connected to the gear shaft, turned washer on it's back for access to motor, unattached the direct drive water pump from the motor drive, unb
... Read more
olted the 3 gearcase mounting bolts and took the entire gearcase, shaft, motor, etc... together, out from under the washtub. the clutch slides off the gearshaft with a little fidgeting and the new assembly is easily installed where the previous was. put everything back together... then... spin spin! worked perfectly
Read less
Parts Used:
-
Andrew from SLC, UT
-
Difficulty Level:Easy
-
Total Repair Time:30 - 60 mins
-
Tools:Nutdriver, Pliers, Socket set
498 of 538 people
found this instruction helpful.
Was this instruction helpful to you?
Thank you for voting!
Washer wouldn't run
I removed the two screws on the back of the control panel. The control panel then flips back. The switch is on the left side. To remove the switch, I first detached the wire to the control panel and unscrewed the grounding wire. The new switch drops right in. I had a little trouble getting it in until I realized the washer lid had to
... Read more
be open. A little awkward but once it's in you can shut the lid and then I reattached the wire from the control panel and screwed in the grounding wire. Pretty easy. $20 for the part (with shipping) and 15 minutes. Way cheaper than a repairman.
Read less
Parts Used:
-
Clint from Kansas City, KS
-
Difficulty Level:Really Easy
-
Total Repair Time:Less than 15 mins
-
Tools:Screw drivers, Socket set
330 of 372 people
found this instruction helpful.
Was this instruction helpful to you?
Thank you for voting!