Your coupon for will be reflected when you check out!
✖
Your coupon for
✖
Hello!
You're visiting the PartSelect site in U.S.
Would you like to shop on the Canadian site?
Stay on this site
Go to Canadian site
✖
Model Number Locations
1Select Category Type
Select Category Type
2Select Product Type
Select Product Type
3Select {MODEL} Type
Select {MODEL} Type
Sample Model Number Tags
Model numbers can be made up of numbers (1005400, for example) or a combination of letters and numbers (LAT1000AAE). The model number will most likely appear on either a paper sticker or a metal plate. Your appliance's model number tag may look similar to the sample model number tags shown here (model number highlighted in yellow):
Model has been saved to My Models. If you're not signed in, your lists are available on this device and will expire within 30 days.
Model has been saved to My Models.
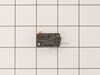
This door switch, also known as a safety switch, is a genuine OEM replacement part for microwaves. It is a safety mechanism that sends signals to the microwaves control system, telling it when the doo...
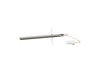
Featuring a bright, clear light, this genuine Samsung Halogen Bulb is ideal for illuminating the cooking area in your microwave for enhanced visibility. Designed with safety and quality in mind, it is...
This is a range temperature sensor, used to detect the interior temperature of your oven when it is baking or cooking. If you notice your oven is baking unevenly or at inconsistent temperatures, will ...
This is a high limit thermostat designed for microwaves, ranges and ovens. Made of plastic and metal, this thermostat is designed to open the electrical circuit for your appliance when it reaches a sp...
This rubber cushion is supplied by the original manufacturer and has a shaft approximately 1 inch long. The cushion acts as a layer of protection between the oven door and oven frame/cavity. It preven...
This manufacturer-approved screw is for refrigerators, including Kenmore refrigerator model. Avoid cross-threading refrigerator screw during installation.
Ensure an optimal cooking experience with the Samsung Humidity Sensor Control. This quality component maintains the perfect moisture level inside your microwave, contributing to consistently perfect m...
This terminal block assembly is designed for use within various models of ranges and is sold as an individual OEM part without any other hardware included. Terminal blocks are responsible for receivin...
This flange nut is designed for use within various cooking appliances like ranges, microwaves and wall ovens. Flange nuts are typically used to evenly distribute pressure across its application surfac...
$6.55
In Stock
Order now and your part arrives by Jun 28
Questions And Answers for NQ70T5511DG
Be the first to ask our experts a question about this model!
✖
Ask a Question
Ask our experts a question on this model and we'll respond as soon as we can.
The repair was very easy, however the bulb was not the same as the original one. The original bulb had a bright setting and a low setting, but the replacement bulb was only the low setting bulb. There was no bright and dim operation. The switch on the microwave had the duel settings.
My barely 4 year old Samsung range/oven began not heating consistently. Even though it said 350, for example, we had to increase to 465 to get it to bake. Thought it was the temperature sensor. Ordered and installed new one easily. That didn't solve the problem. So, rather than throw more money at parts that may not have resolved the
... Read moreissue, I got a new Amana range. Samsung appliances go to my 'do not buy' list along with LG!
ordered the temp sensor for a standard complaint, new sensor was the correct part ordered, however, once the old sensor was removed, I ohm'd the original and the new part. Both were 1080, checked wiring, checked gas burner, checked line voltage. Searched other part prices, found Samsung to be a not desirable product to own. This non repai
... Read morer was to help my neighbor who lives on a fixed income. Checked oven temp with the oven at 350 f setting, oven was 223 f. Set oven to 465 f and fount the oven at 353 f. I wanted to return the part but she insisted I install it anyway and found the oven doing the same thing. She did not want to throw more money at a 4 year old range. Will use it as it is but will buy a cheap oven temp gauge. Samsung sucks.


(0000) Samsung Microwave Oven Combo")