Your coupon for will be reflected when you check out!
✖
Your coupon for
✖
Hello!
You're visiting the PartSelect site in U.S.
Would you like to shop on the Canadian site?
Stay on this site
Go to Canadian site
✖
Model Number Locations
1Select Category Type
Select Category Type
2Select Product Type
Select Product Type
3Select {MODEL} Type
Select {MODEL} Type
Sample Model Number Tags
Model numbers can be made up of numbers (1005400, for example) or a combination of letters and numbers (LAT1000AAE). The model number will most likely appear on either a paper sticker or a metal plate. Your appliance's model number tag may look similar to the sample model number tags shown here (model number highlighted in yellow):
Model has been saved to My Models. If you're not signed in, your lists are available on this device and will expire within 30 days.
Model has been saved to My Models.
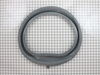
Also known as the door boot seal. This part includes the drain and plug. The seal is located around the door of the washer to prevent water from leaking.
This hose clamp is used in a wide variety of household appliances. Most often it is found in washers, dishwashers, refrigerators, freezers, dehumidifiers, garbage disposals, or air conditioners. This ...
The front facing foot is sold individually. It is used on your washing machine and can also be known as an adjustable leveling leg. This specific front facing leveling leg has a rubber foot. It is imp...
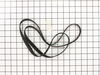
This kit contains a flat drive belt, two motor isolators, and an instructions sheet. The drive belt is made to slip on the pulley until the basket gets up the desired speed.
The hose clamp is used to hold the water hose in place which will prevent the hose from leaking water. Sometimes the clamp may lose its ability to latch on, causing a leaking washer. For the installat...
This water inlet valve attaches the water lines to the back of your appliance. The attaching solenoids on the valve open and close according to the desired temperature, or amount of water needed.
This inlet hose washer, also known as a high pressure inlet hose washer, is used in washing machines, refrigerators, freezers, and dishwashers. The function of this part is to create a watertight seal...
Ask our experts a question about this model and we'll get back to you as soon as possible!
2 questions answered by our experts.
Sort by:
< Prev
1
Next >
Search filter:
Clear Filter
Your search term must have 3 or more characters.
Keep searches simple. Use keywords, e.g. "leaking", "pump", "broken" or "fit".
Sorry, we couldn't find any existing answers that matched.Try using some different or simpler keywords, or submit your new question by using the "Ask a Question" button above!
Eric
January 18, 2020
Fabric softener doesnt dispense. Doesnt appear that water flows into the dispenser cup
For model number NAH6800AWW
Hello and thank you for writing.
It certainly sounds like it could be a faulty dispenser valve assembly PS2003446 and/or possibly a faulty water inlet valve PS11739466, you should check for signs of damage, and replace as necessary. We hope this helps. Please contact us anytime if you require further assistance.
Hi Terry, thank you for the question. Imbalance can be the cause. Make sure that your clothes are well distributed inside the washer. You may want to check the feet to see if there are all sitting properly on the floor or maybe the floor is crooked. If this does not help, we would recommend checking the belt, part number PS2003327. We hope this sorts out your problem!
My washer was leaking when i opened the front panel to check i found that the water was leaking from door boot which had gashes in it. the task was real easy. and took me 30 minutes to fix it, this was my first time repairing any appliance and i found real easy to do. here are the steps i took: 1. unscrew 2 door screws and the 2 sc
... Read morerews opposite to them on the other side (on right if you are facing the washer) 2. take door out by lifting it slightly and then pulling it out. 3. hold front panel from both sides and then push in and twist outward this willl diengage front panel from the hooks on side. 4. tilt front panel towards you about 40 deg. adn pull it up. 5. to take top out, first remove all 4 screws from soap dispenser and take the dispenser out (just pull up after unscrewing) 6. unscrew the electrical unit (where bulb is) in front top by taking out the 2 nuts Note: you must take out left most socket/coupler by pulling it before unscrewing the left nut that will give space for your wrench. 7. In the front corner the Top is bolted to side frame bars you will have to look under top corner and you will see 1 nut on each side, unscrew those nuts and the lift the top ( if you have enough space (about a foot) behind the washer the Top ca n actually go all the way back and rest on wall.) 8. from top view you will see a spring and metal wire system holding your boot, notice the spring position, spring has 2 hooks on each side, with needle nose pliers pull on the spring hook and have someone else disengage wire from spring hook. ( when it is time to put the wire back on the new boot just follow the same thing) 9. once wire is out take the boot out by pulling it from all directions. note: you may still have water in the washer system so before you take the boot out be ready with a bucket to catch it write under the boot plug. 10. your boot is still connected to washer withe the plug at the bottom. with help from needle plier press on clamp and pull plug out. note: if you see water flowing out from drain pipe (where the boot plug goes in try to keep it up to lwer the level of water that will stop the water flowing out (i took help from my 6 year old daughter for this job) now your old boot is out, trash it.:) 11. put the new boot the lip of drum and put the wire back on (again i enlisted my wife and my daughter to keep the wire in place, you cannot do it alone. with 3 of us putting wire was a breeze. put the spring back at the exact same place and with exact orientation. Note: when you start to put wire and new boot on washer drum lip make sure the tiny cuts/slots on the boot slip into the the notches on washer lip other you will have leak from these spaces. 12.now rest is all easy. attach the drain plug back on and then push the tabs of boot into the frontto secure it. 13. put all the thing that you took out in the same order all the way to door and you are ready to go NOTE: i did not front panel back on for couple of days to make sure there i no other leak and also to make sue that boot is not leaking.
The Neptune stacked washer/dryer maintenance manual was a must-have for this repair.
The washer's sound during spin cycle had changed over time from a jet-engine whine to a low rumble. Inspection from the rear revealed that the seals between the spinner and outer tub had failed, and the bearings had been damaged by water intru
... Read moresion. The bearings are not a replacement item. They are installed as part of the outer tub assembly, so the whole outer tub must be replaced. This requires almost complete disassembly of the washing machine.
The disassembly was relatively easy with the maintenance manual in hand. I had to use a gear puller to remove the pulley, though. I decided to replace not only the outer tub, but the spinner shaft as well since I believed the shaft may have been damaged when the bearings failed.
Reassembly was not so easy. I installed the outer tub, then wrestled with the heavy counterweights. The lower weight was particularly unwieldy, since I had support it from below while attaching it to the bottom of the tub. I finally used books of different thicknesses to hold the weight in place while locating the screw holes for attachment. The upper weight attached easily after I wrestled it into position. This is a concrete weight of about 25 lbs, I would guess.
The other problem was attaching the outer tub cover with the rubber boot attached. It is held by 12 clips, and it was difficult to seat the cover tight enough to attach the clips. I started at the bottom and worked around, instaling clips as I went. The last 4 clips were the hardest; I had to cinch up the cover with C-clamps before installing the clips.
The rest of the assembly was not difficult.
I had my wife help locate the new tub on the struts in the back and to help support the motor while I hung it on the outer tub. Otherwise, this is a one-man repair.
Total cost around $350, thanks to Partselect.com reasonable prices. I shopped around and they offered the best price snd excellent service.
First- I unplugged and completely drained machine of water by putting hose at ground level near drain . Second- removed back plate to washer saving all hardware. Third- disconnected in and out hose to pump. Twisted pump gently as to pop it out of slots in bottom of machine. Fourth- disconnected wires to old pump hooked to new pump
... Read morereplaced pump, replaced hoses- tested machine then replaced back plate of machine. Done.


.gif "SUPPLEMENTAL INFORMATION Diagram and Parts List for Amana Washer")