Your coupon for will be reflected when you check out!
✖
Your coupon for
✖
Hello!
You're visiting the PartSelect site in U.S.
Would you like to shop on the Canadian site?
Stay on this site
Go to Canadian site
✖
Model Number Locations
1Select Category Type
Select Category Type
2Select Product Type
Select Product Type
3Select {MODEL} Type
Select {MODEL} Type
Sample Model Number Tags
Model numbers can be made up of numbers (1005400, for example) or a combination of letters and numbers (LAT1000AAE). The model number will most likely appear on either a paper sticker or a metal plate. Your appliance's model number tag may look similar to the sample model number tags shown here (model number highlighted in yellow):
Model has been saved to My Models. If you're not signed in, your lists are available on this device and will expire within 30 days.
Model has been saved to My Models.
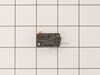
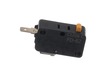
This door switch, also known as a safety switch, is a genuine OEM replacement part for microwaves. It is a safety mechanism that sends signals to the microwaves control system, telling it when the doo...
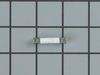
The rectifier (also known as a diode) provides the microwave with energy to cook food. If your appliance is not producing heat or not turning on it could be due to the breakdown of the rectifier. This...
Unscrewed the cover of the microwave replaced the blown fuse with the new fuse, plugged in the microwave and tested all functions and everything worked fine. Thx for quick delivery.
Found instruction on internet, 1. Remove anit-tampering screws with punch and hammer 2. Remove the rest of the screws 3. Removed cover 4. Remove burned out bulb and installed new one 5. INstalled cover 6. Installed screws including the anti tampering onces 7. Op tested unit. Wife is happy.
First I read through the customer comments, reviews, questions, etc. at Parts Select, which is always a good bet. Then I put "samsung microwave door switch replacement" into youtube and watched some videos. They don't even have to be for Samsung. From what I can tell, many of the appliance companies use the same design and the same jun
... Read morek parts, so watching a GE video is almost the same for example. Watch some videos to familiarize yourself with the steps. There are maybe six to disassemble and install the new part. I replaced all three switches. They are not expensive and to replace 3 is only 5% more work than to replace just one; you have to take the microwave apart in either case. UNPLUG THE MICROWAVE FROM THE WALL. Start taking it apart. I use my phone to take a picture of any thing I remove, unscrew or disconnect, especially wires, BEFORE I disconnect them. Thee pictures serve as a reference when I go to reconnect and reassemble. If I am uncertain then I check the picture. Good luck!


.gif "SUPPLEMENTAL INFORMATION Diagram and Parts List for Maytag Microwave")