


MS840BB Microwave - Overview
Models starting with MS840BB
Click on the best match to narrow your results.
Keep searches simple, eg. "belt" or "pump".

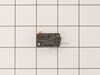
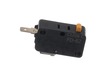
Micro Door Switch
PartSelect #: PS4131192
Manufacturer #: 3405-001034
This door switch, also known as a safety switch, is a genuine OEM replacement part for microwaves. It is a safety mechanism that sends signals to the microwaves control system, telling it when the doo...
$32.63
In Stock

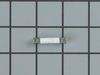
High-Voltage Diode
PartSelect #: PS4235633
Manufacturer #: DE91-70063D
This high-voltage diode is designed for use within various makes and models of microwaves and is a genuine OEM part that converts alternating current (AC) into direct current (DC). If you notice your ...
$33.69
In Stock

Microwave Light Bulb
PartSelect #: PS11745088
Manufacturer #: WP8183592
Sold individually.
$35.80
On Order


Rectifier
PartSelect #: PS11738693
Manufacturer #: WP13091701
The rectifier (also known as a diode) provides the microwave with energy to cook food. If your appliance is not producing heat or not turning on it could be due to the breakdown of the rectifier. This...
$18.56
In Stock


Common Symptoms of models starting with MS840BB
[Viewing 3 of 3]No heat
Fixed by
these parts
these parts


Show All
Doesn’t shut off
Fixed by
these parts
these parts
Show All
Won’t turn on
Fixed by
these parts
these parts
Show All

Keep searches simple. Use keywords, e.g. "leaking", "pump", "broken" or "fit".
Buzzing noise, no heating of food
Removed control panel, discharged HV capacitor. Removed old diode, tested to confirm failure. Replaced part. Other than the removal of the panel swapping the part was almost as easy as replacing a light bulb.
Parts Used:
-
Ted from Hudson, NH
-
Difficulty Level:Easy
-
Total Repair Time:30 - 60 mins
-
Tools:Pliers, Screw drivers
22 of 32 people
found this instruction helpful.
Was this instruction helpful to you?
Thank you for voting!
Blown Fuse - Ps1750182
Unscrewed the cover of the microwave replaced the blown fuse with the new fuse, plugged in the microwave and tested all functions and everything worked fine. Thx for quick delivery.
Parts Used:
-
John from Inverness, FL
-
Difficulty Level:Really Easy
-
Total Repair Time:Less than 15 mins
-
Tools:Screw drivers
12 of 14 people
found this instruction helpful.
Was this instruction helpful to you?
Thank you for voting!
Light bulb burned out.
Found instruction on internet,
1. Remove anit-tampering screws with punch and hammer
2. Remove the rest of the screws
3. Removed cover
4. Remove burned out bulb and installed new one
5. INstalled cover
6. Installed screws including the anti tampering onces
7. Op tested unit.
Wife is happy.
1. Remove anit-tampering screws with punch and hammer
2. Remove the rest of the screws
3. Removed cover
4. Remove burned out bulb and installed new one
5. INstalled cover
6. Installed screws including the anti tampering onces
7. Op tested unit.
Wife is happy.
Parts Used:
-
Stephen from Cottonwood, AZ
-
Difficulty Level:Easy
-
Total Repair Time:Less than 15 mins
-
Tools:Screw drivers
16 of 33 people
found this instruction helpful.
Was this instruction helpful to you?
Thank you for voting!