Your coupon for will be reflected when you check out!
✖
Your coupon for
✖
Hello!
You're visiting the PartSelect site in U.S.
Would you like to shop on the Canadian site?
Stay on this site
Go to Canadian site
✖
Model Number Locations
1Select Category Type
Select Category Type
2Select Product Type
Select Product Type
3Select {MODEL} Type
Select {MODEL} Type
Sample Model Number Tags
Model numbers can be made up of numbers (1005400, for example) or a combination of letters and numbers (LAT1000AAE). The model number will most likely appear on either a paper sticker or a metal plate. Your appliance's model number tag may look similar to the sample model number tags shown here (model number highlighted in yellow):
Model has been saved to My Models. If you're not signed in, your lists are available on this device and will expire within 30 days.
Model has been saved to My Models.
This is a single grease filter manufactured for a microwave. The microwave grease filter filters the exhaust air and traps any grease flowing out of the appliance. It is important to keep the filter c...
This is a light bulb and it is a part for your microwave. This bulb uses 30 watts, operates on 125 volts, and is an incandescent lamp. The function of this bulb is to illuminate the surface underneath...
This bracket holds the metal or plastic flapper that closes off the exhaust duct when the fan is not running and opens when the fan turns on. If the exhaust fan on your microwave does not appear to be...
This genuine LG Microwave Oven Mounting Bracket Plate is a crucial part for some microwave models. Designed to securely hold the microwave to the wall studs, it enables easy installation above the ran...
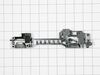
Discover the Locker Door Latch Housing Assembly, an important part for LG Microwaves. This useful item plays a key role in the operation of your microwave, ensuring the door latches safely and securel...
The inner door panel covers the screws that attach door handle to the microwave, the door panels must be separated to access the screws and replace the door handle.
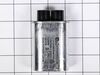
Discover the essential part for your LG microwave oven: the High Voltage Capacitor. This genuine OEM item from LG is specifically designed for certain models of microwave ovens. The high-quality capac...
$43.18
On Order
Questions And Answers for MR-1646KSL
Be the first to ask our experts a question about this model!
✖
Ask a Question
Ask our experts a question on this model and we'll respond as soon as we can.
I replaced the whole component with all three switches in it even though only one switch was bad . Taking out one switch out of the holder unit would probably have damaged the unit that was holding the switches. Easy install and it works great again .
diagnosed defective 'door-shut switch' in the switch holder assembly. rather than replace switch, replaced entire locker holder assembly which made for a very simple and easy repair...not to mention very inexpensive.
Not knowing which of the switches to replace I ordered all three in the assembly. Replacing the full assembly was easy, first unplug the microwave. Then remove the top cover to access the screws that hold the control panel in place and let the control panel hang. There are two screws that hold the assembly in place - remove those. I u
... Read moresed needle nose pliers to pull the wires off of the switches and immediately put the wires on to the new assembly so there was no confusion on what wire went where. Place the assembly back in position, replace the two screws to hold it in, put control panel in place and secure screws. Replace top cover and plug in.