Your coupon for will be reflected when you check out!
✖
Your coupon for
✖
Hello!
You're visiting the PartSelect site in U.S.
Would you like to shop on the Canadian site?
Stay on this site
Go to Canadian site
✖
Model Number Locations
1Select Category Type
Select Category Type
2Select Product Type
Select Product Type
3Select {MODEL} Type
Select {MODEL} Type
Sample Model Number Tags
Model numbers can be made up of numbers (1005400, for example) or a combination of letters and numbers (LAT1000AAE). The model number will most likely appear on either a paper sticker or a metal plate. Your appliance's model number tag may look similar to the sample model number tags shown here (model number highlighted in yellow):
Model has been saved to My Models. If you're not signed in, your lists are available on this device and will expire within 30 days.
Model has been saved to My Models.
This is a microwave air filter that is located on the bottom side of an over-the-range appliance. No tools are needed for this repair, simply pull back on the tab to lift the existing filter out, and ...
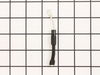
This part is the replacement halogen lamp for your range hood. The bulb is 35 watts and 130 volts. The halogen lamp lights up the area under the range hood so you can see the cooktop more effectively ...
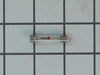
In your microwave, the diode allows current to flow one-way only, converting alternating current to direct current. If you notice that your microwave does not heat properly, you may need to replace th...
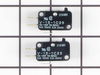
This part is a genuine manufacturer door interlock switch kit, also known as primary micro switch or microwave switch kit, for a microwave. The function of this part is to sense when the door of the m...
This is the replacement charcoal filter for your microwave. It is black in color and measures approximately 11 inches by 2 ½ inches. The charcoal filter removes cooking odors from the air that circul...
1. I went to the internet to find the service manual for the Maytag microwave. 2. I opened up the oven and started measuring the resistance of the diode, capacitor, transformer, and magnetron between terminals and then to ground. The transformer and magnetron were well within the resistance limits. The diode was shorted in both direc
... Read moretions(+-). The capacitor was fully open in both directions -- high resistance. 3. I ordered the 2 parts, installed them, and ran the oven. Worked perfect first time. 4. Reinstalled oven and worked ever since (1 week so far). 5. The secret was that the transformer had a load hum. I figured the transformer was OK. The magnetron had no short between filaments and ground to filaments. The only two left were the diode and capacitor. The first two are about $200 -- almost the value of a new microwave. The $70 repair was well worth it. If the first two were still bad, then tempted to buy a new oven.
Remove top grille (2 screws), undo control panel (1 screw). Tilt down control panel, switches are on the left. There are actually three switches that are involved with the door, two horizontally mounted, one vertically mounted. This would be an EASY REPAIR, but it took me a while to figure out which of the three switches was bad, and a
... Read morelso took a while to figure out that there is a plastic rod that inserts through the hole in the switch body. Once i figured this out went like a breeze. Lower horizontal switch was the bad one, but since the kit came with two switches i went ahead and replaced the upper horizontal one as well. IT appears that the horizontal switches are probably more likely to fail than the vertical switch based on the position of the switch and force angles. Works great now!
The repair went well...I am so glad that I read this info before buying a new microwave....it saved me lots of money. I did have a repair man come and look at it and he told me to buy a new one but it cost alot of money when it wasn't necessary. I did the repair and I was very proud of myself. Three men watched a woman fix this and
... Read moreit was no problem...they were impressed also....


.gif "SUPPLEMENTAL INFORMATION Diagram and Parts List for Maytag Microwave")