Your coupon for will be reflected when you check out!
✖
Your coupon for
✖
Hello!
You're visiting the PartSelect site in U.S.
Would you like to shop on the Canadian site?
Stay on this site
Go to Canadian site
✖
Model Number Locations
1Select Category Type
Select Category Type
2Select Product Type
Select Product Type
3Select {MODEL} Type
Select {MODEL} Type
Sample Model Number Tags
Model numbers can be made up of numbers (1005400, for example) or a combination of letters and numbers (LAT1000AAE). The model number will most likely appear on either a paper sticker or a metal plate. Your appliance's model number tag may look similar to the sample model number tags shown here (model number highlighted in yellow):
Model has been saved to My Models. If you're not signed in, your lists are available on this device and will expire within 30 days.
Model has been saved to My Models.
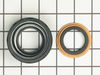
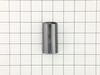
This rear drum bearing kit is designed for use with dryers. It supports the rear of the drum in your appliance as it tumbles your clothes during the drying cycle. If your drum will not tumble, or if i...
If your dryer does not tumble, will not start, is noisy, or is leaving marks on your clothing, you may need to replace the drum support bearing. The drum is supported at the rear by a bearing, which a...
This rubber V-style drive belt slips on the motor pulley to bring the basket to the required speed. If you notice a burning rubber smell or grinding noises coming from your washer, your washer does no...
The door catch on your dryer is an important part as it keeps your dryer door closed, in order to ensure no air or clothes can escape. This part works by holding the door strike, which allows the door...
This dryer lint screen is for laundry centers.
Dryer lint screen captures lint and debris from the exhaust air flowing from the dryer.
Follow the instructions in the owner's manual when installing this part.
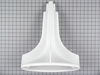
The front lower drum seal is used in the assembly of dryers. This seal helps keep your appliance running quietly. It allows the drum to smoothly rotate on the front panel. If you notice brown marks on...
The multi-rib drum belt is also known as a drive belt and is a part for your dryer. The function of the drum belt is to attach to the motor pulley. It will then spin the drum as the motor rotates. Ove...
This kit contains two coils, one is a two-wire secondary coil and the other is a three-wire booster coil. Both coils in the ignition coil kit should be used together in the clothes dryer. Some of the ...
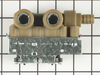
The water inlet valve has two ports for water to enter and controls the flow of water into a washing machine. Hot, cold, and warm water can easily enter the washer this way. If the water inlet valve i...
The door strike is attached to the door of your dryer and holds the door closed. If your dryer door is not closing, this might be due to the door strike needing to be replaced. This is a simple repair...
$30.53
In Stock
Order now and your part arrives by Apr 9
Questions And Answers for MLXG42RED2
Be the first to ask our experts a question about this model!
✖
Ask a Question
Ask our experts a question on this model and we'll respond as soon as we can.
1. Unplug dryer from outlet 2. Using Lg. flat screwdriver, pry under the front edge of the top and release two spring tabs 3. Lift up top and tilt back out of your way 4. Unscrew two phillips scews on inside of front panel 5. Lift up and out the front panel. Two spring clips at bottom. 6. Rlease tension on drum be
... Read morelt at the motor. Access panel at rear of dryer. 7.Unscrew 3 screws from inside, center rear of drum. 8. Remove drum through the front of the dryer. You may have to spread the sides apart a little bit for it to fit 9. Lift up on the rear drum bearing to remove it from the bearing retainer. ( U shaped plastic socket) 10. unsrew 2 screws and remove the bearing retainer, ground ball. Ball retainer is on outside of dryer. 11. Vacuum everything--duct, blower, lint trap, ect. 12. Intall new bearing retainer and grounding ball, an assistant is helpful at this time, one to hold ball retainer on rear of dryer, one to screw it in from the inside 13. reassemble remainder of parts in reverse order.
carefully pry up on front washer top to release plastic keeper pins,remove 2 phillips screws from beneath lower front washer panel,slightly lift upward on panel to release.remove old broken belt,push new belt beneath large tub pulley,put belt on small motor pulley,push back belt tension /idler arm,start belt on large tub pulley,turn tub p
... Read moreulley by hand to run belt on,release tension on idler arm.replace front panel and lower top.WALAAH!!!! you are done.
1) Unplugged washer and disconnected the hot and cold hoses. 2) removed the 2 phillips screws at the bottom of the front panel then removed front panel, you need enough clearance by the floor, this is tricky because you have to lean washer back and push down on the front panel. 3) removed the agitator from the washer 4) lif
... Read moreted top of washer and leaned back against the wall and removed the splash tub cover one clip at a time with a flat screw driver. 5) removed the trunion, this is difficult and will take some time due to the corrosion from many years of use use a hammer (3Lb short handle) and tap one side then the other. You will need to rock it back and forth awhile. 6) lift the basket out of splash tub 7) I removed the hose for water level and removed the 3 bolts that hold the splash tub to the three base mounts (support arms). 8) remove the splash tub 9)change the plastic washer that is between the splash tub and the transmission in the bottom of the splash tub 10) change the bearing(metal sleeve) on the bottom of splash tub and lightly grease w/ a thin film of teflon grease 11) install splash tub and install the 3 bolts along w/ the water level tube 12) install the larger seal (w/ spring in it) and push into the splash tub firmly 13) use some tub and faucet silicone grease on the smaller seal because you don't want to damage this main seal, install the main seal (sits on top of the larger one that's in the tub already) be careful when getting to flat part of the shaft when installing ( spin around the shaft as you pass this point) it will keep the seal from coming out. 14) install trunion (sits down on top of the seal) you will feel the tension of the spring when bolting the trunion back into place. 15) install basket and bolt it to the trunion (I installed a new filter on the bottom of the basket and required some special glue, ask for "3M" GMGA600 adhesive. 16) installed splash tub cover, agitator and front cover. Washer works great and is quieter than it was new.