Your coupon for will be reflected when you check out!
✖
Your coupon for
✖
Hello!
You're visiting the PartSelect site in U.S.
Would you like to shop on the Canadian site?
Stay on this site
Go to Canadian site
✖
Model Number Locations
1Select Category Type
Select Category Type
2Select Product Type
Select Product Type
3Select {MODEL} Type
Select {MODEL} Type
Sample Model Number Tags
Model numbers can be made up of numbers (1005400, for example) or a combination of letters and numbers (LAT1000AAE). The model number will most likely appear on either a paper sticker or a metal plate. Your appliance's model number tag may look similar to the sample model number tags shown here (model number highlighted in yellow):
Model has been saved to My Models. If you're not signed in, your lists are available on this device and will expire within 30 days.
Model has been saved to My Models.
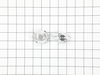
The Dryer Thermal Fuse (Thermal Cutoff, Temperature Fuse) is a 2 by ½ inch, white, plastic safety mechanism that stops the flow of electricity to the motor circuit when a dryer overheats. If the fuse ...
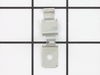
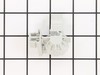
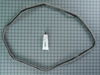
This part replaces your appliances latch (Door Latch Kit, Door Catch, Dryer Door Latch Kit). On your appliance you will find both a strike and a catch. The strike is mounted on the body of the dryer, ...
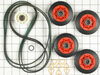
This Whirlpool Dryer Repair Kit is a convenient solution for fixing noise and drum movement problems in 27-inch dryers. Compatible with models from Whirlpool, Kenmore, Maytag, and more, the kit includ...
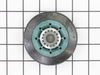
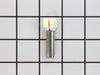
This drum support roller is sold individually. Most dryers require two. The tri-rings are included. This is a drum support roller for a dryer. It is a genuine replacement part. This part is sold separ...
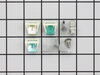
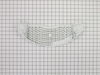
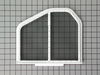
The filter collects lint during the drying cycle. This filter is 12 1/2 inches wide and 10 1/2 inches deep. Replacing the lint filter is an easy repair which requires no tools. When replacing the lint...
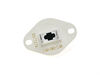
This dryer thermistor is a genuine replacement component designed to monitor and regulate internal temperature in Whirlpool dryers. Mounted on the blower housing, it plays a critical role in controlli...
If you notice that your dryer is noisy or will not tumble, you may need to replace the tri ring. This part is triangular, and is less than an inch in size. Tri rings can be found both on the idler pul...
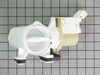
This is a manufacturer-approved replacement drain pump for your washing machine. To complete this repair you will need a 1/4 inch nut driver, 5/16ths nut driver, a flat blade screwdriver, and a pair o...
Also known as Thermal Cut-Off kit. The thermostat acts as a safety mechanism that keeps the dryer from overheating and the fuse is like a backup system - it's set to trip at a higher temperature than...
Used to help make the door stay closed. Sold individually.
$10.70
In Stock
Order now and your part arrives by Apr 20
Questions And Answers for MLE22PDAYW0
Ask our experts a question about this model and we'll get back to you as soon as possible!
3 questions answered by our experts.
Sort by:
< Prev
1
Next >
Search filter:
Clear Filter
Your search term must have 3 or more characters.
Keep searches simple. Use keywords, e.g. "leaking", "pump", "broken" or "fit".
Sorry, we couldn't find any existing answers that matched.Try using some different or simpler keywords, or submit your new question by using the "Ask a Question" button above!
Courtney
January 5, 2023
error code f 74 and f 26
For model number MLE22PDAYW0
Hello Courtney, thank you for your question. Error Code F26: Problem with the Door Switch PS11753513. F74 timer/main controller/CCU has failed. The Dryer Electronic Control Board PS11753940 and the Washer Motor Control Board PS11754008. We look forward to hearing from you.
Hello Jim, thank you for the great question. This indicates the washer or dryer is inoperative. Diagnostic codes displayed on the upper portion of the display belong to the dryer section, and diagnostic codes displayed on the lower portion of the display apply to the washer section. Diagnostic codes displayed on both the upper and lower portions of the display apply to the control systems of both the washer and dryer. You need to fix these errors to clear the screen. We hope this information helps!
Did this question help you?
Thank you for voting!
Jim
April 4, 2023
Why does the machine keep showing out of order with no error codes. I reset by cycling power but it only lasts for a day.
For model number MLE22PDAYW0
Hi Jim, Thank you for writing. We suggest putting the appliance into Diagnostic mode. The appliance needs to be plugged in and in stand by mode with all indicators off. Choose any one button on the console except Power, Start, or Stop. Press/Hold 3 Seconds - Release 3 Seconds - Press/Hold 3 Seconds - Release 3 Seconds - Press/Hold 3 Seconds. If the diagnostic test mode has been successfully entered, all of the indicator lights will glow for five seconds with 88 on the time display. If it didn't work try #2 again. If there are any saved fault codes they will be displayed. If there are no save fault codes all indicator lights will turn off for a moment then back on with 88 displayed and the automatic diagnostic test mode will begin in five seconds. If you are unable to enter the diagnostic test mode, press the power button and verify that the button you were trying to use operates properly to program the washer's cycle function. There may be something wrong with that function button. Find another button on the control that appears to work and try to enter the diagnostic mode with that button. You may also want to verify that the user interface has a good connection to the washing machine control board at the P11 terminal. We hope this helps!
Did this question help you?
Thank you for voting!
< Prev
1
Next >
✖
Ask a Question
Ask our experts a question on this model and we'll respond as soon as we can.
First I unplugged the dryer, then removed the back panel, this exposed most all of the wiring and I could see the heater coils. Not knowing what the problem was I started looking at the coils and could not see any broken parts. So then checked the thermal fuse for continuity I removed the two wires from it with a small pair of
... Read moreneedle nose pliers, it was held in place by two screws, once they were removed the fuse came out easily, I checked continuity with a volt meter placing the meter on X1 Ohms and could not get a reading. I replaced with a new one and put it all back together the way I took it apart. Then I plugged it in and it worked first time, I now have warm dry clothes.
Cleaning the lint out of the whole machine took quite a bit of time--it was everywhere. Underneath the lint trap was a collection that ultimately ruined the thermal fuse where it restricted the air flow considerably.
Ascertaining the problem was the most time consuming part.
The actual repair was quite simple and did
... Read moren't take but 15-20 minutes.
Received your parts, Popped them both right into place, Even though only one side needed to be replaced, I wanted them to match up. It was amazing how easy this was. My husband was quite impressed I had ordered these rather then look for either a new or used dryer from some other source.


 Diagram and Parts List for Maytag Washer Dryer Combo")