Your coupon for will be reflected when you check out!
✖
Your coupon for
✖
Hello!
You're visiting the PartSelect site in U.S.
Would you like to shop on the Canadian site?
Stay on this site
Go to Canadian site
✖
Model Number Locations
1Select Category Type
Select Category Type
2Select Product Type
Select Product Type
3Select {MODEL} Type
Select {MODEL} Type
Sample Model Number Tags
Model numbers can be made up of numbers (1005400, for example) or a combination of letters and numbers (LAT1000AAE). The model number will most likely appear on either a paper sticker or a metal plate. Your appliance's model number tag may look similar to the sample model number tags shown here (model number highlighted in yellow):
Model has been saved to My Models. If you're not signed in, your lists are available on this device and will expire within 30 days.
Model has been saved to My Models.
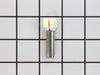
This hose clamp is used in a wide variety of household appliances. Most often it is found in washers, dishwashers, refrigerators, freezers, dehumidifiers, garbage disposals, or air conditioners. This ...
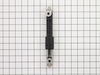
Sold individually. These shock absorbers keep the washer from vigorous shaking during its cycles. This shock absorber is for washers.
Shock absorber absorbs the vibrations and movements of the oute...
This touch-up paint can be used on a wide variety of household appliances. It is most often used on washers, dryer, refrigerators, dishwashers, ranges, freezers, trash compactors, or microwaves. It is...
This is a replacement tub-to-pump hose for your washer. This hose runs from the bottom of the tub to the water pump, and is used to transport water. The hose can develop a hole, and when this happens ...
This is the replacement bellow clamp for your washer. It is approximately 18 inches in diameter and is sold individually. The bellow clamp goes around the bellow in your washer and holds it in place o...
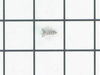
The leveling leg locking nut is an OEM replacement fastener for use in dryers and washers. It has a head diameter of 3/8 inches and a thread pitch of 16 threads per inch. The nut secures the leveling ...
Appliance spray paint is a great way to cover up any chips and scratches that have appeared on your appliances. Instead of replacing the part entirely, this is an easy fix. This is also a great way to...
Ask our experts a question about this model and we'll get back to you as soon as possible!
1 question answered by our experts.
Sort by:
< Prev
1
Next >
Search filter:
Clear Filter
Your search term must have 3 or more characters.
Keep searches simple. Use keywords, e.g. "leaking", "pump", "broken" or "fit".
Sorry, we couldn't find any existing answers that matched.Try using some different or simpler keywords, or submit your new question by using the "Ask a Question" button above!
William Young
November 11, 2025
Washer machine too full of clothes won’t quit cycling?
For model number MHN30PDAGW0
Hello William, thank you for getting in touch. When a washing machine is overloaded, it often gets stuck in a cycle. Press the start/pause button, then turn off the machine and unplug it from the power source for safety. Open the washer and manually redistribute the clothes evenly around the drum. Do not pack them tightly; they should be loosely piled. If the machine is still too full, remove some items. The general rule of thumb is to leave about six inches of space between the top of the laundry and the top of the drum. We hope this helps.
1 person found this helpful.
Did this question help you?
Thank you for voting!
< Prev
1
Next >
✖
Ask a Question
Ask our experts a question on this model and we'll respond as soon as we can.
This product comes in a bottle with a brush like Liquid Paper. It goes on incredibly easy. A second coat might be needed. I wanted to prevent rust from setting in so I covered the scratches and dings. The paint is a little brighter since my washer is 10 years old but it still looks great.
Overall, the install was easy. Just a matter of getting yourself to get it done. The video on the removal / install procedures was most helpful. The front shocks were completed very quickly. The rear shock required all hoses to be disconnected and the back of the washer to be removed. After removing perhaps a dozen screws t
... Read morehe cover was still fastened. You will see (in my case) 4 plastic flat clips. after they were removed the back came off. The rest of the project was the same as the front shocks. 1st time thru so to be expected. Anyway, certainly a project that any DIYer can tackle. Thanks Partselect for the correct parts in a timely fashion and the knowledge to perform the install. Scott


 Diagram and Parts List for Maytag Washer")