


MFI2269VEW Maytag Refrigerator - Overview
Sections of the MFI2269VEW
[Viewing 1 of 1]
Keep searches simple, eg. "belt" or "pump".

Refrigerator Water Filter
PartSelect #: PS11722130
Manufacturer #: EDR4RXD1
This water filter (Whirlpool EveryDrop Refrigerator Water Filter, Single Turn Filter) purifies water going to the water dispenser and sometimes the icemaker as well. This part should be replaced if it...
$84.45
In Stock

Replacement Ice Maker
PartSelect #: PS2121513
Manufacturer #: D7824706Q
This ice maker (Ice Maker Assembly, Refrigerator Ice Maker) produces ice cubes that are ejected into the storage bucket. It is located in the freezer section of your appliance, mounted on the freezer ...
$95.17
In Stock

Ice Maker Assembly
PartSelect #: PS11769140
Manufacturer #: W10882923
This is an ice maker assembly for refrigerators. This assembly is responsible for freezing and breaking water that comes from the water line within your refrigerator. If your ice maker is not producin...
$162.12
In Stock

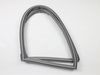
Gray Refrigerator Door Gasket
PartSelect #: PS11759512
Manufacturer #: W10830055
This gray refrigerator door gasket is a genuine OEM replacement part designed for select Whirlpool, Maytag, KitchenAid, and Kenmore models. It forms an airtight seal around the fresh food compartment ...
$143.57
In Stock

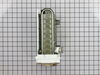
Thermistor
PartSelect #: PS2003772
Manufacturer #: 12002355
This long harness thermistor kit is what helps monitor and regulate the temperature inside your refrigerator. It can be located in either the freezer compartment near the evaporator coils or in the fr...
$47.40
In Stock

Water Filter Cover
PartSelect #: PS11743682
Manufacturer #: WP67006331
This part is the replacement water filter cover for your refrigerator. The cover protects the water filter to prevent damage. If the water filter cover is cracked or missing, you should replace it. It...
$73.04
In Stock
 – Part Number: W11396037")
Refrigerator Door Gasket - Right (White)
PartSelect #: PS12731167
Manufacturer #: W11396037
This French door gasket is a genuine replacement component designed to form a tight, energy-efficient seal around the inner door panel of select refrigerators. Made from flexible white rubber, it prev...
$123.59
In Stock

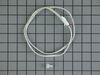
Dual Water Valve
PartSelect #: PS2069865
Manufacturer #: 67006322
The water inlet valve is a solenoid-operated switch that, when activated, releases water from the supply line to the water valve and into the compact icemaker mold.
$133.47
In Stock
 – Part Number: W11378944")
Door Gasket - (Black)
PartSelect #: PS12728558
Manufacturer #: W11378944
This door gasket is used to make an air-tight seal for the cabinet when the door is closed.
$129.67
In Stock

Ice Maker
PartSelect #: PS11752391
Manufacturer #: WPW10300024
This is an icemaker assembly, which is responsible for the creation of ice in the freezer compartment of your refrigerator. If you notice a lack of ice being made or falling into the icemaker bin desp...
$159.13
In Stock

Condenser Fan Motor
PartSelect #: PS16744942
Manufacturer #: W11613295
This is a condenser fan motor for your refrigerator/freezer. This fan motor is most commonly used with frost-free refrigerators with a condenser coil. It controls the rotation of the condenser fan bla...
$68.86
In Stock

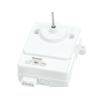
Main Electronic Control Board
PartSelect #: PS11752593
Manufacturer #: WPW10312695
The refrigerator main control board is a critical component that manages essential functions like cooling and defrosting, ensuring the appliance operates efficiently and reliably. This genuine OEM rep...
$239.32
In Stock
Questions And Answers for MFI2269VEW
We're sorry, but our Q&A experts are temporarily unavailable.
Please check back later if you still haven't found the answer you need.
Common Symptoms of the MFI2269VEW
[Viewing 20 of 20]Ice maker not making ice
Fixed by
these parts
these parts

Show All
Leaking
Fixed by
these parts
these parts

Show All
Ice maker won’t dispense ice
Fixed by
these parts
these parts
Show All
Not dispensing water
Fixed by
these parts
these parts

Show All
Fridge too cold
Fixed by
these parts
these parts
Show All
Fridge too warm
Fixed by
these parts
these parts
Show All
Will Not Start
Fixed by
these parts
these parts


Show All
Door Sweating
Fixed by
these parts
these parts


Show All
Noisy
Fixed by
these parts
these parts
Show All
Ice maker dispenses too little ice
Fixed by
these parts
these parts
Show All
Door won’t open or close
Fixed by
these parts
these parts

Show All
Freezer too cold
Fixed by
these parts
these parts
Show All
Ice maker dispenses too much ice
Fixed by
these parts
these parts
Show All
Fridge and Freezer are too warm
Fixed by
these parts
these parts
Show All
Freezer section too warm
Fixed by
these parts
these parts
Show All
Freezer not defrosting
Fixed by
these parts
these parts
Show All
Won’t start
Fixed by
these parts
these parts
Show All
Touchpad does not respond
Fixed by
these parts
these parts
Show All
Frost buildup
Fixed by
these parts
these parts
Show All
Fridge runs too long
Fixed by
these parts
these parts
Show All


")

Keep searches simple. Use keywords, e.g. "leaking", "pump", "broken" or "fit".
light on to order water filter
Pressed in the end of the filter cover, lowered it down part way. Twisted the old filter 1/4 turn and removed it. Set in the sink to drain. Inserted new filter and twisted it to lock. closed cover. Done. Total time @ 1 Minute.
Parts Used:
-
Douglas from Byron, NY
-
Difficulty Level:Really Easy
-
Total Repair Time:Less than 15 mins
915 of 1051 people
found this instruction helpful.
Was this instruction helpful to you?
Thank you for voting!
Icemaker producing few or no cubes and often leaving "kling-ons" on ice tray
Interior surface of ice tray felt rough & flaky (coating deteriorated) so cubes would not release.
Unplug appliance.
Remove timer cover by hand pressure @ edge.
Remove single attachment screw & bracket at lower front of icemaker.
Disconnect wiring harness from socket @ rear of compartment.
Tricky part was determin ... Read more ing what type of connection held the other two attachment points along the long edge of the icemaker. I did not have repair manual or useful drawing but looked @ PartsDirect pic of side brackets & used a small mirror to confirm that mine were also some sort of "snap in" attachment.
Remove icemaker unit by pushing upward and outward on the unit. I takes a good bit of pressure and will pop loose, but be careful not to break attachment bracket from freezer wall.
Scavenge shut off bar and wiring harness from old icemaker once you have it out & attach to new one before installing it back in freezer.
Again, you might find a mirror useful to align those pesky snap-in brackets with the new unit.
Since you probably kept your freezer running while waiting for the part, the plastic snap-ins will be cold and brittle. I warmed them up first by applying a dampened cloth heated in the microwave to make them a little more pliable.
A good push of the new unit towards the snap-ins along with some upward force will get it stable.
Reattach the metal screw in bracket & connect the wiring harness to rear plug... and don't forget to plug the whole thing back in.
It will take awhile for the first batch of cubes dump as the timer may need to cycle completely around to get to the fill cycle... be patient.
Dump the first couple of batches of cubes just to make sure you're free of any residue.
Read less
Parts Used:
-
Bernie from Diamond Bar, CA
-
Difficulty Level:Easy
-
Total Repair Time:30 - 60 mins
-
Tools:Nutdriver
815 of 914 people
found this instruction helpful.
Was this instruction helpful to you?
Thank you for voting!
Ice maker leaking at first then quit making ice all together
unplugged refrigerator and shut off water, removed one screw and loosened two more, after removing one side of the ice bucket rail, unplugged electrical from old ice maker. Then I removed the bail and out on new one, reinstalled ice maker in reverse order from taking it out.
Parts Used:
-
Hootie from Joshua, TX
-
Difficulty Level:Really Easy
-
Total Repair Time:15 - 30 mins
-
Tools:Nutdriver
429 of 491 people
found this instruction helpful.
Was this instruction helpful to you?
Thank you for voting!