Your coupon for will be reflected when you check out!
✖
Your coupon for
✖
Hello!
You're visiting the PartSelect site in U.S.
Would you like to shop on the Canadian site?
Stay on this site
Go to Canadian site
✖
Model Number Locations
1Select Category Type
Select Category Type
2Select Product Type
Select Product Type
3Select {MODEL} Type
Select {MODEL} Type
Sample Model Number Tags
Model numbers can be made up of numbers (1005400, for example) or a combination of letters and numbers (LAT1000AAE). The model number will most likely appear on either a paper sticker or a metal plate. Your appliance's model number tag may look similar to the sample model number tags shown here (model number highlighted in yellow):
Model has been saved to My Models. If you're not signed in, your lists are available on this device and will expire within 30 days.
Model has been saved to My Models.
This an authentic OEM 40-Watt replacement light bulb, used in a number of household appliances. It is specially designed to withstand extreme temperatures, which is why these replacement bulbs are mos...
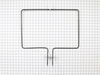
This is a heating element compatible with various makes of ranges and ovens and is sold as an individual part. Measuring 20.5-inches wide and 20.25-inches (with terminals) long, this heating element i...
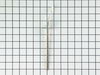
This oven temperature sensor, for ranges, works together with the oven control board to measure and regulate the oven temperature. The sensor detects the temperature in the oven cavity. If the followi...
This is a multi-use and multi-appliance screw. It can be used on a microwave, refrigerator, range/oven, air conditioner, dehumidifier, washer, or dryer. The measurements of this screw are 8 x 1/2 inch...
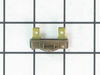
This part is for oven ranges, it connects individual wires and protects the device from electrical surges, voltages, and current. With this part, the house power is connected to the range wire harness...
This touch-up paint can be used on a wide variety of household appliances. It is most often used on washers, dryer, refrigerators, dishwashers, ranges, freezers, trash compactors, or microwaves. It is...
This surface element control switch, also known as an infinite switch, is a genuine OEM replacement designed for 6-inch electric burners on select ranges. It regulates the power supplied to the surfac...
This broiler pan and roasting rack set is designed to help reduce mess while cooking by allowing grease to drain away from food. Its durable porcelain-coated construction stands up to high temperature...
This dual element control switch is designed to regulate heat for dual surface burners on select electric ranges. It provides precise temperature control and helps restore functionality when a burner ...
This bottle of non-abrasive cooktop cleaner breaks down and gets rid of the hardest baked-on stains and residue without causing any harm to your appliance. The bottle is 10 oz and does not require a l...
The light socket on your electric range connects the power source to the light bulb. If your oven light is malfunctioning, you may need to replace the light socket. The light socket is located in the ...
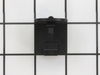
This part is used as a safety feature. If your range overheats this part will shut the range down.
$34.74
In Stock
Order now and your part arrives by Jun 28
Questions And Answers for MER8680BS0
Ask our experts a question about this model and we'll get back to you as soon as possible!
8 questions answered by our experts.
Sort by:
< Prev
1
2
Next >
Search filter:
Clear Filter
Your search term must have 3 or more characters.
Keep searches simple. Use keywords, e.g. "leaking", "pump", "broken" or "fit".
Sorry, we couldn't find any existing answers that matched.Try using some different or simpler keywords, or submit your new question by using the "Ask a Question" button above!
Vicki
December 4, 2019
I have a Maytag aqualift 6.2cf range glass top. The dual burners in the front turn red very quickly even on low. Can you help me?
For model number MER8680BS0
Hi Vicki,
Thank you for your question. If the dual burners at the front of the cooktop are set on a low setting and they instead go to a high setting, then the issue is with the burner switches and they will need to be replaced. The part number listed under your model number for the burner switch is PS11754687. I hope this helps. Thank you and have a great day!
2 people found this helpful.
Did this question help you?
Thank you for voting!
Barb
December 16, 2019
I turn the oven on to 350 and it goes up to 400. If i turn it on to 325 it will be 350. What could be the problem?
For model number MER8680BS0
Hello Barb and thanks for writing.
It certainly sounds like a faulty oven temperature sensor PS11749737 check the part and replace it if needed. We hope this helps. Please contact us anytime.
The oven is taking a longer time to reach the set temperature after we replaced the oven sensor.
For model number MER8680BS0
Hi Carlos, thank you for contacting us. Ensure the sensor is not touching the oven's interior walls. If it makes contact with the metal casing, it will measure the wall's temperature instead of the air, causing the oven to cycle heat incorrectly. It should be at a 90-degree angle to the back wall. A loose or corroded modular connector can cause high resistance, tricking the control board into thinking the oven is hotter than it is and shutting the elements off early. We hope this information helps!
1 person found this helpful.
Did this question help you?
Thank you for voting!
Carlos
April 12, 2026
Hello, I replaced the oven sensor. The oven took 45 minutes to preheat. The display showed 350 degrees, the oven never got to the desired temperature inside the oven. The display still showed it was at 350 degrees
For model number MER8680BS0
Hi Carlos, thank you for getting in touch. If replacing the sensor did not help, we would suggest checking the main control board, part number PS11756979. It acts as the brain of the unit, using internal relays to switch power on and off to the heating elements. If these relays are burnt or stuck, the board may believe it is heating the oven and update the display to 350°F based on a timer, even if it has never actually sent electricity to the coils. You may need to replace it. We hope this sorts out your problem!
2 front dual burners go to full heat on any selected temp range.
For model number MER8680BS0
Hello Daniel, Thank you for the question. This is normally an indication there is an issue with the Switch that controls the Element, PartSelect Number PS11754687. If you need help placing an order, customer service is open 7 days a week. Please feel free to give us a call. We look forward to hearing from you!
Opened up the back of the stove. Unpluged the sensor. Replaced the sensor. Replace the back of the stove.
The sensor that has been replaced is not what is expected. After reading all of the instructions for adjusting the temperatures, the only temp that stays steady is when we first turn on the oven to 350 degrees. That stays s
... Read moreteady but when I turn it to 400 it slowly goes up to 425 degrees.
Took 2 screws under front edge of smooth top. Unscrewed ground wire from back of smooth top unit. Unplugged 2 wire bundles, from back. Took bad element out , put in new one. Put back together. About 10 min's tops. Easy peasy.
First, we turned on broil and the upper element turned orange and obviously worked. We figured the bottom element went out. The diagram on this site showed a bottom heating element that looked nothing like ours, but after reading other reviews, and reading that part that goes through the back of the oven was in the middle, and not off to
... Read morethe side, we ordered this element. It was perfect. All you have to do is unplug the oven, take out the bottom pan covering the element by removing 2 screws in the back, remove the lower small cover on the back of the oven and then unplug the old element, unscrew the old element on the inside of the stove, then install the new element and put everything back like it was. Nothing to it. It worked like a charm and my oven now heats up fast again. Easiest appliance repair job ever!


 Diagram and Parts List for Maytag Range")