Your coupon for will be reflected when you check out!
✖
Your coupon for
✖
Hello!
You're visiting the PartSelect site in U.S.
Would you like to shop on the Canadian site?
Stay on this site
Go to Canadian site
✖
Model Number Locations
1Select Category Type
Select Category Type
2Select Product Type
Select Product Type
3Select {MODEL} Type
Select {MODEL} Type
Sample Model Number Tags
Model numbers can be made up of numbers (1005400, for example) or a combination of letters and numbers (LAT1000AAE). The model number will most likely appear on either a paper sticker or a metal plate. Your appliance's model number tag may look similar to the sample model number tags shown here (model number highlighted in yellow):
Model has been saved to My Models. If you're not signed in, your lists are available on this device and will expire within 30 days.
Model has been saved to My Models.
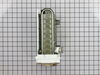
This ice maker (Ice Maker Assembly, Refrigerator Ice Maker) produces ice cubes that are ejected into the storage bucket. It is located in the freezer section of your appliance, mounted on the freezer ...
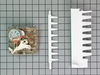
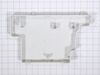
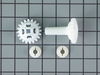
This is a center crisper rail for your refrigerator. This part acts as a support rail for the crisper drawer by holding the center of the crisper frame. You will need to replace this part is if your c...
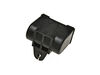
This capacitor (Refrigerator and Freezer Compressor Run Capacitor, Run Capacitor) provides the voltage or energy current required to start the compressor and keep it running. It allows the compressor ...
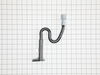
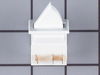
This light switch may also be known as a refrigerator door switch or a light switch kit, and is compatible with your refrigerator. The function of the refrigerator door switch is to turn on the light ...
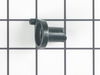
This is a multi-use and multi-appliance screw. It can be used on a microwave, refrigerator, range/oven, air conditioner, dehumidifier, washer, or dryer. The measurements of this screw are 8 x 1/2 inch...
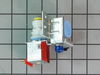
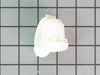
The single water inlet valve, also known as a water solenoid valve, is used for refrigerators. This part is a solenoid-operated switch that releases water from the supply line to the water valve and i...
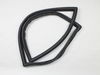
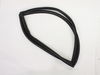
The p-trap drain tube kit may also be known as the duck bill, or the drain pipe, and it is compatible with your refrigerator. The function of the p-trap drain kit is to carry the water that has formed...
Sold individually. Crisper drawer is an original equipment manufacturer (OEM) part that fits some bottom-freezer Kenmore, Amana, Crosley, Jenn-Air, KitchenAid, Maytag and Whirlpool refrigerators.
T...
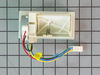
The electronic control board is used in refrigerators to monitor and manage the temperature settings, such as cooling or defrosting times. If your fridge or freezer is too warm, too cold, is not defro...
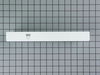
This refrigerator shelf frame is designed to support the glass shelf positioned above the crisper or pantry drawer, helping to keep your fresh food items organized and easily accessible. Crafted for d...
$91.05
In Stock
Order now and your part arrives by May 18
Questions And Answers for MBR2258XES1
Ask our experts a question about this model and we'll get back to you as soon as possible!
5 questions answered by our experts.
Sort by:
< Prev
1
Next >
Search filter:
Clear Filter
Your search term must have 3 or more characters.
Keep searches simple. Use keywords, e.g. "leaking", "pump", "broken" or "fit".
Sorry, we couldn't find any existing answers that matched.Try using some different or simpler keywords, or submit your new question by using the "Ask a Question" button above!
June
February 24, 2020
Crisper tray guide broke off shelving
For model number MBR2258XES1
Hello June, Thank you for contacting us. I have researched the model you have provided and have found the part you are looking for is PartSelect Number PS11757048 for the Center Crisper Drawer Slide Rail . We hope this helps.
Hey my ice maker quit working while we were away, there was a power outage during that time, I took the wiring harness off checked the fusible link it showed full continuity, put it back. Took the auto fill valve out checked continuity on it, it was low, so ordered a new valve from you guys but still am not getting any water into my icemaker, what’s next to check, have powered the fridge on and off a few times as well.
For model number MBR2258XES1
Hi Marc, thank you for reaching out. If your icemaker is not getting water, there are a few things you can check in an attempt to resolve the concern. Make sure the water supply is turned on to the refrigerator. The water supply line to the refrigerator has a shut-off valve, which is usually found under the sink or in the basement. Check the feeler arm or paddle to make sure it can move freely. Ice blocking its movement will signal to the icemaker that it should pause, making ice. The fill tube which supplies water to the icemaker can freeze and cause no water to get to the icemaker. If all checks are fine, we recommend replacing the ice motor kit, part number PS733947. We hope this solves your problem!
My refrigerator began warming in the refrigerator to the 60's with the freezer being accurate. So I shut it off at the circuit breaker for 4 days and then turned on the circuit breaker and both the freezer and refrigerator were the correct temperature for 3 days and then it happened again and the refrigerator was up again to the 60's and the freezer was totally accurate. What is causing that?
For model number MBR2258XES1
Hi John, thank you for contacting us. The issue seems to be with the damper control assembly, part number PS11750106. It controls the cold airflow from the freezer compartment into the refrigerator compartment. We hope this information helps!
Frig not cooling well freezer froasts up
Technician thought it was frozen somewhere although it was turned off and defrosted. Could it be the cspacitator
For model number MBR2258XES1
Hi Karen, thank you for the question. Based on our understanding of the issue, we would suggest you checking the damper control assembly, part number PS11750106, to fix the issue. If you need help placing an order, customer service is open 7 days a week!
Ice is forming all the time in the bottom of the freezer.
For model number MBR2258XES1
Hi Ruben, thank you for contacting us. Check the drain hole for any blockage first. If it is fine, the issue could be with the door gasket, part number PS11754714. You may need to replace it to fix the issue. We hope this solves your problem!
Interior surface of ice tray felt rough & flaky (coating deteriorated) so cubes would not release. Unplug appliance. Remove timer cover by hand pressure @ edge. Remove single attachment screw & bracket at lower front of icemaker. Disconnect wiring harness from socket @ rear of compartment. Tricky part was determin
... Read moreing what type of connection held the other two attachment points along the long edge of the icemaker. I did not have repair manual or useful drawing but looked @ PartsDirect pic of side brackets & used a small mirror to confirm that mine were also some sort of "snap in" attachment. Remove icemaker unit by pushing upward and outward on the unit. I takes a good bit of pressure and will pop loose, but be careful not to break attachment bracket from freezer wall. Scavenge shut off bar and wiring harness from old icemaker once you have it out & attach to new one before installing it back in freezer. Again, you might find a mirror useful to align those pesky snap-in brackets with the new unit. Since you probably kept your freezer running while waiting for the part, the plastic snap-ins will be cold and brittle. I warmed them up first by applying a dampened cloth heated in the microwave to make them a little more pliable. A good push of the new unit towards the snap-ins along with some upward force will get it stable. Reattach the metal screw in bracket & connect the wiring harness to rear plug... and don't forget to plug the whole thing back in. It will take awhile for the first batch of cubes dump as the timer may need to cycle completely around to get to the fill cycle... be patient. Dump the first couple of batches of cubes just to make sure you're free of any residue.
I knew the chances of all the freon leaking out was unlikely so I looked at the wiring to the compressor and there was a capacitor and a starter/overload so i figured I would start there. I went on line and found the parts at this site and they were less than the minimum service call charge for a service tech so I figured what the heck le
... Read moret's give her a shot so I did give it a shot. I ordered the parts and they were there in less time than a service tech could come out and i installed the parts and guess what for 90.00 in parts and 15 minutes in time I repaired my refrigerator. Thanks guys, It took less time to order the parts than it did to make the repair so thanks, your website rocks and is very well designed so my hat is off to you guys!
Having seen this problem before in other equipment so I had an idea where to look. Problem: the automatic defrost function was not operating. Looking through openings in the back panel of the freezer compartment, you could see the evaporator coils and fins were a solid chuck of ice. There are three logical components to check. Heater
... Read moreelement, thermostat (located just above the evaporator) and a relay on the control board (located in the fridge control panel). Checked the heater with an ohm meter -- OK. The thermostat closes the circuit at around 20 degrees and opens at around 32 degrees. Pulled out the thermostat, wiring, fan unit. Everything unplugs, unscrews, and unclips, don't cut wires. Put the whole assembly in a friends freezer for an hour or so to see if the thermostat closes -- OK. Problem had to be with the control board. Replaced control board, reprogrammed it per included instruction. Everything is working again.