Your coupon for will be reflected when you check out!
✖
Your coupon for
✖
Hello!
You're visiting the PartSelect site in U.S.
Would you like to shop on the Canadian site?
Stay on this site
Go to Canadian site
✖
Model Number Locations
1Select Category Type
Select Category Type
2Select Product Type
Select Product Type
3Select {MODEL} Type
Select {MODEL} Type
Sample Model Number Tags
Model numbers can be made up of numbers (1005400, for example) or a combination of letters and numbers (LAT1000AAE). The model number will most likely appear on either a paper sticker or a metal plate. Your appliance's model number tag may look similar to the sample model number tags shown here (model number highlighted in yellow):
Model has been saved to My Models. If you're not signed in, your lists are available on this device and will expire within 30 days.
Model has been saved to My Models.
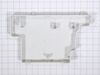
This is a center crisper rail for your refrigerator. This part acts as a support rail for the crisper drawer by holding the center of the crisper frame. You will need to replace this part is if your c...
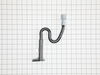
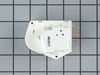
This capacitor (Refrigerator and Freezer Compressor Run Capacitor, Run Capacitor) provides the voltage or energy current required to start the compressor and keep it running. It allows the compressor ...
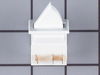
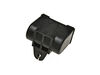
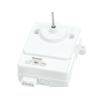
This light switch may also be known as a refrigerator door switch or a light switch kit, and is compatible with your refrigerator. The function of the refrigerator door switch is to turn on the light ...
This is a multi-use and multi-appliance screw. It can be used on a microwave, refrigerator, range/oven, air conditioner, dehumidifier, washer, or dryer. The measurements of this screw are 8 x 1/2 inch...
The p-trap drain tube kit may also be known as the duck bill, or the drain pipe, and it is compatible with your refrigerator. The function of the p-trap drain kit is to carry the water that has formed...
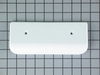
This is a door handle for your refrigerator or freezer, which allows you to easily open and close the door. Take note that the screws are not included when you order this part; you will need to keep t...
This is a deli drawer glide for the right side of your refrigerator. It allows the deli drawer to glide in and out smoothly. In order to access your glider, you will have to remove drawer and shelf, a...
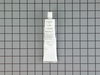
This touch-up paint can be used on a wide variety of household appliances. It is most often used on washers, dryer, refrigerators, dishwashers, ranges, freezers, trash compactors, or microwaves. It is...
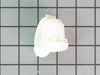
This is a replacement pan glide for your refrigerator. The pan glide can be found attached to the refrigerator shelf, and allows the pan to slide in and out efficiently. If your refrigerator pan will ...
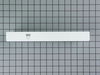
Sold individually. This crisper drawer is for refrigerators.
Crisper drawer stores fruits and vegetables at a humidity level that helps keep them fresh longer.
Ask our experts a question about this model and we'll get back to you as soon as possible!
3 questions answered by our experts.
Sort by:
< Prev
1
Next >
Search filter:
Clear Filter
Your search term must have 3 or more characters.
Keep searches simple. Use keywords, e.g. "leaking", "pump", "broken" or "fit".
Sorry, we couldn't find any existing answers that matched.Try using some different or simpler keywords, or submit your new question by using the "Ask a Question" button above!
Jason
November 2, 2021
I can't seem to twist the bulb out of the fridge section. Am I missing something, or is it just stuck?
For model number MBB1952HEW5
Hello Jason, Thank you for the question. The Bulb is just a regular Unscrew Bulb. This sounds like the bulb is stuck in the socket. With the appliance unplugged from the outlet and wearing protecting gloves and glasses, wrap a cloth around the bulb and tap it with a hammer or a tool to break the bulb. Clear away any glass around the base of the bulb that is still in the socket so there are no sharp edges. Use a pair of pliers and insert them into the base and spread them apart to grip the base. Rotate to remove the base from the socket. You can also try to pull the base from the socket with the pliers. If this does not work, you will need to remove and replace the socket. We hope this helps!
The rubber liner on the inside of the fridge door is worn and mold grows on it. Can this be replaced?
For model number MBB1952HEW5
Hello Bonnie, thank you for reaching out. The part that you are looking for is the fridge door gasket, part number PS11754805. To install the new gasket, use the flat-blade screwdriver to pry out the old door gasket from the groove, remove it from the door, and clean the mounting group before the installation of the new gasket. We hope this helps!
What is a typical temperature setting for our refrigerator? The temperature control is number from 1 through 7. I currently have it set at 3. Will this temp keep our food from spoiling? Thank you for your help in this.
For model number MBB1952HEW5
Hi Herb, thank you for contacting us. We have researched and found that the factory recommended temperature setting is 4. We would recommend using the recommended setting for better performance. We hope this helps.
Was this helpful?
Thank you for voting!
< Prev
1
Next >
✖
Ask a Question
Ask our experts a question on this model and we'll respond as soon as we can.
I knew the chances of all the freon leaking out was unlikely so I looked at the wiring to the compressor and there was a capacitor and a starter/overload so i figured I would start there. I went on line and found the parts at this site and they were less than the minimum service call charge for a service tech so I figured what the heck le
... Read moret's give her a shot so I did give it a shot. I ordered the parts and they were there in less time than a service tech could come out and i installed the parts and guess what for 90.00 in parts and 15 minutes in time I repaired my refrigerator. Thanks guys, It took less time to order the parts than it did to make the repair so thanks, your website rocks and is very well designed so my hat is off to you guys!
Start by removing the freezer door and inner baskets so you have some space. Next, take out the ice maker by removing the 3 screws that attach it to the side and unplug it from the harness. Then the cover for the thermistor and the fan vent should be popped off carefully leaving the back cover only. The back cover is held on by 4 screw
... Read mores, one in each corner. Remove all 4 screws and carefully loosen the back cover by pulling the top forward and laying it level to pull it out. Behind the cover are the coils and other components. If the coils are covered with ice they should be defrosted by using a blow dryer. Once the ice is clear, the thermostat is located towards the top left clamped onto a copper pipe that circles up and around. Carefully pull it off the pipe and cut the wires making sure you leave enough to reattach the new ones with a butt connector. Strip about 1/4 inch of insulation off the wires and crimp both ends into the butt connector making sure they are tight. Heat shrink is highly recommended. Clamp the new thermostat to the copper pipe where the old one used to be and your almost done. Replace the back cover the opposite of the way it was pulled out by putting it in flat with the bottom part in front. Once it is all the way to where it needs to be, push the top upwards while sliding the bottom downwards, then push it in flat against the back. It can be bent slightly if needed. Put the screws back in that hold it on and replace the plastic covers. Then reinstall the ice maker being sure the hose for the water is correctly positioned so that the water goes into the ice maker. Turn it back on and put the baskets and door back on and you're done.


 Diagram and Parts List for Maytag Refrigerator")