Your coupon for will be reflected when you check out!
✖
Your coupon for
✖
Hello!
You're visiting the PartSelect site in U.S.
Would you like to shop on the Canadian site?
Stay on this site
Go to Canadian site
✖
Model Number Locations
1Select Category Type
Select Category Type
2Select Product Type
Select Product Type
3Select {MODEL} Type
Select {MODEL} Type
Sample Model Number Tags
Model numbers can be made up of numbers (1005400, for example) or a combination of letters and numbers (LAT1000AAE). The model number will most likely appear on either a paper sticker or a metal plate. Your appliance's model number tag may look similar to the sample model number tags shown here (model number highlighted in yellow):
Model has been saved to My Models. If you're not signed in, your lists are available on this device and will expire within 30 days.
Model has been saved to My Models.
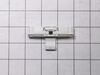
This part is the replacement lid latch or latch assembly for your top-load washer. The lid latch holds your washer door closed, and allows the washer to run its cycle. If the lid latch is damaged, you...
The hose clamp is used to hold the water hose in place which will prevent the hose from leaking water. Sometimes the clamp may lose its ability to latch on, causing a leaking washer. For the installat...
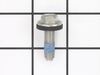
The leveling leg locking nut is an OEM replacement fastener for use in dryers and washers. It has a head diameter of 3/8 inches and a thread pitch of 16 threads per inch. The nut secures the leveling ...
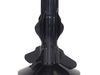
This spanner nut, also referred to as a lock nut, is a critical component that secures the inner tub to the drive block in large-capacity washers. Featuring a right-hand thread, it ensures the tub rem...
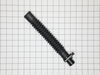
The tub-to-pump hose carries the water from the tub to the drain pump. Unplug the washer and shut off the water supply before installing this part. Wear work gloves to protect your hands
$27.36
In Stock
Order now and your part arrives by Apr 9
Questions And Answers for MAT23MNAGW0
Be the first to ask our experts a question about this model!
✖
Ask a Question
Ask our experts a question on this model and we'll respond as soon as we can.
This was a learning experience but it appears to have worked out in the end. Our 3 1/2 year old washer was not agitating much and I attributed that to a loose bolt. I would tighten the bolt and it would work ok for a load or two and then stop agitating. I would find that the bolt was loose again. I took a number of steps to try to get
... Read more the bolt to stay on tight - threadlock, a new bolt, more threadlock, and applying progressively more force on the bolt, with no better results. Yet the repair guys on you tube were saying the bolt only needs to be snug, not super tight - something was amiss. I even went so far as to secure the basket with a rope so I could use two hands on the socket wrench (please don't do this). But when I tried the washer again there was no agitation at all! I observed the agitation output in manual test mode and the bolt was turning in lock step with the shaft but the agitator wasn't turning at all. That's when I suspected that the problem was actually a worn lower agitator. Trouble was that now I couldn't seem to get the bolt off. Turning the wrench caused the shaft itself to rotate so I couldn't loosen the bolt from the shaft. I thought I broke the washer. Then I considered that maybe the shaft was rotating because the washer was in an agitation mode when I turned it off. I went back into manual test mode, made the washer spin, then turned it off. Fortunately, this worked. The shaft was again stationary and, albeit with great difficulty, I got the bolt off.
I removed the agitator, and as a pro would have figured out long before, the ridges inside the top of the lower agitator were almost completely worn down. I realized then that the contact between these ridges and the splines on the shaft is what is supposed to cause the lower agitator to move with the shaft. The purpose of the bolt is just to keep the agitator in the correct position and from coming off the shaft. I had been trying to compensate for the worn agitator ridges by over-tightening the bolt, creating some contact at the top of the shaft. This would work for a little while, then the agitator would start slipping, and the slipping agitator was acting just like a wrench loosening the bolt (until my stupid rope trick, that is.)
So I ordered a new agitator (only the lower agitator was bad, but the price of an entire agitator isn't a lot more than just the lower part and I was reading that the upper agitator parts will wear over time) and another new bolt (because my repeated attempts to over-tighten the first one I ordered had split the rubber gasket apart and worn the bolt head).
The new agitator fit snugly on the splines of the shaft so I sensed no need to use excessive force on the bolt. Just an easy one-handed snug tightening with the socket wrench, using the other hand to hold the lower agitator. The washer is now working again.


 Diagram and Parts List for Whirlpool Washer")