Your coupon for will be reflected when you check out!
✖
Your coupon for
✖
Hello!
You're visiting the PartSelect site in U.S.
Would you like to shop on the Canadian site?
Stay on this site
Go to Canadian site
✖
Model Number Locations
1Select Category Type
Select Category Type
2Select Product Type
Select Product Type
3Select {MODEL} Type
Select {MODEL} Type
Sample Model Number Tags
Model numbers can be made up of numbers (1005400, for example) or a combination of letters and numbers (LAT1000AAE). The model number will most likely appear on either a paper sticker or a metal plate. Your appliance's model number tag may look similar to the sample model number tags shown here (model number highlighted in yellow):
Model has been saved to My Models. If you're not signed in, your lists are available on this device and will expire within 30 days.
Model has been saved to My Models.
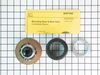
This kit comes with a hub assembly, agitator seal, and spanner nut. If your washer leaks once it is full (with or without clothes in it) or leaks during agitation, then you should replace the seal. Th...
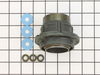
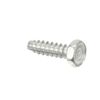
This is a multi-use and multi-appliance screw. It can be used on a microwave, refrigerator, range/oven, air conditioner, dehumidifier, washer, or dryer. The measurements of this screw are 8 x 1/2 inch...
This hose clamp is used in a wide variety of household appliances. Most often it is found in washers, dishwashers, refrigerators, freezers, dehumidifiers, garbage disposals, or air conditioners. This ...
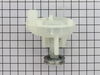
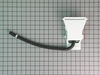
This washing machine drain pump is intended for use with automatic washers that have been manufactured since 1958. The pump itself is made of plastic, though it does come with a metallic belt pulley.
The leveling leg pad or foot pad fits over the leveling leg on your washing machine. The foot pad is designed to protect your floor and keep the washing machine level and in place. This foot pad is ju...
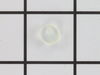
This washing machine lid hinge ball is well under an inch in diameter. These hinge balls are sold separately, though two are required per lid. This lid hinge ball is made of plastic and is used for Ma...
This kit is used on 2-belt washers. It is recommended to change the seal kit at the same time. The tub bearing kit fixes issues with leaking, loud noise, excessive shaking/moving or if your pump is no...
If your washer shakes or vibrates loudly when it reaches its max speed, make sure the 4 levelling legs are even. Adjust the legs so that the machine is level, and tighten the locking nuts on the legs ...
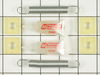
This spring retaining clip is just under 1 inch long. The clip is made entirely of metal and is attached to the back wall of the washer, under the console. If your washer is vibrating and louder than ...
The hose clamp is used to hold the water hose in place which will prevent the hose from leaking water. Sometimes the clamp may lose its ability to latch on, causing a leaking washer. For the installat...
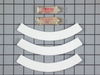
This damper pad kit is used for base support. It comes with three six inch damper pads, two little tubes of lubricant. NOTE: This part will need adhesive to stick it in place.
$38.96
In Stock
Order now and your part arrives by May 9
Questions And Answers for MAT10PDEGW
Be the first to ask our experts a question about this model!
✖
Ask a Question
Ask our experts a question on this model and we'll respond as soon as we can.
My washer is 5 years old and water began to leak on the floor. I took off the front panel and filled the tub. Water did not leak immediately, but after the tub filled with about 3-4 inches of water, the water began to leak from a rubber washer between the fixed tub and the drive shaft. I looked online for exploded diagrams of Maytag wa
... Read moreshers, when I came across your site. By looking at your diagrams, I determined what parts I needed and ordered them. The parts arrived in 2 days, and I installed them. There were no leaks and it cost me under $70 (a repairman would have cost at least $250). The only thing I would recommend to those in similar situations, is to purchase a spanner wrench (your site does not sell, but others do). The stem seal and hub assembly is reverse threaded (clockwise to loosen) and is difficult to remove due to tight quarters in the tub.
I determined that the spin bearing was bad and decided to replace the brake too. Placed the machine on its side and then removed the rubber cap, v-belt, screw, drive lug and pulley. Then used a chain-vise grip to turn the brake off with the aid of a 3 foot long pipe extender for leverage. Blocked up the tub to align the transmission and i
... Read morenstalled the new spin bearing, brake, pulley and drive lug. Adjusted the drive lug position to contact the ccw motion of the pulley at the point when I could just feel the brake pressure. Installed the screw and rubber cap. Replaced the drive belts. Tested and all works. Halleluah!
Firstly, remove ac power from washer! After removing the front panel of the washer (two philips screws), I loosened and removed the plastic motor cover and removed three hex head screws holding the motor. Have someone help you tilt the washer so you can remove the belts by "rolling" them off of the pullies (pump pully and motor pully
... Read more). What I did was use a chemical degreaser to clean the motor base metal channel where the nylon sliders reside. After doing that and letting it dry, I removed the two old springs. I ended up reinstalling the old springs because they were not stretched and I installed a new spring (total three) on the right side of the mount. A stiff metal rod with a hook on the end will help you install the springs. Squirt some of the included silicone lubricant on both sides of the motor mount channel and exercise the lube. Reinstall the motor and plastic cover over top of motor. Clean hands and clean belts while you have them out, reinstall belts and front cover and you're finished. My wife said it never ran better!