Your coupon for will be reflected when you check out!
✖
Your coupon for
✖
Hello!
You're visiting the PartSelect site in U.S.
Would you like to shop on the Canadian site?
Stay on this site
Go to Canadian site
✖
Model Number Locations
1Select Category Type
Select Category Type
2Select Product Type
Select Product Type
3Select {MODEL} Type
Select {MODEL} Type
Sample Model Number Tags
Model numbers can be made up of numbers (1005400, for example) or a combination of letters and numbers (LAT1000AAE). The model number will most likely appear on either a paper sticker or a metal plate. Your appliance's model number tag may look similar to the sample model number tags shown here (model number highlighted in yellow):
Model has been saved to My Models. If you're not signed in, your lists are available on this device and will expire within 30 days.
Model has been saved to My Models.
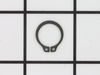
The metal retaining ring, which is under an inch long, holds the rear wheels on the axels of the dryer. The main reason why it would need to replaced is if the retaining ring has sprung out of place o...
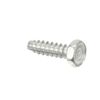
This is a multi-use and multi-appliance screw. It can be used on a microwave, refrigerator, range/oven, air conditioner, dehumidifier, washer, or dryer. The measurements of this screw are 8 x 1/2 inch...
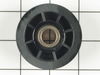
This v-shaped spin belt helps transfer power from the motor to the transmission to help pump the water in and out of the washer. It also helps runs the spin cycle in the washer.
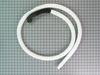
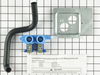
This hose clamp is used in a wide variety of household appliances. Most often it is found in washers, dishwashers, refrigerators, freezers, dehumidifiers, garbage disposals, or air conditioners. This ...
If your washer shakes or vibrates loudly when it reaches its max speed, make sure the 4 levelling legs are even. Adjust the legs so that the machine is level, and tighten the locking nuts on the legs ...
The hose clamp is used to hold the water hose in place which will prevent the hose from leaking water. Sometimes the clamp may lose its ability to latch on, causing a leaking washer. For the installat...
This washing machine cleaner includes three time-release tablets designed to remove odor-causing residues, grime, and buildup from high-efficiency and top-load washing machines. The tablets work by cl...
This was the second time for the repair. The original bearing lasted 5 years then became noisy. Replaced it, and the unit worked great 5 more years and the noise came back. So I knew exactly what needed fixing what to order, parts wise. This is not a project for the faint of heart, you will completely disassemble your washer to change
... Read more out the main bearing. Roughly here are the steps: 1, pull out the agitator with a good firm jerk up. 2, remove the rubber plug in the center of the drive hub, 3 remove the bolt you have just exposed. 4, pry up on the hub, use a puller if you have to to remove it. 5, pry off the cone shaped rubber seal and remove the large main nut from the drive shaft. 6, remove the 4 bolts holding tub, 7 remove the front panel and unscrew the front of the top panel, tip the top up. 8, lift out the tub, 9, remove the 6 large springs holdig the inner assembly to the base, 10, disconnect the water to tank hose and the fill level hose, 11, disconnect the motor cable at the motor, 12, free up the drain hose and pull it, 13, have a helper lift the inner assembly out and move it to a work area, 14, unbolt the drum from the base, motor, and counter weight 15, pry the drive hub off the transmission shaft, 16, remove the rubber seal from the drum, 17 flip the drum and remove the 3 bolts holding the bearing in place. Reverse to put it back. These steps are from memory so they may not be exact. The exploded views on PartsSelect.com web help, as to the instructions that come with the parts.
Water was leaking on the floor during the wash cycle and especially during draining of the washer. I removed the front panel at ground level and watched while draining after a rinse.
I t was obvious that water was spraying from a hole in the rubber end of the hose (the hose is a fused assembly of a plastic section and a rubber
... Read more section).
So, I finished draining, removed the hose (required pliers to squeeze off a hose clamp).
Upon inspecting the hose, it was also apparent that the hole was caused by rubbing against a support bracket for the motor. This should not happen, but it did because the plastic standoff supposed to keep the hose away from the bracket was installed 180 degrees backwards.
So, I simply replaced the hose and turned the bracket around to the correct orientation.
Everything worked as planned and my repair cost was much less than if I had called someone out.
Unplugged the washing machine and turned off the water to the machine. Removed the two front covers; unhooked the two front springs; removed the (4) motor mounting bolts; unhooked the two hoses for the water pump; unhooked the wiring harness; removed the belt from the driven pulley; pulled the motor assembly out; removed the (3) screws t
... Read moreo separate the water pump from the motor; removed the belt from the motor pulley; installed new belt and repeated above in reverse to put everything back together; started washing machine and it worked great.