


LRSOS2706S LG Refrigerator - Overview
Models starting with LRSOS2706S
Click on the best match to narrow your results.
Keep searches simple, eg. "belt" or "pump".

Refrigerator Water Filter LT1000P
PartSelect #: PS12724834
Manufacturer #: AGF80300704
The Water filter reduces contaminants such as lead, iron, and chlorine from drinking water. This OEM filter is a genuine part manufactured by LG for use in refrigerators. We recommend you replace eve...
$75.43
In Stock

Door Bin Shelf
PartSelect #: PS16662680
Manufacturer #: MAN64890501
This door basket, also known as a door shelf or door bin, is compatible with LG refrigerators. It is an authentic manufacturer replacement part, sourced directly from LG. It is made of clear plastic a...
$62.60
In Stock

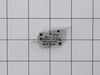
Micro Switch
PartSelect #: PS3529276
Manufacturer #: 6600JB3001C
This is a micro switch for various models of LG refrigerators. This switch is responsible for turning the ice dispenser on and off within the freezer compartment of the fridge. If this switch is damag...
$31.58
In Stock


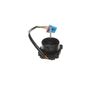
Refrigerator DC Motor Assembly
PartSelect #: PS16662422
Manufacturer #: EAU65058502
Introducing the MOTOR ASSEMBLY,DC from the trusted brand, LG. This genuine OEM item is specifically crafted to work with select LG refrigerator models. Its essential role is to power the condenser fan...
$91.06
In Stock

Door Shelf Bin
PartSelect #: PS16662679
Manufacturer #: MAN64890401
This door bin, also known as a door shelf, is a genuine OEM replacement bin used in LG refrigerators. It is translucent and made of plastic. It has measurements of approximately 18 inches in length an...
$62.60
In Stock

COVER ASSEMBLY,TV
PartSelect #: PS16661518
Manufacturer #: ACQ30341202
Introducing the LG Refrigerator Cover Assembly, a genuine OEM item specifically designed for certain LG refrigerator models. This accessory serves as a superior replacement or addition to the TV cover...
$80.82
In Stock


Refrigerator Deodorizer
PartSelect #: PS12739141
Manufacturer #: MCS62101805
Refrigerator deodorizers help to reduce bacteria growth and therefore reduce smells and extend the life of food.
$31.58
In Stock


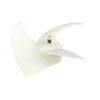
FAN ASSEMBLY
PartSelect #: PS16546769
Manufacturer #: ADP73273402
This fan assembly moves air efficiently. Replace if airflow weakens. This part is designed to keep your appliance operating reliably and efficiently. Replacing a worn or failing component helps preven...
$31.58
In Stock

Common Symptoms of models starting with LRSOS2706S
[Viewing 4 of 4]Noisy
Fixed by
these parts
these parts
Show All
Ice maker won’t dispense ice
Fixed by
these parts
these parts
Show All
Ice maker dispenses too much ice
Fixed by
these parts
these parts
Show All
Not dispensing water
Fixed by
these parts
these parts
Show All
Keep searches simple. Use keywords, e.g. "leaking", "pump", "broken" or "fit".
Evaporator fan making noise
Turn off the power to the refrigerator. Remove the back plate. Unplug the fan motor. Remove the fan housing and pull the fan blade from the motor. Replace the motor by removing 4 screws. Replace with the new motor and reinstall the fan blades. Secure the fan housing, plug the fan motor, and screw on the back panel. Plug and go!
Parts Used:
-
Tom from COPPER HILL, VA
-
Difficulty Level:Really Easy
-
Total Repair Time:Less than 15 mins
-
Tools:Screw drivers
7 of 13 people
found this instruction helpful.
Was this instruction helpful to you?
Thank you for voting!
Very tight fit, almost gave up.
Refrigerator door needs to be open all the way and still you have to squeeze to glass shelf in to place. It needs to go in straight and make sure the placement is correct. It may seem like it doesn't fit but it does, it is very, very tight.
Parts Used:

-
Alberto from KING CITY, CA
-
Difficulty Level:A Bit Difficult
-
Total Repair Time:Less than 15 mins
4 of 6 people
found this instruction helpful.
Was this instruction helpful to you?
Thank you for voting!
ice tray froze in place and motor broke tray and gear in motor
shut off ice maker in door and removed bin and top cover, removed two bottom screws and middle screws and loosened top screw and assembly pulls uot from the bottom and unplug the unit. After the new ice maker unit is installed turn on the ice maker to highest setting for 24 hours and throw the ice away. then reset for maxium ice making fo
... Read more
r the next 24 hours and you have a bin full of new ice
Read less
Parts Used:

-
Thomas from Seaford, DE
-
Difficulty Level:Very Easy
-
Total Repair Time:30 - 60 mins
-
Tools:Screw drivers
2 of 2 people
found this instruction helpful.
Was this instruction helpful to you?
Thank you for voting!