Your coupon for will be reflected when you check out!
✖
Your coupon for
✖
Hello!
You're visiting the PartSelect site in U.S.
Would you like to shop on the Canadian site?
Stay on this site
Go to Canadian site
✖
Model Number Locations
1Select Category Type
Select Category Type
2Select Product Type
Select Product Type
3Select {MODEL} Type
Select {MODEL} Type
Sample Model Number Tags
Model numbers can be made up of numbers (1005400, for example) or a combination of letters and numbers (LAT1000AAE). The model number will most likely appear on either a paper sticker or a metal plate. Your appliance's model number tag may look similar to the sample model number tags shown here (model number highlighted in yellow):
Model has been saved to My Models. If you're not signed in, your lists are available on this device and will expire within 30 days.
Model has been saved to My Models.
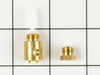
This gas conversion kit converts a natural gas clothes dryer to a L.P clothes dryer. This kit contains a blocking plug, a burner orifice, a caution label, a rating label, and an instructions sheet.
$35.80
Special Order
Questions And Answers for LNC8750A71
Be the first to ask our experts a question about this model!
✖
Ask a Question
Ask our experts a question on this model and we'll respond as soon as we can.
First, I inserted a screwdriver between the front panel and the top and popped the top loose. Next, there is a screw close to the top of the front panel on each side. Remove these. Next I unplugged the light switch from the front panel and removed the panel. Next, unscrew the gas line from the burner assy. and remove the screw holding
... Read more the burner assy. to the frame. CAREFULLY, remove the burner assy. taking care not to break the ceramic igniter. Remove the assembly and unscrew the brass screw on the right side of the burner. Replace the screw with the new assembly furnished with the conversion kit. Remove the tube that directs the gas to the ducting. Unscrew the orifice fitting and replace with the new fittings furnished with the kit. Reinstall the tube and CAREFULLY return the burner assembly to the dryer. Screw the assy to the frame and re-connect the gas line. Replace the front panel, 2 screws, and snap the top back down onto the front panel, taking care to align the two guide pins. Connect the gas line to the dryer and install the ducting. Plug it in and test for leaks.
I asked a plumber to connect my new dryer. It came from the factory ready for natural gas and he needed the part to make it work with propane. My suggestion, ask a Whirlpool certified repairman. The plumber could not do the job and I had to ask a certified repairman out to do the job.