Your coupon for will be reflected when you check out!
✖
Your coupon for
✖
Hello!
You're visiting the PartSelect site in U.S.
Would you like to shop on the Canadian site?
Stay on this site
Go to Canadian site
✖
Model Number Locations
1Select Category Type
Select Category Type
2Select Product Type
Select Product Type
3Select {MODEL} Type
Select {MODEL} Type
Sample Model Number Tags
Model numbers can be made up of numbers (1005400, for example) or a combination of letters and numbers (LAT1000AAE). The model number will most likely appear on either a paper sticker or a metal plate. Your appliance's model number tag may look similar to the sample model number tags shown here (model number highlighted in yellow):
Model has been saved to My Models. If you're not signed in, your lists are available on this device and will expire within 30 days.
Model has been saved to My Models.
This refrigerator water filter replacement is for 2010 LG refrigerators that have either forward French doors or are the four-door dispensing models. This filter is designed to minimize impurities tha...
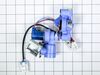
This water tube, or plastic tube, is used in refrigerators and freezers. The tube ensures water is directed to parts of the refrigerator that need it, such as the water dispenser and ice maker. If you...
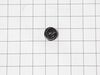
This handle screw, also known as a mounting bolt, is a mounting screw to help secure the door handle to your refrigerator door. If your handle is loose, you may just need to tighten the screw. If your...
This door basket assembly is supplied by the original manufacturer to provide storage for various food items in refrigerators. It consists of a white plastic base and a transparent shield, measuring 1...
Refrigerator Air Filters are a key component for neutralizing odors and ensuring a fresh stream of air into your refrigerator. Swapping your old filter out for a fresh one isn’t difficult and should t...
This is a drawer roller for the freezer compartment of your LG refrigerator. This roller is made of white plastic, and acts as a wheel to allow the drawer to glide smoothly back and forth when you ope...
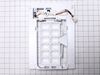
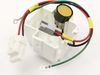
This ice maker assembly is for refrigerators. This Ice maker assembly contains the complete ice maker and housing. The assembly may include multiple parts; refer to your parts diagram for a complete ...
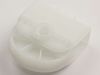
This is a manufacturer-approved refrigerator door closure for your refrigerator. It is made of white plastic and measures approximately 3 inches by 2 inches. If your old closure is damaged, your refri...
This glass shelf provides storage space in your refrigerator above the crisper. Shelves can crack and chip due to frequent use, and should be replaced immediately if cracks start to appear. This shelf...
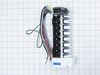
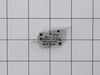
This is a micro switch for various models of LG refrigerators. This switch is responsible for turning the ice dispenser on and off within the freezer compartment of the fridge. If this switch is damag...
This part must be installed by a licensed and trained LG technician that is able to perform a software update, which is required for the installation of this compressor. Part number CJT30000002 is nee...
This fridge gasket, also known as a door seal, is an authentic OEM part supplied by LG for use with various models of LG refrigerators. It is a flexible strip of rubber that sits along the perimeter o...
$101.29
In Stock
Order now and your part arrives by Jun 27
Questions And Answers for LFXS29626S
Ask our experts a question about this model and we'll get back to you as soon as possible!
4 questions answered by our experts.
Sort by:
< Prev
1
Next >
Search filter:
Clear Filter
Your search term must have 3 or more characters.
Keep searches simple. Use keywords, e.g. "leaking", "pump", "broken" or "fit".
Sorry, we couldn't find any existing answers that matched.Try using some different or simpler keywords, or submit your new question by using the "Ask a Question" button above!
Ted
January 7, 2020
Compression runs but quit cooling or freezing what part would i need
For model number LFXS29626S
Hello Ted and thank you for writing.
It certainly sounds like it could be a faulty Temperature sensor PS7792212, you should check for signs of damage, and replace if necessary. We hope this helps. Please contact us anytime if you require further assistance.
Clogged coils can cause poor cooling. Check to make sure nothing is stuck in the condenser fan and that it spins freely (models with coils on the back won't have a fan). To do this, unplug the fridge and pull it out. Plug in the fridge and make sure the fan runs when the compressor is running. We hope this helps. Please contact us anytime if you require further assistance.
Freezer door not shutting all the way and freezer filled with frostiness/crusty ice covering everything. How do I fix it?
For model number Lfxs29626s
Hi James, thank you for getting in touch. Your freezer door is not shutting completely because built-up ice is blocking the seal, or the rubber gasket itself is damaged, dirty, or warped. This gap lets warm, humid room air inside, which instantly freezes into the frost and crusty ice covering your food. We would suggest checking the door gasket properly. The freezer door gasket for your model is part number PS11758511. You may need to replace it to fix the issue. We hope this sorts out your problem!
Do you sell the other door baskets? Or just the one size?
(One side has bigger baskets than the other side)
For model number LFXS29626S
Hi Mary,
Thank you for your question. For the left-side door, the part number listed under your model number for the door bin is PS3637059. For the right-side door, the part number listed for the top door bin is PS3637062. The part number listed for the middle door bins is PS7786005. The part number listed for the bottom door shelf is PS7794205. The parts are sold individually. If you would like to place an order for these parts, please call our customer service line and anyone will be happy to assist you. We look forward to hearing from you!
Hello Chris, thank you for your question! After installing the refrigerator, plug the power cord into a 3-prong grounded outlet and push the refrigerator into its final position. Your refrigerator has two front leveling legs, part number PS3532322. One on the right, and one on the left. Adjust the legs to alter the tilt from front to back or side to side. If your refrigerator seems unsteady, or if you want the doors to close more easily, adjust the tilt of the refrigerator using the following instructions:
1. Turn the leveling leg to the left to raise that side of the refrigerator or to the right to lower it. It may take several turns of the leveling leg to adjust the tilt of the refrigerator.
2. Open both doors again and check to make sure that they close easily. If the doors do not close easily, tilt the refrigerator slightly more to the rear by turning both leveling legs to the left. It may take several more turns, and you should turn both leveling legs the same amount.
Thank you for your inquiry, good luck with this repair!
Before you begin, I'd recommend unplugging the refrigerator. You have to slip the putty knife in around the edge of the dispenser panel and carefully release the tabs all the way around and the entire panel pulls straight out. There are three wiring harnesses to unplug. You'll have to remove several screws and release the tabs around the
... Read moreelectronic panel and remove it from the main panel. It's a good idea to take note or even pictures of how the ice and water actuators are positioned on the panel, so you get them situated properly on the new panel. If the ice actuator is not fit correctly on a knob that sticks up it may dispense ice all the time (happened to me). After you transfer the actuators to the new panel and the ice and water dispensing levers, you can re-attach the electronic panel on the left side. make sure all of the wiring harnesses are plugged in and the wires situated out of the way, then re-install the panel by pushing it straight back in. Plug the refrigerator in and test it out.
Shut off water supply. Disconnect main supply line. Remove rear lower panel on back of refrigerator. Remove all tubing clamps on back. Disconnect leaking tubing from water supply valve. Remove water filter and unscrew/remove water filter housing. Replace tubing - connect to water filter housing then to water supply valve. Reconnect filter
... Read more housing and filter. Reinstall lower panel, then main water supply line, then all tubing clamps. Turn water back on and check for leaks after discarding several glasses of water to fill filter. Job complete!
This couldn't have been easier. Two tiny screws in the front needed unscrewed, and then two plastic clips in the middle just had to be popped lose. Finally, you unplugged the power cord. Then, you just needed to reverse the process by plugging the new ice maker in, popping the clips in place, and screwing the two holes back in and turning
... Read more the whole thing on. Voila! Perfect ice cubes again. And for only a little over $100.