Your coupon for will be reflected when you check out!
✖
Your coupon for
✖
Hello!
You're visiting the PartSelect site in U.S.
Would you like to shop on the Canadian site?
Stay on this site
Go to Canadian site
✖
Model Number Locations
1Select Category Type
Select Category Type
2Select Product Type
Select Product Type
3Select {MODEL} Type
Select {MODEL} Type
Sample Model Number Tags
Model numbers can be made up of numbers (1005400, for example) or a combination of letters and numbers (LAT1000AAE). The model number will most likely appear on either a paper sticker or a metal plate. Your appliance's model number tag may look similar to the sample model number tags shown here (model number highlighted in yellow):
Model has been saved to My Models. If you're not signed in, your lists are available on this device and will expire within 30 days.
Model has been saved to My Models.
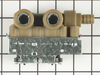
The water inlet valve has two ports for water to enter and controls the flow of water into a washing machine. Hot, cold, and warm water can easily enter the washer this way. If the water inlet valve i...
The water inlet and dispenser valve is used in washing machines. The function of this part is to control and monitor the amount of water flow into the washer. If there is leaking during use, your mach...
This water inlet valve attaches the water lines to the back of your appliance. The attaching solenoids on the valve open and close according to the desired temperature, or amount of water needed.
This genuine OEM washer water inlet valve controls the flow of hot and cold water into the tub during wash cycles, ensuring accurate water levels and temperatures. Operated by dual solenoids, the valv...
First I removed the top panel held by four screws at rear of panel, pulling the panel foward and up. Then disconnected the power and water connections. Then I removed the two screws holding the flow valve to the washer rear panel,pulled the valve foward ,removed the two electric connectors, pinched the water clamp with pliers and remo
... Read moreved the water connection to the valve. Then replaced with the new valve followed the above steps in reverse order, finishing up by re placing the water connections and power. Then checked fo proper replacenent and leaks before replacing top panel.
My husband made the repair. First, he had to remove the dryer off of the top of the washer since it's a stacking unit. Disconnect water lines. Next he removed two screws from the back of the washer that allows you to remove the lid. Now unsnap a trim piece that is on the back surrounding the water connections and an exhaust port. Rea
... Read morech inside the washer, turn the exhaust port unlocking it and pushing out the back of the washer as far as you can to get it out of the way. Disconnect the electrical lines from the valve dispenser. Remove the two screws that fasten the valve dispenser to the washer. Install the new dispenser and reassemble.
unscrew the top from the back. lift it up. Support the top and then unplugged the old valve, unscrewed it took the drain hose off it and presto the old came right out. align the new one was a little tricky and attached the drain hose and tightened the screw hook up the wires reattach the top and I was done. 30/45 minutes. I was really sur
... Read moreprized that the part I ordered was the same one I took out. Thanks for being there.