Your coupon for will be reflected when you check out!
✖
Your coupon for
✖
Hello!
You're visiting the PartSelect site in U.S.
Would you like to shop on the Canadian site?
Stay on this site
Go to Canadian site
✖
Model Number Locations
1Select Category Type
Select Category Type
2Select Product Type
Select Product Type
3Select {MODEL} Type
Select {MODEL} Type
Sample Model Number Tags
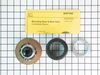
Model numbers can be made up of numbers (1005400, for example) or a combination of letters and numbers (LAT1000AAE). The model number will most likely appear on either a paper sticker or a metal plate. Your appliance's model number tag may look similar to the sample model number tags shown here (model number highlighted in yellow):
Model has been saved to My Models. If you're not signed in, your lists are available on this device and will expire within 30 days.
Model has been saved to My Models.
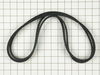
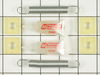
This kit includes both the drive belt and the pump belt which are both V-shaped. If your washer does not toss, spin, or drain water properly, this might be because one of these belts has worn or stret...
This kit comes with a hub assembly, agitator seal, and spanner nut. If your washer leaks once it is full (with or without clothes in it) or leaks during agitation, then you should replace the seal. Th...
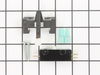
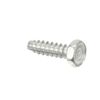
This is a multi-use and multi-appliance screw. It can be used on a microwave, refrigerator, range/oven, air conditioner, dehumidifier, washer, or dryer. The measurements of this screw are 8 x 1/2 inch...
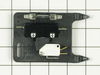
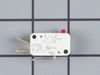
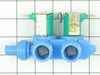
This washer/dryer lid or door switch kit serves as a critical safety component, designed to prevent the appliance from operating when the lid or door is open. It ensures that the washer does not fill ...
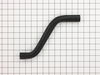
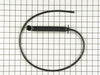
This hose clamp is used in a wide variety of household appliances. Most often it is found in washers, dishwashers, refrigerators, freezers, dehumidifiers, garbage disposals, or air conditioners. This ...
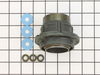
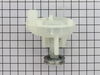
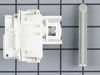
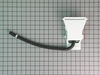
This washing machine drain pump is intended for use with automatic washers that have been manufactured since 1958. The pump itself is made of plastic, though it does come with a metallic belt pulley.
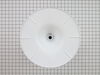
The leveling leg pad or foot pad fits over the leveling leg on your washing machine. The foot pad is designed to protect your floor and keep the washing machine level and in place. This foot pad is ju...
This washing machine lid hinge ball is well under an inch in diameter. These hinge balls are sold separately, though two are required per lid. This lid hinge ball is made of plastic and is used for Ma...
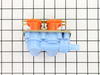
This kit is used on 2-belt washers. It is recommended to change the seal kit at the same time. The tub bearing kit fixes issues with leaking, loud noise, excessive shaking/moving or if your pump is no...
$70.95
In Stock
Order now and your part arrives by Apr 6
Questions And Answers for LAT9606AAE
Ask our experts a question about this model and we'll get back to you as soon as possible!
5 questions answered by our experts.
Sort by:
< Prev
1
Next >
Search filter:
Clear Filter
Your search term must have 3 or more characters.
Keep searches simple. Use keywords, e.g. "leaking", "pump", "broken" or "fit".
Sorry, we couldn't find any existing answers that matched.Try using some different or simpler keywords, or submit your new question by using the "Ask a Question" button above!
Jannell
January 18, 2020
What is the tub size of this machine?
For model number LAT9606AAE
Hello and thank you for writing.
This a 5.0 cu. ft. capacity Maytag® top load washer. We hope this helps. Please contact us anytime if you require further assistance.
4 people found this helpful.
Was this helpful?
Thank you for voting!
Jim
December 2, 2019
Washer agitator only goes one direction it does not go back and forth.
For model number LAT9606AAE
Hello Jim, Thank you for the question. This sounds to be an issue with the Coupler in the Agitator PartSelect Number PS2019803. The coupler is only sold as part of the agitator. Hope this helps!
Kenmore series 700 water will not fill machine, all hoses and screens are clear
For model number LAT9606AAE
Hello Jim, Thank you for the question. In most cases if the water is not filling, the inlet valve will need to be replaced. Hope this helps!
Was this helpful?
Thank you for voting!
Todd
August 31, 2023
I have replaced both drive and pump belts and washer still does not spin?
For model number LAT9606AAE
Hello Todd, thank you for your inquiry. According to our research, the issue is most probably with the drainage. We would recommend checking the drain hose for any blockage to resolve the issue. If the issue remains, then you may need to replace the drain pump, part number PS11743017. We hope this information is useful!
The tank is leaking right next to the large rubber drain hose. It looks like there was a little plug in there at one time.
For model number LAT9606AAE
Hi James, thank you for reaching out. Inspect the drain hose for any damage first. If it is fine, the issue could be with the hose clip, part number PS11739384.. You may need to replace it to fix the issue. We hope this solves your problem!
I removed the 2 phillips screws on the bottom of the front panel. Then checked around to find the belts were actually below the floor panel. I pulled the washing machine away from the wall and tilted it bacwards and found the pump belt was off the pully and the drive belt was badly damaged. I replaced the 2 belts which took no tools
... Read moreand about 3 minutes to accomplish then resecured the front panel, pushed back in place and leveled. Complete repair from diagnosis to back in operation took less than 15 minutes.
My washer is 5 years old and water began to leak on the floor. I took off the front panel and filled the tub. Water did not leak immediately, but after the tub filled with about 3-4 inches of water, the water began to leak from a rubber washer between the fixed tub and the drive shaft. I looked online for exploded diagrams of Maytag wa
... Read moreshers, when I came across your site. By looking at your diagrams, I determined what parts I needed and ordered them. The parts arrived in 2 days, and I installed them. There were no leaks and it cost me under $70 (a repairman would have cost at least $250). The only thing I would recommend to those in similar situations, is to purchase a spanner wrench (your site does not sell, but others do). The stem seal and hub assembly is reverse threaded (clockwise to loosen) and is difficult to remove due to tight quarters in the tub.
* Remove front Panel * Remeove two screws that allow the top to hing up. * Loosen set screw on agitator (1/4" socket) * Remove Agitator *Loosen spanner nut from mounting seal with hammer and punch remember to loosen, turn clockwise * Remove Inner Tub * Losen Mounting stem with Hammer and Punch- Remember to l
... Read moreoosen, turn clockwise * Remove Boot seal with hands * Remove bolts from the three brackets that attach to the outer tub * Remove Outer Tub hoses * Remove outer Tub. CAREFUL, I cut my hands on sheet metal when outer tub broke free and came up * Knock Outer tub bearing out with large block of wood * Cut bearing sleeve off of the transmission with a drimmel tool and cutting wheel. It was siezed on and would not turn off. Also, first tried to chisel , but was too difficult * Cleaned area where bearing sleeve came off with fine sandpaper * Put small amount of non-permanent thread lock on transmission (bearing area) before installing the new bearing sleeve because the sleeve is not pressed on and I did not want it to turn freely * I did not but new bolts for the outer tub 3 brackets, but noticed that they needed to be sealed. So I bought some rubber washers at hardware store * I also used some stuff called CLR to clean some rust off of the outside of the INNER tank * I replaced the O-ring on the top of the agitator shaft Also, on the agitator shaft: To really do it right, I probably should have changed the agitator shaft because the old seal wore grooves into the shaft. I took my chances and cleaned it up with some fine metal sandpaper. I could not get the worn grooves completely smooth, but did not want to take off more material as I thought it may cause a leak. We'll see * I just used a hammer and punch to retighten the mounting stem and Spanner nut. REMEMBER COUNTER CLOCKWISE TO TIGHTEN * This was not too bad if you are somewhat mechanically inclined. I could have got a new washer, but quite frankly, I get more satisfaction from seeing the old one keep working * One last thing...and this is mostly for the younger guys cause the older guys already know it. CLEAN EVERYTHING on the washer...make it look like NEW and tell your wife how much you saved. Make sure you have the parts and tools to do the job within a timeframe that you do not have to go to the laundry mat and do not leave a big mess. This advice will definately pay off. GOOD LUCK