Your coupon for will be reflected when you check out!
✖
Your coupon for
✖
Hello!
You're visiting the PartSelect site in U.S.
Would you like to shop on the Canadian site?
Stay on this site
Go to Canadian site
✖
Model Number Locations
1Select Category Type
Select Category Type
2Select Product Type
Select Product Type
3Select {MODEL} Type
Select {MODEL} Type
Sample Model Number Tags
Model numbers can be made up of numbers (1005400, for example) or a combination of letters and numbers (LAT1000AAE). The model number will most likely appear on either a paper sticker or a metal plate. Your appliance's model number tag may look similar to the sample model number tags shown here (model number highlighted in yellow):
Model has been saved to My Models. If you're not signed in, your lists are available on this device and will expire within 30 days.
Model has been saved to My Models.
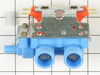
This is a water inlet valve which is used in washing machines. The valve controls and monitors the flow of water into the washer. It has a multi-mount bracket and outlet adaptor. The tools needed for ...
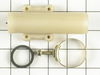
This hose clamp is used in a wide variety of household appliances. Most often it is found in washers, dishwashers, refrigerators, freezers, dehumidifiers, garbage disposals, or air conditioners. This ...
This siphon break elbow kit is designed to connect a washing machine’s internal drain pipe to a 7/8" external drain hose, helping to prevent dirty water from flowing back into the tub. By creating a h...
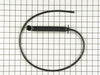
This spring retaining clip is just under 1 inch long. The clip is made entirely of metal and is attached to the back wall of the washer, under the console. If your washer is vibrating and louder than ...
The hose clamp is used to hold the water hose in place which will prevent the hose from leaking water. Sometimes the clamp may lose its ability to latch on, causing a leaking washer. For the installat...
This is a heat-resistant adhesive for your appliance. The heat resistance allows you to stick parts such as grate feet, gaskets, and felt seals in hot areas, such as a cooktop, without compromising th...
This inlet hose washer, also known as a high pressure inlet hose washer, is used in washing machines, refrigerators, freezers, and dishwashers. The function of this part is to create a watertight seal...
No Longer Available
Questions And Answers for LA7500S
Be the first to ask our experts a question about this model!
✖
Ask a Question
Ask our experts a question on this model and we'll respond as soon as we can.
I started by unplugging the appliance and then shut off the hot and cold water faucets then I disconnected and drained the hoses. Next, I removed the two screws that held the valve assembly in place. I then pulled the assembly out about 3 inches and disconnected the two wire plugs. The last step was to loosen the hose clamp on the outl
... Read moreet hose and pull off the outlet hose. I reversed the steps to install the new assembly and the total repair took about 10 minutes.
Occasional noted leak became worse and I had a repair service out. Incorrect detection of outer tub seal made so cancelled them and read comments about raising the top. Did so just at start of a rinse cycle to see soapy water shoot from top of syphon break then continue to dribble out through tub empty process--this is what had cause th
... Read moree water to flow down the interior drain hose and out through the side and bottom near the pump.
Ordered all the parts shown here and they arrived just in time for planned work. Did not need or use the clamp and gasket purchased as the gasket was included in the break package and I really like the old-style clamps much better.
Replaced the break and the elbow and put it back together. Things went south on a rinse as water shot out the back hose at the new elbow. I had not realized the size of the new elbow was smaller than the original. Went back to the old elbow but it bothered me that it would still move when the 4 assembly bolt-screws were completely tight.
So far this seems to have worked. There does not seem to be any leaking at all. For those who read this, the job could be done in about and hour for less than I spent if you observe and diagnose properly. It appears that the washer at the end of the Syphon Break wore out and that is what caused the leak.
Thanks much to PartSelect for being in business and to all the posters on this site for helping everyone to get these things done right!