Your coupon for will be reflected when you check out!
✖
Your coupon for
✖
Hello!
You're visiting the PartSelect site in U.S.
Would you like to shop on the Canadian site?
Stay on this site
Go to Canadian site
✖
Model Number Locations
1Select Category Type
Select Category Type
2Select Product Type
Select Product Type
3Select {MODEL} Type
Select {MODEL} Type
Sample Model Number Tags
Model numbers can be made up of numbers (1005400, for example) or a combination of letters and numbers (LAT1000AAE). The model number will most likely appear on either a paper sticker or a metal plate. Your appliance's model number tag may look similar to the sample model number tags shown here (model number highlighted in yellow):
Model has been saved to My Models. If you're not signed in, your lists are available on this device and will expire within 30 days.
Model has been saved to My Models.
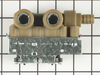
The water inlet valve has two ports for water to enter and controls the flow of water into a washing machine. Hot, cold, and warm water can easily enter the washer this way. If the water inlet valve i...
First I removed the top panel held by four screws at rear of panel, pulling the panel foward and up. Then disconnected the power and water connections. Then I removed the two screws holding the flow valve to the washer rear panel,pulled the valve foward ,removed the two electric connectors, pinched the water clamp with pliers and remo
... Read moreved the water connection to the valve. Then replaced with the new valve followed the above steps in reverse order, finishing up by re placing the water connections and power. Then checked fo proper replacenent and leaks before replacing top panel.
Checked problem on-line and discovered it was the water inlet valve. Matched the part on part select. Com. Finding the part was very easy. Part select had a grid behind the picture to help determine the size and pictures from all sides. Removing the old part, matching it, and replacement took a total of 30 minutes. I now have cl
... Read moreean clothes.
After moving machine to an area that allowed easy access to the unit, disconnected the water supply hoses from the inlet valve. Removed the two screws that keep the back in place, removed the clips that keep the top in place, moved the top over far enough to get the valve out. Removed the screw that keeps the inlet valve in place, di
... Read moresconnected the power supply to the valve, Pulled valve out in order to remove the water outlet hose. Repalced with new vale, and reversed order to install. Works just fine now.