


KMBT730SPS00 KitchenAid Microwave - Overview
Sections of the KMBT730SPS00
[Viewing 6 of 6]


Keep searches simple, eg. "belt" or "pump".

DIODE
PartSelect #: PS12584264
Manufacturer #: W11256462
This diode, or high voltage diode, is used in microwaves. It is an electrical current control device that ensures power flows in one direction and not the other way. If your microwave produces no heat...
$26.20
In Stock

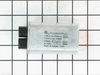
Microwave Capacitor
PartSelect #: PS11731152
Manufacturer #: W10850446
This authentic high-voltage capacitor stores and supplies electrical energy to the magnetron so that your microwave can heat up your food. It is a cylindrical component located inside the control area...
$133.86
In Stock


Questions And Answers for KMBT730SPS00
We're sorry, but our Q&A experts are temporarily unavailable.
Please check back later if you still haven't found the answer you need.
Common Symptoms of the KMBT730SPS00
[Viewing 3 of 3]No heat
Fixed by
these parts
these parts

Show All
Noisy
Fixed by
these parts
these parts
Show All
Won’t turn on
Fixed by
these parts
these parts
Show All
Keep searches simple. Use keywords, e.g. "leaking", "pump", "broken" or "fit".
Microwave made very loud noise while on. No heat.
Unless you have a very comfortable background with electronics and electricity, I don't necessarily recommend taking apart a microwave. If you are very handy and are going to be VERY cautious to follow the rules of discharging caps and testing voltages before moving forward, then go for it. That said, I took the microwave off and apart.
... Read more
Not knowing where to find the parts, I was fortunate that the installer put the instruction book for the microwave inside the front vent slot above the touchpad for reference. it details the location of every part and it tells you very clearly what each part you test should show specific to this microwave on your multimeter. Find this guide online if you don't have it. Turn on the microwave for 20 seconds with a glass of water to make sure it's not heating - that with the noise means it's eeither the magnetron, cap, or diode. Read the notes on this site for all of the basic things to look for with the magnetron, diode, and capacitor. Once comfortable with the guide, locations of those devices, and how to test, then take it down and apart. Unfortunately, I didn't do all those things in that order, and it only wasted a lot of time trying to find the parts. Once I found the parts and put all the screws and covers back for all the areas that didn't need to be accessed for the repair, testing went quickly. The diode was bad. Ordered a new one and had it in 3 days or so. That means your microwave will be apart and sitting somewhere for a little while until you get the part and have time to repair it. Putting the diode back isn't too bad. Reassemble the microwave and put it back up again. If i had to do it again, it would take me 20 to 30 minutes once the microwave was down and on a table. Also, I used some bricks with towels over them or you could use some sawhorses to keep the microwave elevated so you can plug it in and run it after installing the new component. Again, make sure you discharge the cap before touching anything again even if you didn't run it, but just plugged it in.
Read less
Parts Used:
-
Sleiman from Miami, FL
-
Difficulty Level:Easy
-
Total Repair Time:More than 2 hours
-
Tools:Pliers, Screw drivers
51 of 83 people
found this instruction helpful.
Was this instruction helpful to you?
Thank you for voting!
Humming sound, not heating.
I turn off the income electricity by shutting down the corresponding circuit breaker. Then, I removed the control panel from the microwave which gave me access to the capacitor and adjacent diode. After that i unscrewed the defective diode and replaced it with the new one and BINGO!
Parts Used:
-
Fausto from Miramar, FL
-
Difficulty Level:Easy
-
Total Repair Time:15 - 30 mins
-
Tools:Nutdriver, Pliers, Screw drivers
43 of 61 people
found this instruction helpful.
Was this instruction helpful to you?
Thank you for voting!
Wolud not heat or cook anything.
Instead of telling you, i have question do you have any instructions on how to do the repair. It would have helped save time on the repair.
This job took longer then it should have, becasue I did not start right in the begining. I did figure it out quickly after the wrong start.
You were a big help in picking the r ... Read more ight part to correct the problem. You should be able to help with the repair. Thank You
This job took longer then it should have, becasue I did not start right in the begining. I did figure it out quickly after the wrong start.
You were a big help in picking the r ... Read more ight part to correct the problem. You should be able to help with the repair. Thank You
Read less
Parts Used:
-
Wayne from Wingate, NC
-
Difficulty Level:A Bit Difficult
-
Total Repair Time:30 - 60 mins
19 of 38 people
found this instruction helpful.
Was this instruction helpful to you?
Thank you for voting!