Your coupon for will be reflected when you check out!
✖
Your coupon for
✖
Hello!
You're visiting the PartSelect site in U.S.
Would you like to shop on the Canadian site?
Stay on this site
Go to Canadian site
✖
Model Number Locations
1Select Category Type
Select Category Type
2Select Product Type
Select Product Type
3Select {MODEL} Type
Select {MODEL} Type
Sample Model Number Tags
Model numbers can be made up of numbers (1005400, for example) or a combination of letters and numbers (LAT1000AAE). The model number will most likely appear on either a paper sticker or a metal plate. Your appliance's model number tag may look similar to the sample model number tags shown here (model number highlighted in yellow):
JVM6172SF1SS General Electric Microwave - Overview
Save your modelModel Saved!
Save your model for later to make things easier.
Model has been saved to My Models. If you're not signed in, your lists are available on this device and will expire within 30 days.
Model has been saved to My Models.
This light bulb is a 40 watt, 130-volt clear appliance light bulb that is manufactured to fit microwaves with small-base light bulb sockets. The light bulb illuminates the inside of the microwave whil...
This light bulb socket that is used in microwaves. The socket is meant to fit small-base light bulbs. * Please note: The light bulb is not included with this part and is sold separately. If the follow...
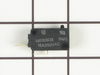
The secondary door switch is a simple on/off mechanism that stops the microwave from operating when the door is open (normally opened). The switch monitors the door latch position, and communicates w...
The microwave glass light lens protects the light bulb inside the appliance. It is clear in color and measures approximately 6-1/2 inches long, and 2-1/2 inches wide. You may notice that this part is ...
This charcoal filter is for microwaves.
Charcoal filter removes cooking odors from air that circulates through the microwave vent.
Follow the instructions in your owner's manual when installing this part.
Unplug your microwave before attempting this repair. You will need to remove the grill, which is held into place by two screws at the top of the grill (open your microwave door before doing this). Rem...
This is the glass cooking tray for your microwave. It rotates your food to ensure it cooks evenly. It is made of glass, and as a result, it can occasionally crack or break entirely. In this case you w...
Introducing a must-have safety feature for your microwave, the GE Thermal Fuse Thermostat. This essential component ensures the longevity of your appliance by monitoring temperature levels and avoidin...
Ensure the secure installation of your GE microwave with this effective mounting bolt. Designed by esteemed manufacturer GE, this handy microwave part ensures your appliance remains firmly in place wi...
$50.71
In Stock
Order now and your part arrives by May 29
Questions And Answers for JVM6172SF1SS
Ask our experts a question about this model and we'll get back to you as soon as possible!
5 questions answered by our experts.
Sort by:
< Prev
1
Next >
Search filter:
Clear Filter
Your search term must have 3 or more characters.
Keep searches simple. Use keywords, e.g. "leaking", "pump", "broken" or "fit".
Sorry, we couldn't find any existing answers that matched.Try using some different or simpler keywords, or submit your new question by using the "Ask a Question" button above!
John
December 24, 2019
Is this microwave also a convection oven?
For model number JVM6172SF1SS
Hi John,
Thank you for your question. This is just a microwave. We hope this helps. Thank you and have a great day!
1 person found this helpful.
Did this question help you?
Thank you for voting!
Mike
July 2, 2021
Making a strange sound, then overheats and shuts itself off. What could be causing that and is it an easy fix?
For model number JVM6172SF1SS
Hello Mike, Thank you for the question. This can be caused by the high voltage parts inside the unit getting too hot and the Transformer may need to be tested or replaced. We hope this helps!
You just answered my question regarding the microwave making an unusual noise, overheating, not venting the smoke and shutting itself off. You responded it might be the transformer. However, when asking about that part, the response came back that there was no response for that part.
For model number JVM6172SF1SS
Hi Mike,
Thank you for getting back to us. We apologize that your previous question was not completely answered. Microwaves produces radiation, which requires a lot of power. Where the microwave uses a lot of power to cook, it has its own transformer. The transformer is used to convert the electricity supplied by the electrical outlet into a much higher voltage. Most microwave ovens will include a high voltage diode that is responsible for converting the A/C power output delivered by the transformer to D/C. This increases the voltage to 5000 volts and provides the magnetron with enough power to cook the food with. In the majority of cases, if a microwave is not heating correctly, the parts that fix the issue are either the door switches, the high voltage diode or the magnetron. If the issue is with the transformer, it is a high voltage part and to safely access it you will need to release the charge in the capacitor. You can use a pair of needle nose pliers with an insulated handle to do this. Touch both terminals at the same time and be careful not to touch the metal portion of the tool. If you are uncomfortable with this type of repair, you may need to get a technician to repair it for you. We hope this helps! If you have any questions, please let us know.
The digital readout has gotten extremely dim and almost unseeable. Does this require the PCB Main Assembly Panel to correct or is it time to replace entire unit?
For model number JVM6172SF1SS
Hi Paul,
Thank you for your question. If you are no longer able to view the screen on the display, then you will need to replace the PCB main assembly. The part number listed under your model number for the PCB main assembly is PS8754669. If you need help placing an order for it, customer service is open 7 days a week and anyone will be happy to assist you. Please feel free to give us a call. We look forward to hearing from you!
Hello Rose Richard & Ricky, Thank you for contacting us. You can either unplug the microwave to reset the settings, or to change the power level, you can press Power Level, select the desired level and then press start/pause. We hope this helps.
Did this question help you?
Thank you for voting!
< Prev
1
Next >
✖
Ask a Question
Ask our experts a question on this model and we'll respond as soon as we can.
Noted on partselect.com that someone else with this problem, found it to be secondary door switch. There are three door switches in this model, but online info noted that one of the three might feel "soft" (in my case, one switch clicked in a rather "jiggly" way, the other two were strong decisive clicks.) To access the door switches on
... Read more this model was the only difficult part. First use a torx bit to remove the two torx screws below the latches inside the microwave. This frees the latching part inside, that holds the door switches, which you will remove after you take off the control panel. The top grill has to come off before you can remove the door panel. Remove the screws above the grill, on the microwave top cover, The grill on this model is covered with a panel that moves out when it vents. After removing the two top screws, the covered grill vent slides left to remove. Be careful, as the sliding tabs are plastic. Wiggle and jiggle it, to slip it off. Below the removed grill, is a small metal grill with one screw in lower center. Remove that screw, and wiggle that out. You'll then see the one screw that holds on the control panel. Remove this screw, and lift the control panel up to remove. Again, go slowly and gently, as the bottom tabs holding the control panel in, are also plastic and easily broken. Lay the control panel on something, (I used the coffee maker) and pull out the wire bundles tucked on the left, that are attached to the latching panel. Wiggle the latching panel gently to lift it up off of it's plastic tabs and pull it out towards you, so you can see the three door switches. Each switch (part number WB24X829) has a little black switch on it. Feel each switch with either your finger, or a screwdriver to see which one doesn't "click" strongly. The weak one is the one you will replace. The door switches are fitted into a tab, and plugged into their wires. Remove the defective switch, pull out the wires, and replace it with the new switch, plugging back the wires, and slipping it back into it's plastic tabs. Then put everything back together in reverse order. The entire job took me fifteen minutes EXCEPT for figuring out how to slide off the upper grill, which I have told you. A repairman would have cost $150, the part was $18. AND, there's a good chance, the other two switches will get "used up" in the next year or so as well, so I'll be ready next time. Thank you, Partselect, why work all day, to make money, only to give it to somebody else, for fifteen minutes of work. All I needed was the knowledge.
Above the stove mounted microwave. I dropped the lens cover from under the bulb and tried to remove the bulb. The bulb separated from the base. I tried to remove the base with a pliers and the lamp socket broke. I ordered the parts and dropped the bottom cover of the unit down (5 screws). Removed 1 screww from the lamp socket, unplugged t
... Read morehe wires and took it out. Simply replaced socket, fastened bottom cover of microwave, installed new bulb and closed lens cover.
At first I tried to use pliers to unscrew the base,very uncomfortable working position,upside down and backwards(the microwave is installed over the range top)very limited space for your body and arms to manuver and you really cant see the base,all of this took place after the breaker was turned off ofcourse,finally figured out that you c
... Read morean drop the entire bottom housing of the microwave by unscrewing 6 screws and the light sockets are easily accessable once you lower it,take out 1 retaining screw ,remove the entire socket and unscrewed the broken base and replaced the bulbs,I said bulbs,there is no sense in having to replace another bulb in who knows how long since only one had burned out but they were both the same age