Your coupon for will be reflected when you check out!
✖
Your coupon for
✖
Hello!
You're visiting the PartSelect site in U.S.
Would you like to shop on the Canadian site?
Stay on this site
Go to Canadian site
✖
Model Number Locations
1Select Category Type
Select Category Type
2Select Product Type
Select Product Type
3Select {MODEL} Type
Select {MODEL} Type
Sample Model Number Tags
Model numbers can be made up of numbers (1005400, for example) or a combination of letters and numbers (LAT1000AAE). The model number will most likely appear on either a paper sticker or a metal plate. Your appliance's model number tag may look similar to the sample model number tags shown here (model number highlighted in yellow):
JVM1870WFC04 General Electric Microwave - Overview
Save your modelModel Saved!
Save your model for later to make things easier.
Model has been saved to My Models. If you're not signed in, your lists are available on this device and will expire within 30 days.
Model has been saved to My Models.
This light bulb is located on the inside of your microwave. The bulb is behind the top grill. It will need to be replaced when it has burnt out and no longer works. Unplug the unit before beginning th...
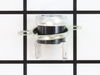
This is a microwave turntable drive motor. This is a genuine OEM replacement part. It accepts a D-shaped drive shaft. The drive motor is located under the glass microwave turntable, and allows the tur...
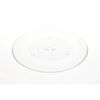
The microwave glass light lens protects the light bulb inside the appliance. It is clear in color and measures approximately 6-1/2 inches long, and 2-1/2 inches wide. You may notice that this part is ...
This part is the replacement flat cab mounting bolt for your microwave. The bolt is approximately 4 inches long. It is designed to hold the microwave in place in your cabinet. The main reason to repla...
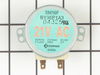
The thermostat hood or thermostat cut out is used in microwaves. This safety device switches the microwave off if it begins to overheat. It closes with heat to run the vent fan and ensure the temperat...
No Longer Available
Questions And Answers for JVM1870WFC04
Be the first to ask our experts a question about this model!
✖
Ask a Question
Ask our experts a question on this model and we'll respond as soon as we can.
First I removed the single screw holding the lens assembly in place. Then I lowered the assembly and tilted it until it came out. To remove the existing cracked glass lens there were four tabs bent down on it. By hand I lifted each tab just enough to remove the broken lens. I then replaced the broken lens with the new one and re-bent
... Read morethe tabs down by hand to secure them to the new lens.
The lens assembly, now removed, revealed the cavity that contained the two halogen bulbs. Since they were both burned out for days, they weren't hot so I could pull each one out by hand. The bulbs are secured by two straight heavy gauge wire leads and provided a little resistance but come out fairly easily. Make a mental note of the angle they came out so it will be easier to replace them with new ones.
You're not supposed to touch halogen bulbs with your bare hands, so I used the bubble wrap they came in as a means to hold the bulb while installing it.
Be sure to insert the bulbs at the same angle they came out so the pins do not get bent.
Once both bulbs are in place, replace the lens cover assembly by putting the end opposite where the screw hole goes in first on the right, then swing it up until flush and screw it down.
First I unplugged the microwave. :) Then, I removed the 6 screws found underneath the microwave, which allowed the bottom piece to hang down so I could see the turntable motor. I took the two screws out holding the motor in place and pulled the electric connectors off the motor terminals. Then I got the new part from PartSelect.com, repla
... Read moreced the electrical commectors, fit the motor back into the slot it came from (cause the pin has to be seated up in the hole) and replaced the 2 screws holding in the motor. Then I put the bottom metal piece back up and put the 6 screws back in. It was really easy - and I'm a chick! ;)
Had to take unit off wall and disassemble the main casing.then disconnected the wires from the magnetron.took the mounting nuts off but wasn't able to remove the magnetron until I loosened the transformer out of the way .Then it came out easy.Installed the magnetron ,tightened the nuts,installed the transformer back in, connected the t
... Read morehe wires back on and installed the casing on ,screwed the screws and got help to install the unit to the wall again.....Tested the unit before putting back on the wall to make sure it heated....The parts were exac same type and wasn't too hard to do...