Your coupon for will be reflected when you check out!
✖
Your coupon for
✖
Hello!
You're visiting the PartSelect site in U.S.
Would you like to shop on the Canadian site?
Stay on this site
Go to Canadian site
✖
Model Number Locations
1Select Category Type
Select Category Type
2Select Product Type
Select Product Type
3Select {MODEL} Type
Select {MODEL} Type
Sample Model Number Tags
Model numbers can be made up of numbers (1005400, for example) or a combination of letters and numbers (LAT1000AAE). The model number will most likely appear on either a paper sticker or a metal plate. Your appliance's model number tag may look similar to the sample model number tags shown here (model number highlighted in yellow):
Model has been saved to My Models. If you're not signed in, your lists are available on this device and will expire within 30 days.
Model has been saved to My Models.
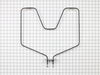
This large broiler pan is found in the bottom of your oven and is used to catch drippings from broiling foods. This part includes the grate and bottom pan and is made of porcelain. The grate measures ...
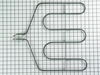
Meet the authentic GE Fan Blade?a dependable and top-notch replacement part for your room air conditioner. This critical component plays a key role when it comes to air circulation within your unit's ...
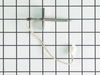
Enhance the functionality of your GE range with this Oven Door Lock Assembly. Primarily designed to provide additional safety, this component locks the oven door during the self-cleaning cycle, helpin...
You shouldn't have to struggle with ineffective outdoor tools! That's why we offer the Yard Man Clutch Assembly, a critical piece specifically designed to bring your tools back to life. This clutch as...
$153.77
In Stock
Order now and your part arrives by May 14
Questions And Answers for JTP16GT1BB
Be the first to ask our experts a question about this model!
✖
Ask a Question
Ask our experts a question on this model and we'll respond as soon as we can.
Fan motor has to be removed from the rear. Since this is a (double) wall oven, the hardest part was sliding the oven out of the wall.
First, doors are removed, eight screws that hold the oven in place (along the side of the doorways) are removed. The rear panel inside the oven must be removed to expose the fan. Four screws hol
... Read mored that in place. Next, slide out the oven. The fan is covered by a tin shroud which is easily removed with a nut driver. The blade of the fan (inside the oven) is held on by a reverse threaded nut which must be removed. The fan motor is mounted with three screws and has two wires plugged into it. Piece of cake.
Reverse the procedure and you're done.
The best part was that I had originally called a service guy, who was going to 'defer me to GE for the repair' because the oven had to come out of the wall!! I think I'm going into the repair business!
I took the door off, removed the four phillips screws that held the wall oven in it's hole. All the 1/4" fasteners were on the face of the over but you have to pull the oven forward to remove the hinges. Buying thes two hinges from G.E. would have cost $ 90.00 I paid $ 55.00 from Part Select and they arrived the NEXT DAY. I did not
... Read more do rush shipping.